Designing a garage dog kennel is like whipping up a new recipe; you mix the right ingredients for comfort, style, and fun. Imagine giving your pup a cozy retreat that feels like home, but without the mess spilling all over your garage. Wondering how to blend practicality with flair? From breezy outdoor enclosures to interactive storage solutions, there are plenty of creative ways to make your furry friend wag their tail with joy. Stick around to discover more.
Breezy Outdoor Enclosure Ideas
When you’re planning your dog’s outdoor space, you might wonder how to keep it breezy and fun at the same time. Trust me, there’s a lot you can do with some clever garage dog kennel ideas.
Think about incorporating shade sails or mesh panels; they let in air but block harsh sunlight. You could add a removable tarp, too, for those surprise drizzles. Adding a tall jumpproof gate can further enhance safety and allow for peace of mind while your pup enjoys the outdoors. Additionally, investing in premium dog training equipment can help reinforce good behavior while they play.
If your pup loves to dig, maybe create a sand pit in one corner—pure joy! Mix in some toys for variety.
And don’t forget comfy bedding; even dogs like to lounge luxuriously. Picture them sprawled out under a cloud of fresh air, looking like they’ve just conquered the world.
It’s all about keeping it cozy and playful, especially when considering a dog grass potty station that adds both functionality and comfort to the area.
Our Collection
Now that you’ve spiced up your outdoor space, let’s check out our collection of must-have features for your garage dog kennel.
You’re gonna love the paw-friendly flooring solutions, customizable safety gates, and clever storage for toys, all designed to make life easier for you and your pup. Additionally, proper dog food storage solutions can enhance your dog’s diet and keep their food fresh and safe from pests. Investing in high quality dog food storage options can also help reduce waste and ensure your pet stays healthy.
Trust me, cozy shade structures and pet-friendly plants will transform your kennel into a tail-wagging paradise—who knew creating a doggie haven could be this fun? Plus, our selection includes a top-rated premium pet gate system, ensuring your furry friend stays safe and secure in their space.
1. Paw-Friendly Flooring Solutions
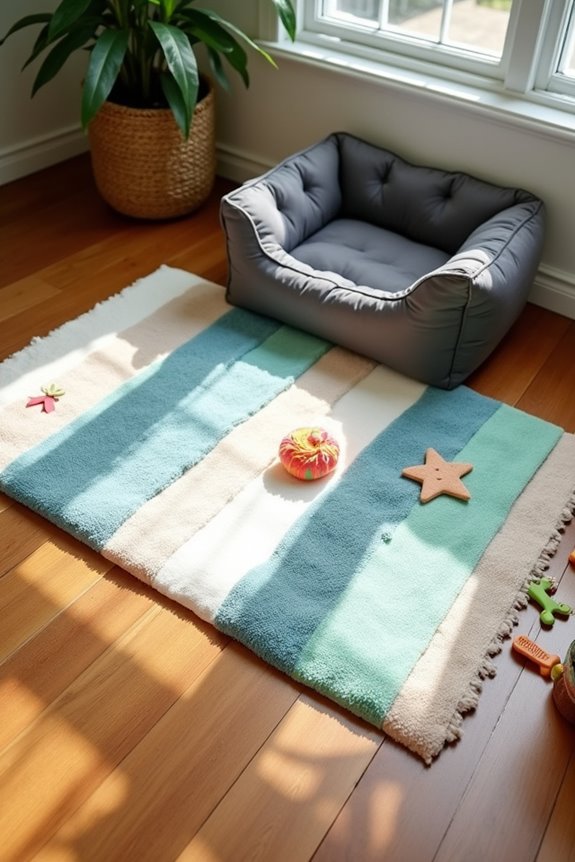
Creating comfortable dog mats can be a game-changer for any pet owner. Not only do these mats provide a soft, cozy spot for your pup to lounge, but they also protect your flooring from scratches and slobber. Plus, they’re a fraction of the cost of store-bought mats and allow you to customize your space with your favorite colors or patterns. Who wouldn’t want to add a personal touch to their furry friend’s hangout? Additionally, investing in premium dog stairs bed can further enhance your pet’s comfort and accessibility. It’s also worth noting that using dog diapers for females in heat can help manage any mess during that time, ensuring your mats stay clean. Investing in luxury dog beds can provide even greater comfort and style for your beloved pup’s resting area, making it an ideal furniture option for dogs.
Materials Needed:
- Old towels or blankets (the fluffier, the better)
- Fabric scissors
- Measuring tape
- Sewing machine or needle and thread
- Pillow stuffing (optional, for extra fluff)
- Fabric spray or adhesive (optional, for added durability)
- Non-slip rug pad or fabric (to keep mats in place)
Step-by-Step Instructions:
- Measure Your Space: Decide where you want your dog mat to go. Measure the area and determine how big your mat should be. You know, for the epic lounging occasions.
- Cut Towels/Blankets: Take your old towels or blankets and cut them into the desired shape and size. Don’t aim for perfection; your dog isn’t judging you!
- Layer Up: If you’re using multiple layers for extra comfort, stack the cut pieces providing enough cushion. This is also where you can add pillow stuffing between layers to give it that cloud-like softness.
- Sew It Up: If you’re feeling fancy, sew the edges together so they stay snug. If sewing isn’t your thing, just fold the edges inward and use safety pins or fabric glue to hold everything in place.
- Add a Non-Slip Bottom: Cut the non-slip rug pad (or fabric) to fit the bottom size of your mat and attach it with fabric spray or glue. This helps keep the mat from sliding around as your pup makes themselves comfortable.
- Final Touches: Give your mat a little shake, and check for any loose threads that might be tempting for a mischievous pup. Voilà! You’ve got a dog mat.
Optional Add-ons/Variations:
- Personalized Touches: Consider using fabric paint or patches to add your dog’s name or favorite designs. Bright patterns can brighten up your space and make the mat a statement piece.
- Seasonal Themes: You can create different mats for different seasons — how about a cozy plaid for winter and floral for spring?
Pro Tip:
When choosing fabrics, opt for machine-washable materials for easy cleanup. We all know how quickly a dog can turn a “clean” mat into a muddy masterpiece. Trust me, you’ll thank yourself later, especially during those impromptu mud-soaked puppy playdates!
2. Customizable Safety Gates

If you’re a dog owner, you know that keeping your furry friend safe often means keeping them contained to certain areas of your home. Enter customizable safety gates—a DIY project that’s not only practical but also stylish.
With just a few materials and a little creativity, you can make safety gates that blend seamlessly with your decor and provide peace of mind for you and comfort for your pup. In addition, a good dog travel crate can also be an essential tool for safe travel with your pet.
Materials Needed:
- Wood or PVC boards (your choice for frame)
- Wood screws or PVC connectors
- Sandpaper (for smoothing edges)
- Wood stain or paint (for finishing touches)
- Hinges (to allow the gate to swing open)
- Latch or hook-and-eye closure (to keep it secure)
- Measuring tape
- Saw (hand saw for wood or PVC cutter)
- Screwdriver
- Drill
- Safety goggles (because safety first!)
Step-by-Step Instructions:
- Measure Your Space: Start by measuring the doorway or area where you want to install the gate. It’s super important to get this right, or you might end up with a gate that’s too tall, too short, or just not fitting at all.
- Cut Your Boards: Use your saw to cut the wood or PVC boards to your desired dimensions. Think of this as a new art project, but with fewer paint splatters and more precision.
- Sand the Edges: Take the sandpaper and smooth out any rough edges on your cut pieces. No one wants their dog getting snagged on a sharp corner. Trust me; I learned this the hard way when my team of tiny terrors went sprinting toward their escape.
- Assemble the Frame: Using wood screws or PVC connectors, attach your cut pieces together to form a rectangular frame. Make sure it’s sturdy—the last thing you want is your gate to collapse like a house of cards during a “guard dog” moment.
- Attach Hinges: Secure the hinges to one side of the gate and attach them to the wall or doorframe. This way, your gate swings open when you need it to, but you can easily close it to keep Fido contained.
- Add Latch or Closure: Install a latch or hook-and-eye closure opposite to the hinges to keep your gate secure. You could even get cheeky and use a fun decorative latch to add some character, like a quirky dog bone shape.
- Finish with Stain or Paint: If you want to go the extra mile (and believe me, your home will thank you), apply a wood stain or paint that matches your decor. Let it dry, and your gate will look less like a dog prison and more like a chic feature of your home.
Optional Add-ons/Variations:
- Decorative Patterns: Get crafty with some stencils or decals. Maybe a paw print pattern or your pup’s name, which would certainly impress your guests.
- Color Customization: Try a bright color that pops against your walls or something soft that matches your existing decor. After all, a little color never hurt anyone, right?
Pro Tip:
When choosing the materials, opt for weather-resistant woods or paints if your gate might be exposed to the elements (think backyard gates).
And, if you’re not sure about your carpentry skills, start with a small gate first. Better to practice on a miniature version than a massive one that causes a cascading disaster. Just sayin’.
3. Interactive Toys Storage Solutions
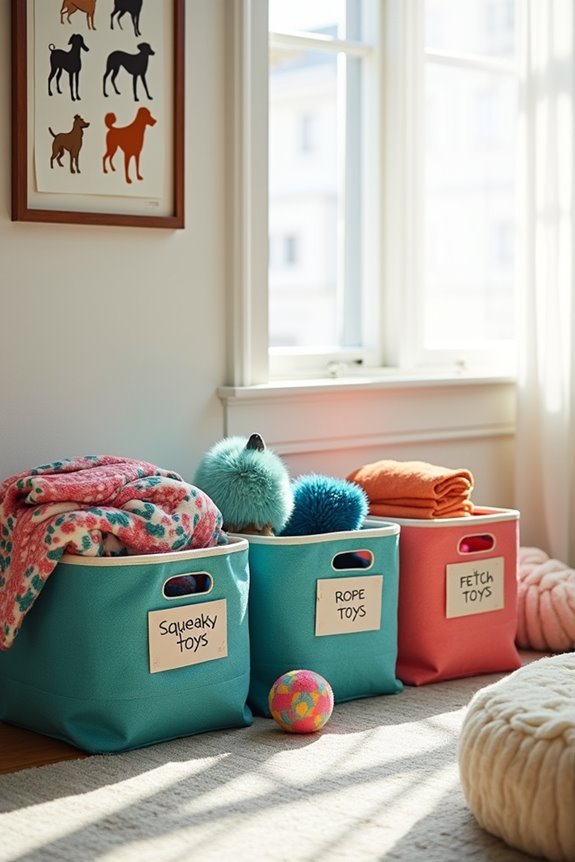
If you’re a dog owner, you probably know the sensation of stepping on a squeaky toy in the middle of the night, right? Ouch! That’s why creating a dedicated storage solution for your dog’s interactive toys is a game changer. Not only will it keep your home organized, but it’ll also help your furry friend quickly find their favorite toys—and give your living space a tidy vibe.
Let’s explore a simple DIY project that makes life easier for you and more fun for your pup.
Materials Needed:
- Small storage bins (plastic or woven, depending on your style)
- Labels (you can use a label maker or label stickers)
- Markers (for decorating or labeling)
- Stacks of old blankets or fabric scraps (for added comfort)
- Spray paint (optional, for customizing bins)
- Measuring tape (to find the right size)
- Scissors (for cutting fabric or labels)
Step-by-Step Instructions:
- Choose Your Bins: Start by selecting a few small storage bins that fit your space. Think about how many toys your pup has—like that mysterious squeaky hedgehog they can’t get enough of—so you can choose bins that are just the right size.
- Measure and Cut Fabric: If you’re adding a cozy touch, measure your fabric or blankets to fit the bottom of each bin. This not only makes it look snazzy but also gives your toys a comfy spot to rest.
- Label the Bins: Using labels, mark each bin according to its contents. Maybe one is for squeaky toys, another for rope toys, and another for the epic tug-o-war gear. You could even let your dog do the labeling—just kidding, but wouldn’t that be adorable?
- Spray Paint Bins (Optional): If you’re feeling adventurous, give your storage bins a spray paint makeover. A pop of color goes a long way in personalizing your space. Just remember to do this outdoors and let them dry completely—save your living room from a new paint job.
- Organize the Toys: Once your bins are labeled and decorated, go ahead and toss all of your pup’s toys into their respective containers. You might find toys you completely forgot about. Surprise party for your dog.
- Find a Home for Your Bins: Place the bins in a designated spot in your house. Whether it’s a utility room, living room, or even the base of your stairs, just make sure it’s a convenient spot for easy access during playtime.
Optional Add-ons/Variations:
- Personalized Touches: Instead of traditional labels, try using fun pictures of your dog next to pictures of the toys. Your guests might just get a kick out of “Rex’s Favorite Fetch Toys” labeled with his adorable face.
- Color Themes: Match the colors of the bins to your home decor, or use patterned fabric for a fun and vibrant look. Can you say chic and organized?
Pro Tip:
Consider letting your dog “help” you organize by bringing their favorite toys over to the bins. It’s a great way to bond, and you’ll know exactly where their prized possessions are. Plus, it’s a good excuse for you both to play together after all that hard work.
Creating a toy storage solution is an easy way to keep your home clutter-free while ensuring your furry friend has all their goodies organized and ready to go.
4. Cozy Shade Structures
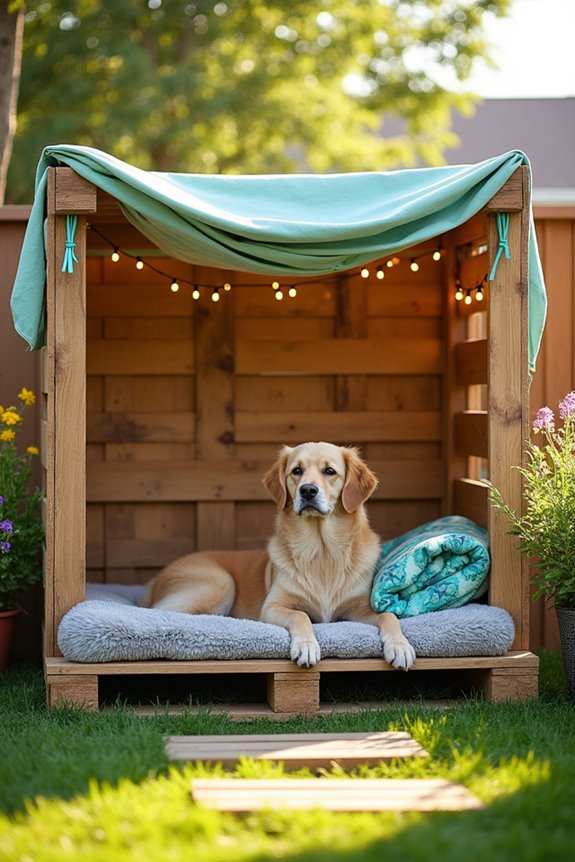
Are you looking for a way to keep your furry friend cool during those sunny afternoons? A cozy shade structure might just be your answer. Not only does it provide your pup with a perfect spot to relax and escape the heat, but it also enhances your backyard, turning it into a comfy oasis.
Plus, it’s a fun DIY project that saves you money while adding value to your home. So, let’s get to work creating a little slice of paradise for your four-legged friend.
Materials Needed:
- Wooden pallets (you can find these for free or at a low cost)
- Outdoor fabric or tarp (to create the shade)
- Rope or bungee cords (for securing the fabric)
- Screws (to assemble the pallets)
- Drill (or a screwdriver)
- Sandpaper (to smooth any rough edges)
- Paint or wood sealant (optional, for some weatherproofing)
- Measuring tape (to confirm you get the right fit)
- Scissors (to cut the fabric or tarp)
Step-by-Step Instructions:
1. Gather Your Pallets: Start by collecting wooden pallets. Make sure they’re in good condition and safe for your dog—no splinters on your pup’s paws, please.
If you can, aim for a couple of pallets stacked on each other for added height and shade.
2. Sand Down Rough Edges: Take the sandpaper and smooth out any jagged edges or splinters on the pallets. Trust me, your dog will thank you later when they’re lounging without any worries.
3. Assemble the Frame: Use the drill and screws to securely attach the pallets together. You can create a basic frame—either upright for a roof or laid flat for a low-profile look—whichever fits your yard better.
4. Cut Your Shade Fabric**: Grab your outdoor fabric** or tarp and measure it to fit over your newly built structure. Aim for a slight overhang; it helps keep the sun out and gives it that cozy vibe.
5. Secure the Fabric: Attach the fabric to the frame using the rope or bungee cords. Make sure it’s snug and won’t flap in the wind. You want your dog to have a stable, comfy spot to curl up.
6. Personalize It: If you’re feeling creative, you can paint the pallets or add some fun designs. Maybe go for your dog’s favorite color or even paint their paw print on the side.
It adds a personal touch and a little flare to your backyard.
7. Find a Perfect Spot: Position your new shade structure in a nice spot in your yard where your dog can chill and enjoy the breeze. A place that gets partial shade is perfect, so they don’t overheat while snoozing.
Optional Add-ons/Variations:
- Add a Floor: Want to up the comfort level? Consider placing a soft dog mat or blankets in the shade structure. Your pup will love it even more.
- Decorate: String fairy lights or add cute signs to your shade structure. Your dog may not notice, but you’ll love the aesthetic.
Pro Tip:
Before you start your project, double-check that your pallets are pesticide-free and safe for outdoor use. A little extra care goes a long way in guaranteeing your dog’s safety and comfort.
And if you’re not sure where to find pallets, check your local stores or online community groups for some great deals (or even free finds).
Creating a cozy shade structure isn’t just a fun project; it’s an investment in your dog’s comfort this summer. Plus, you’ll have the satisfaction of saying, “I made that!” whenever your pup snuggles underneath.
Happy building!
5. Pet-Friendly Plant Decorations

If you’re a dog owner looking for a way to breathe some life into your space, then creating pet-friendly plant decorations is just the project you need. Not only do these plants add a vibrant touch to your home, but they also offer your furry friend a fresh environment. By selecting the right plants, you can save money on decor, provide safe chewing options for your pup, and enhance your home’s overall appeal. Plus, investing in high-end kitchen appliances like quality planters can elevate your plant display even further.
Additionally, using training prong collars can help ensure that your dog behaves around your new plants.
Plus, there’s nothing quite like that ‘look’ your pup gives you when they discover a new pet-friendly plant in their domain.
Materials Needed:
- Pet-safe plants (like spider plants, Boston ferns, or marigolds)
- Decorative pots (you can upcycle old containers or get new ones)
- Potting soil (choose organic if you want to be extra safe)
- Small rocks or gravel (for drainage)
- Watering can (to keep your plants hydrated)
- Gardening gloves (to keep your hands clean)
- Trowel (for planting)
Step-by-Step Instructions:
- Choose Your Plants: Go to your local nursery or garden store to find beautiful, dog-safe plants. Check the tags to make sure they’re non-toxic. You want your home to be pretty, not like an emergency vet visit on speed dial.
- Prepare Your Pots: If you’re reusing old containers, give them a good wash first. Then, place a layer of small rocks or gravel at the bottom of your pot for drainage. This helps keep the roots nice and healthy, plus it prevents muddy messes.
- Fill with Soil: Use your trowel to add potting soil to the pot. Fill it about two-thirds of the way full. Don’t be shy; it’s a great excuse to get a little dirt on your hands, and your dog will enjoy the extra attention for sure.
- Plant Your Greenery: Take your chosen plant and carefully remove it from its nursery pot. Create a little hole in your potting soil and place your plant in, making sure to cover the roots and firm up the soil around it. Give your new buddy a gentle pat — yes, plants need love too.
- Water Wisely: Grab your watering can and give your newly potted plant a drink. You want the soil to be damp but not soggy—think of it like a gentle shower rather than a downpour.
- Position Your Decor: Find a bright spot in your home that’s out of your dog’s reach (because let’s face it, they might think it’s a new chew toy if it’s too low). Consider shelving, tabletops, or high windowsills where they can still soak up the sun without being tempted.
- Keep an Eye on Growth: Monitor your plant’s growth as well as your dog’s curiosity. If you see more pawing than peeking, it might be time to rethink its location.
Optional Add-ons/Variations:
- Personal Color Palette: Choose pots that match your decor—maybe some vibrant terracotta pots for a rustic vibe or sleek ceramic ones for a modern touch. Your home can be classy and cuddly.
- Plant Arrangements: Group small pet-friendly plants together to create a mini indoor garden, adding a colorful and inviting centerpiece to any room.
Pro Tip:
To keep your plants thriving longer, regularly check the soil moisture. You can stick your finger into the soil—if it feels dry an inch down, it’s time to water. And, just because plants are hardy doesn’t mean they can survive your pup’s playful antics, so always keep an eye out for those mischievous moments.
6. Roof-Top Weather Protection

Keeping your furry friend comfortable and safe in their kennel is a top priority, especially when the weather’s less than ideal. A roof-top weather protection project is a fantastic way to provide cover from rain, snow, and harsh sunlight, confirming your dog has a cozy and protected space outdoors.
Plus, it’s cost-effective and adds a touch of charm to your kennel setup without breaking the bank.
Materials Needed:
- Wooden pallets or plywood sheets (for the roof)
- Waterproof tarp or roofing material (to cover the wood)
- 2×4 lumber (for support beams)
- Wood screws and nails (to hold everything together)
- Drill and screwdriver (to assemble)
- Saw (to cut wood to size)
- Measuring tape (for accuracy)
- Level (to verify stability)
- Safety goggles and gloves (always work safely)
Step-by-Step Instructions:
1. Measure Your Kennel: Begin by measuring the top of your dog kennel to determine how large your roof needs to be. This is your chance to channel your inner architect—who knew measuring could lead to such creative bliss?
2. Cut Your Wood: Based on your measurements, cut the wooden pallets or plywood sheets to size. If you’re feeling fancy, you can even create a slanted roof to help rainwater run off.
Just remember—it’s a roof, not a work of art… or is it?
3. Assemble the Frame: Use the 2×4 lumber to create a sturdy frame that will support the roof. Secure the wood together with screws and nails.
Make sure everything is tight and strong; the last thing you want is a surprising roof collapse.
4. Secure the Roof Panels: Place your cut wood pieces on top of the frame. If you’re using multiple pieces, make sure they’re closely fitted together.
Fasten them down with screws, embracing your inner handyman (or woman) as you go.
5. Cover with Waterproof Material****: Drape the waterproof tarp or roofing material over the wood. This will create a weather-proof layer that keeps rain and snow out.
Fasten it securely around the edges — you don’t want your masterpiece to become an unintentional swimming pool during a storm.
6. Check for Stability: Make sure everything is leveled and stable. A little wobble is fine for humans but definitely not for a dog shelter.
Adjust as needed, because who wants a roof that plays peek-a-boo?
7. Finishing Touches: Now for the fun part. You can paint the roof or add decorations that match your style or your dog’s personality.
Maybe some paw prints or a doggy-themed mural to give it that extra pizzazz.
Optional Add-ons/Variations:
- If you want to take it a step further, consider adding a small solar light on the roof for a cozy nighttime glow.
- You could also insulate the inside of the roof with foam boards for that extra layer of protection during colder months.
Pro Tip:
Always verify the roof is at a slight angle to allow water runoff. It’s a small detail that can save you from cleaning up any unwelcome puddles in your dog’s kennel.
Plus, a little slope helps keep the entire structure secure and stable.
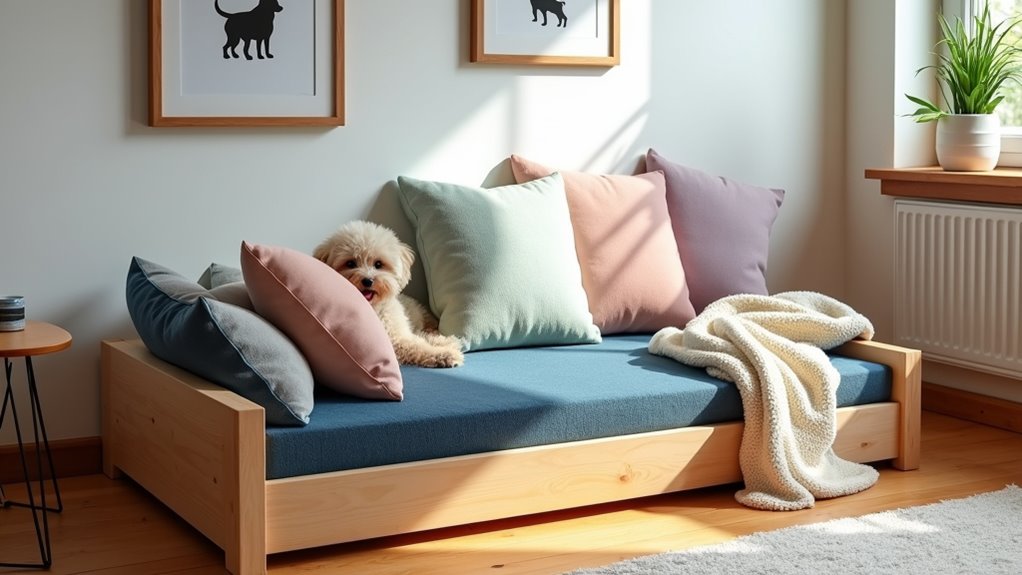
7. Elevated Dog Bed Options

Creating a cozy elevated dog bed is a fantastic DIY project for dog owners wanting to give their furry companions a comfortable and stylish place to rest. It not only keeps your dog off the cold ground, offering better ventilation and avoiding those pesky drafts, but it also saves money compared to store-bought options. Plus, the addition of a cozy round plush bed can provide extra comfort for those relaxing naps. Luxury dog ramp furniture can also complement your elevated dog bed’s aesthetic. Additionally, investing in automatic pet feeders can make feeding your pet just as convenient as providing them a cozy place to sleep.
Plus, it adds a charming touch to your home decor—your dog deserves to lounge in style too, right?
Materials Needed:
- Wood planks (for the frame and slats; cedar or pine works well)
- Sandpaper (to smooth rough edges)
- Wood screws (for assembly)
- Drill and screwdriver (for putting it all together)
- Saw (to cut wood to size)
- Measuring tape (for precise cuts)
- Paint or wood stain (for stylish finishing)
- Non-slip mat or fabric (for additional comfort, optional)
Step-by-Step Instructions:
1. Measure and Cut Wood: Decide on the size of the dog bed based on your pet’s breed. A general rule? At least 2-3 inches longer than your pup when they’re lying down.
Cut the wood planks accordingly—don’t worry, it’s not rocket science, just good ol’ carpentry.
2. Create the Frame: Assemble a rectangular frame using four long planks for the sides. Secure the corners with wood screws.
Don’t get too stressed about making it perfect; just remember, the dog won’t notice if there’s a slight wobble.
3. Add Cross Slats: Cut several shorter planks to fit across the frame—these will act as supports for the mattress, guaranteeing nothing sags (unless it’s your dog who’s sagging from all the lounging).
Space them evenly, about 3-4 inches apart, and screw them down.
4. Sand It Down: Take the sandpaper and smooth out all the edges and surfaces of the frame.
Trust us, your pup will appreciate the effort. Nothing says “hello comfy bed” like smooth surfaces.
5. Paint or Stain: Now it’s time to channel your inner artist. Choose a paint color or wood stain that fits your decor and apply it.
If you want to get really creative, why not add some cute designs or patterns? Just make sure everything is pet-friendly and safe.
6. Add Non-slip Material: If you want an extra layer of comfort, cut a piece of non-slip mat or fabric to fit the top.
It’ll give your pup a cozy place to settle in and keep them from sliding off—because you’re aware of how ridiculous it’s when they lose their balance.
7. Final Touches: Once everything is dry, place the elevated dog bed in your desired spot.
Add a soft blanket or any favorite dog bed cushions, and just watch your pup as they take to their new throne. You might want to grab your camera for those Instagram-worthy moments.
Optional Add-ons/Variations:
- Custom Colors: Paint the dog bed in bright, funky colors or use patterned fabric for a unique flair—maybe polka dots or stripes (you know, something that showcases your dog’s personality).
- Different Materials: If you’re feeling fancy, try using reclaimed wood for a rustic vibe or go with a sleek metal frame for a modern touch.
Pro Tip:
Always verify the bed is stable and suited to your dog’s weight and size to avoid any accidental tumble.
Trust us, stability is key—because the only thing you want to witness is a peaceful nap, not a dramatic rescue mission.
Extra Tips & Ideas
When it comes to sprucing up your garage dog kennel, a few clever touches can make a world of difference.
Think about adding some bright, playful paint or wall decals. Your pup can enjoy their space more with a little color. Incorporating pressure-mounted gates can also provide an easy solution to create different areas in your garage for your pup.
How about a cozy area rug? It’ll feel nice under their paws and keep things comfy. Additionally, creating a designated outdoor play area can significantly enhance your dog’s playtime experience.
Don’t forget to add some storage bins for toys, keeping the chaos at bay—trust me, you’ll thank yourself later when you’re not stepping on squeaky toys.
And, if you’re feeling adventurous, create a mini photo wall featuring your pup’s cutest moments. It’ll make you smile every time you walk in.
Just remember, a happy dog means a happy you! Additionally, consider investing in a heavyduty outdoor kennel to ensure your pup has a safe and secure space outdoors.
Frequently Asked Questions
What Materials Are Best for Building a Durable Kennel?
For a durable kennel, use weather-resistant wood, metal siding, and reinforced wire mesh. These materials provide strength and insulation, ensuring your pet stays safe and comfortable in all weather conditions, while standing the test of time.
How Can I Ensure My Dog Feels Safe in the Kennel?
To make your dog feel safer than a superhero in a fortress, create a cozy space with familiar blankets, toys, and proper ventilation. Regular positive reinforcement and gentle handling will enhance their comfort and trust in the kennel.
What Size Should the Kennel Be for My Dog?
Your dog’s kennel should be large enough for them to stand, turn around, and lie down comfortably. Measure their height and length, then add a few extra inches for extra space to encourage relaxation.
Are There Any Regulations for Kennel Construction?
Yes, there are regulations for kennel construction. You’ll want to check local zoning laws, health codes, and building permits. Ignoring these could lead to penalties, so make certain you’re fully informed before starting your project.
How Can I Prevent My Dog From Escaping the Kennel?
To prevent your dog from escaping the kennel, guarantee it’s secure with sturdy materials, install a proper latch, check for gaps, and consider adding a roof. Regularly inspect it to maintain safety and functionality.
Conclusion
Creating a garage dog kennel isn’t just about style; it’s about your pup’s happiness. Did you know that dogs spend about 50% of their waking hours sleeping? So, why not make that time cozy and fun? With your creative designs and a dash of love, you can transform that space into a tail-wagging paradise. From paw-friendly flooring to interactive toys, your dog will thank you in all the barks and cuddles you can handle. Let’s get started!