
As the sun blazes and your pup pants like they just climbed a mountain, you probably wonder how to keep them cool and happy. Homemade frozen dog treats might just be your new best friend. Think about it: simple ingredients, no added junk, and a tail-wagging reward for your furry pal. Plus, it’s a chance for some messy fun in the kitchen. Curious about what tasty delights you can whip up? Let’s explore.
Why Homemade?
When it comes to spoiling your furry friend, why go the store-bought route when you can easily whip up your own homemade dog treats?
Making frozen dog treats homemade not only saves you money but also lets you know exactly what’s going into those tasty bites. Plus, you can tailor flavors to your pup’s preferences. Frozen berry treats, in particular, are an excellent way to provide essential nutrients while keeping your dog cool and satisfied. Consider using ingredients that are safe for dogs to maximize their enjoyment and health benefits. Additionally, many fruits like berries provide antioxidants that contribute to overall health and wellness.
Picture this: your pup devouring a peanut butter and banana treat that you whipped up in minutes—pure happiness. You don’t need fancy equipment; just a blender, some molds, and a bit of imagination.
And let’s be honest, dogs tend to prefer homemade goodies anyway. No preservatives, no mystery ingredients, just wholesome ingredients you can trust. Plus, crafting these treats can be a great way to explore delicious homemade ice cream recipes that cater to your dog’s taste buds.
It’s a fun way to spend an afternoon too. So next time it’s a hot day, why not treat your best buddy with a frozen delight made with love?
You’ll both be wagging your tails in delight.
Treats for Pups
When it comes to whipping up frozen treats for your pup, the options are downright delicious. Have you thought about peanut butter banana bites or coconut water popsicles? With choices like blueberry yogurt swirls and pumpkin apple chill bites, you’ll find something to make your furry friend wag their tail with joy. These delicious frozen dog treats are not only refreshing but also packed with nutrients for your pup! Additionally, consider making sweet potato dog treats to provide your pup with a healthy snack option. Offering your dog homemade treats can also ensure they enjoy natural ingredients that are safe and healthy! You can easily customize these treats with fresh ingredients that your dog loves, making each experience unique and special.
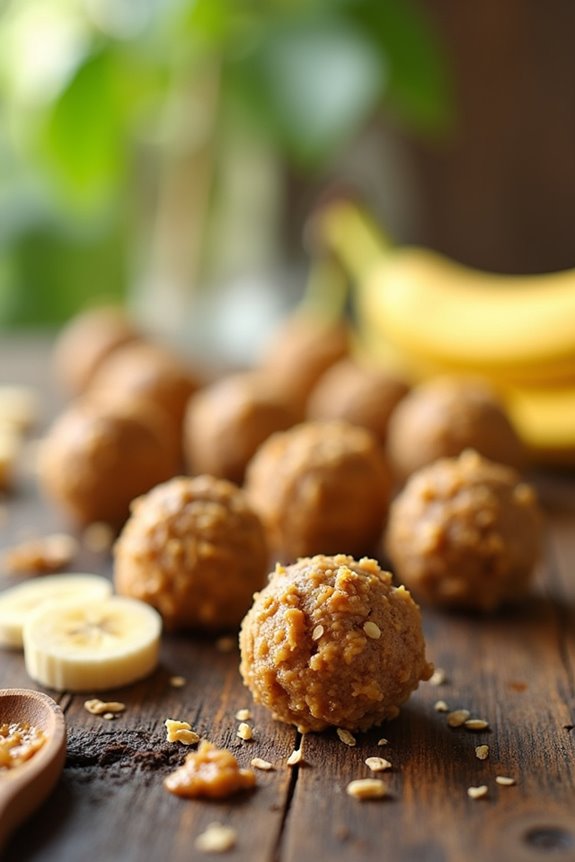
1. Peanut Butter Banana Bites
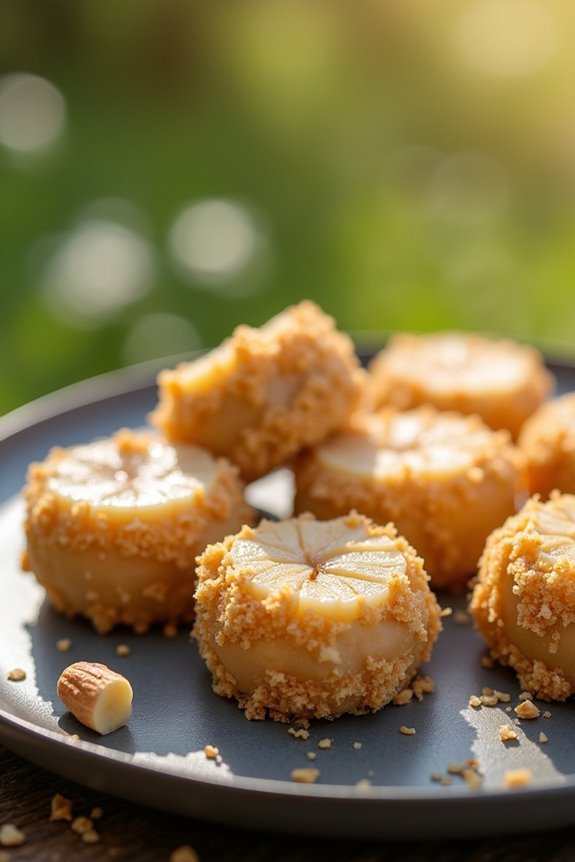
Ready to whip up some delicious Peanut Butter Banana Bites for your pup? You’ll want to gather a few simple ingredients, and I promise, it’s easier than you think. With step-by-step instructions and a couple of fun optional add-ons, your furry friend will be tail-wagging in no time. Additionally, these treats are a popular choice among dog owners due to their tasty flavor and wholesome ingredients. If your pup enjoys variety, consider adding homemade cheese dog biscuits to their treat repertoire for an extra special surprise!
Ingredients
When it comes to whipping up delicious treats for your furry friend, these Peanut Butter Banana Bites are a total win. They’re super easy to make and require just a few simple ingredients that you likely already have at home. Your pup will love them, and honestly, they might even give you those puppy dog eyes begging for more.
So, let’s explore what you’ll need to make these delightful little snacks.
- 1 ripe banana (the riper, the better!)
- 1 cup unsweetened peanut butter (make sure it’s xylitol-free)
- 1 cup whole wheat flour (or a dog-friendly alternative like oat flour)
- 1/4 cup rolled oats
- 1/4 cup water (or adjust as needed for consistency)
See? Simple, right? You won’t need a treasure map to find these ingredients, just a trip to your pantry and maybe a quick visit to the store.
And trust me, your dog will appreciate every single bite of these tasty treats. Just a little side note: if you find yourself snacking on those bananas, I won’t judge.
Watch out for the sneaky pup who might want a taste, though!
Step by Step Instructions
To make these delicious Peanut Butter Banana Bites for your pup, follow these simple steps. Your furry friend will be wagging their tail in delight!
- Gather all your ingredients: ripe bananas, natural peanut butter, and oatmeal (the quick type works best). Trust me, it’s tough to resist a pup’s begging face.
- Peel the ripe bananas and mash them in a mixing bowl using a fork. Aim for a mostly smooth consistency, but a few lumps are okay. Dogs don’t mind a little texture.
- In the same bowl, add ½ cup of natural peanut butter. The stickier, the better. Who knew dog treats could test your own strength?
- Pour in 1 cup of quick oats and mix everything together using a spatula or wooden spoon. You want it combined but not overmixed—think of it like making your favorite smoothie, but with less green stuff.
- Preheat your freezer, or rather, prepare for some serious coldness. Yes, this is a treat that needs to be frozen, not baked!
- Scoop out small spoonfuls of the mixture and form them into bite-sized balls. Think of these as your pup’s personal fuel nuggets.
- Line a baking sheet or tray with parchment paper (this is your best friend for easy cleanup). Place each ball on the tray, leaving some space in between for expansion—no doggy squishing allowed.
- Freeze the tray for about 2–3 hours, or until the bites are solid. Grab a snack while you wait, because your dog’s excitement is going to make it feel like an eternity.
- Once frozen, transfer the treats to a freezer-safe bag or container. Label it, unless you have a freezer with a memory. Dogs tend to ignore old labels.
- Serve your pup a frozen treat and watch their tail wag uncontrollably. Cool completely before serving to your dog to avoid any tongue burns.
And there you have it! Easy-peasy Peanut Butter Banana Bites that will make your dog feel like they hit the jackpot.
Optional Add-ons
If you’re looking to jazz up those Peanut Butter Banana Bites, you’re in for a treat—maybe even more so than your pup!
Consider adding a dash of cinnamon for flavor, or mix in some yogurt for that creamy texture.
Want to be extra fancy? Toss in some shredded carrots or blueberries.
Your furry friend won’t know what hit them, and you’ll feel like a dog chef extraordinaire.
2. Coconut Water Popsicles
Alright, let’s whip up some tasty Coconut Water Popsicles for your furry friend. These treats aren’t only simple to make, but they’ll keep your pup refreshed on those hot days. You’ll need just a few ingredients, and I promise, the step-by-step instructions make it a breeze—trust me, if I can do it, so can you.
Ingredients
When the summer heat hits, you want your furry friend to stay cool and refreshed. Nothing beats the joy of seeing your pup wagging their tail in excitement over a frozen treat.
So, how about whipping up some Coconut Water Popsicles? They’re super simple to make and use ingredients you probably already have at home. Just gather these easy-to-find items, and let’s get that pup treat party started!
- 2 cups coconut water (make sure it’s pure and unsweetened)
- 1 ripe banana, mashed (a little sweetness never hurt)
- 1/2 cup plain yogurt (unsweetened, of course—keep it dog-friendly)
- 1/4 cup peanut butter (check for xylitol-free, as it’s toxic to dogs)
- Optional: 1/2 cup blueberries or diced strawberries for added flavor and nutrition
Gathering these ingredients will have you feeling like a pet treat master in no time. Plus, your pup will think you’re the best chef in the world—right up there with that elusive dog who steals treats off the counter.
Why not treat them to a bit of summer bliss next time the sun shines bright?
Step by Step Instructions
- Gather all your ingredients: coconut water, yogurt (if using), and any dog-friendly fruits or veggies you want to add (like blueberries or carrots).
- Grab your mixing bowl and pour in the coconut water.
- If you’re adding yogurt for a creamy texture, mix it in now until combined (make sure there are no lumps).
- Chop up any fruits or veggies into small pieces, then fold them into the coconut water mixture gently.
- Find some silicone molds or ice cube trays; these will make the perfect shape for your pup’s popsicles.
- Pour the mixture into your molds, filling them about three-quarters full (leave some space for expansion while freezing).
- Insert popsicle sticks into each mold if you’re using them.
- Place the molds in the freezer and allow them to freeze for at least four hours or until solid.
- When they’re ready, remove the treats from the molds (give them a little twist if they’re stubborn).
- Cool completely before serving to your dog—nobody likes a brain freeze, right?
Optional Add-ons
Why settle for plain coconut water popsicles when you can jazz them up with a few tasty add-ons?
Toss in some pureed bananas or a handful of blueberries for a fruity twist. You could even mix in a dollop of peanut butter—just a bit, of course.
Your pup will totally thank you, wagging their tail like they’re dancing. It’s a simple upgrade with a big impact.
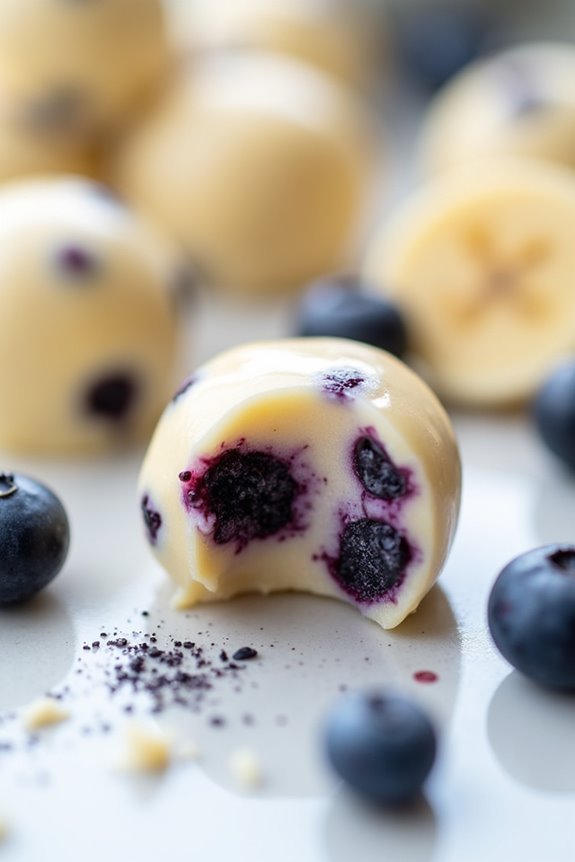
3. Blueberry Yogurt Swirls
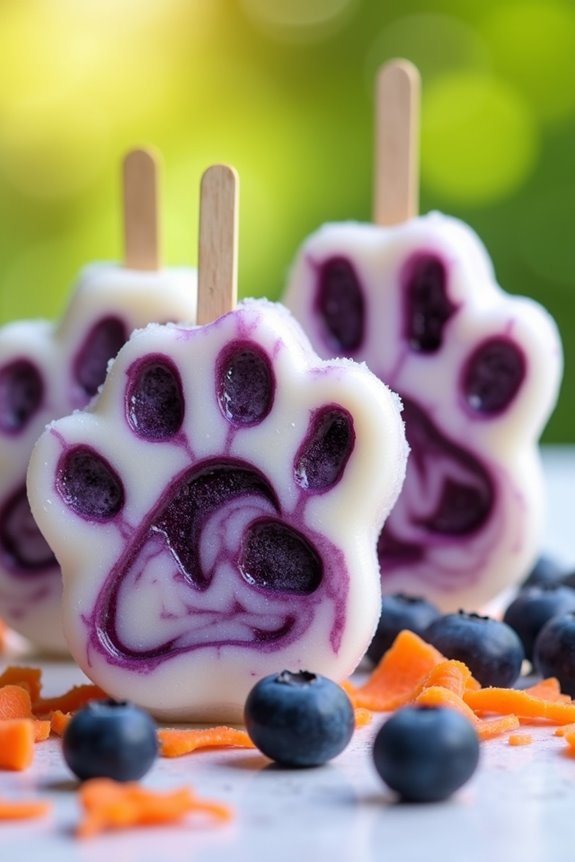
Let’s whip up some delicious Blueberry Yogurt Swirls for your pup. You’ll need just a few simple ingredients, and I promise it’s super easy—trust me, even I can handle it! We’ll go through step-by-step instructions and some fun optional add-ons to kick it up a notch, so your furry friend won’t be able to resist.
Ingredients
Making your own frozen dog treats isn’t just fun, it’s rewarding. Just imagine your furry friend’s tail wagging in delight as they enjoy these tasty, healthy snacks.
The great thing about these Blueberry Yogurt Swirls is that they require simple ingredients you can easily find at your local grocery store. So, let’s dive right into what you’ll need!
- 1 cup plain yogurt (unsweetened and non-fat works best)
- 1 cup fresh blueberries (you can use frozen, too, just thaw them first)
- 1 ripe banana (the riper, the sweeter)
- 1 tablespoon honey (optional, skip it if your pup is under a year old)
- 1/2 cup water (to help them blend smoothly)
And that’s it! You’re just a few steps away from treating your pup to something they’ll love.
Picture that gleeful look on their face when they get their first taste. Just be prepared for some serious tail-wagging afterward!
Step by Step Instructions
- Gather all your ingredients: blueberries, plain yogurt, and banana. Trust me, the fresher, the better—this is a treat for your pup after all.
- Wash the blueberries thoroughly. Make sure they’re squeaky clean; you wouldn’t want any yucky stuff in your dog’s snack.
- In a medium bowl, mash the banana using a fork until it’s smooth. You’re aiming for a fluffy banana puree, not something that looks like abstract art.
- Add the plain yogurt to the mashed banana and stir well until the mixture is creamy and combined. Think of it as making a lovely, dog-friendly smoothie.
- Gently fold in the blueberries. Be careful not to squish them all—let’s keep some of that berry magic intact (who can resist a happy little surprise?).
- Pour the mixture into silicone molds or ice cube trays. Fill them to the top, but don’t overfill—these swirls need room to dance in the freezer, right?
- Place the molds in the freezer and let them chill for about 4–6 hours, or until solid. Feel free to take a peek every now and then; I mean, who can resist checking on treats?
- Once they’re frozen solid, pop the treats out of the molds. If they’re stubborn, give the mold a little twist to help them slide out.
- Serve your pup a treat! Just be sure to cool completely before offering them to your dog. You wouldn’t want to scorch any little tongues, would you?
Optional Add-ons
If you want to take your homemade frozen dog treats to the next level, optional add-ons can really spice things up.
Why not try swirls of blueberry yogurt? Mix plain yogurt with mashed blueberries, then layer it into your treat mixture. Your pup will be drooling, trust me.
Just don’t expect to keep any for yourself—your dog knows the value of a good treat.
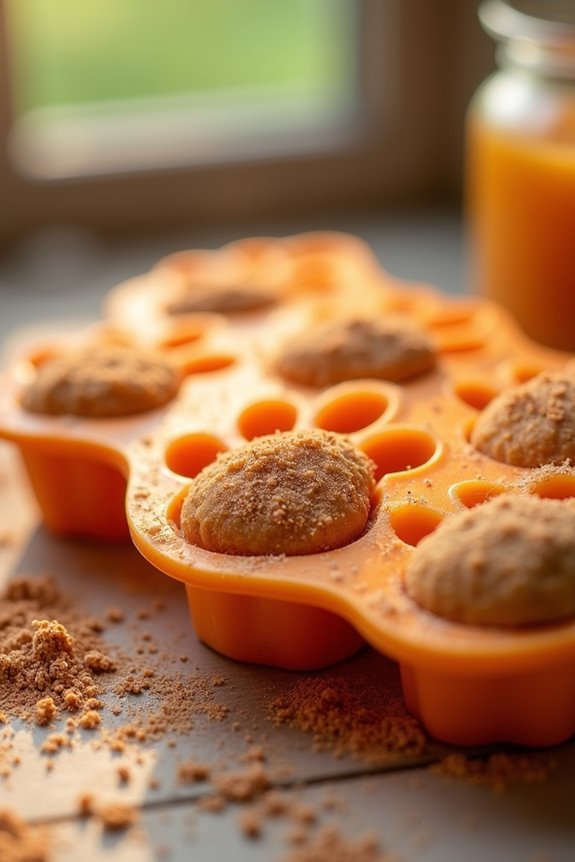
4. Pumpkin Apple Chill Bites
Let’s whip up some Pumpkin Apple Chill Bites that your pup will drool over. You’ll need just a few simple ingredients, and I promise the steps are super easy to follow. Plus, there are optional add-ons to make these treats even more exciting—who knew dog treats could be so fun to make?
Ingredients
Wanna whip up some delightful, tail-wagging treats for your pup? These Pumpkin Apple Chill Bites are super easy to make and use safe, everyday ingredients you probably already have in your pantry.
Plus, your furry friend will absolutely love them. Ready to get started? Check out the simple ingredients you need below.
- 1 cup canned pumpkin (not the spiced pie filling, just pure pumpkin)
- 1 cup unsweetened applesauce (the kind without added sugar is best)
- 2 cups rolled oats (easy to digest and tasty)
- 1 tablespoon honey (just a bit for sweetness—it’s safe in moderation!)
- 1 teaspoon cinnamon (this should be ground, definitely not a cinnamon stick)
And there you have it—the perfect mix of flavors that will have your pup bouncing with joy.
Seriously, if my dog could talk, I’m pretty sure he’d be begging for these all day. The best part? You won’t break the bank finding these ingredients, and they’re safe and nutritious.
Let’s get that tail wagging!
Step by Step Instructions
- Gather all your ingredients—1 cup canned pumpkin, 1 cup unsweetened applesauce, 2 cups whole wheat flour, and 1/2 teaspoon cinnamon—so you have everything ready.
- Preheat your freezer by clearing out any old treats, because this is about your pup today.
- In a large mixing bowl, combine the pumpkin, applesauce, and cinnamon. Mix well until it’s smooth and all the flavors mingle together (think of it as making a healthy smoothie, just for your dog).
- Gradually add the whole wheat flour into the mix. Stir gently until combined—don’t overmix, just until the dough comes together.
- Prepare an ice cube tray or silicone mold by giving it a light spray with non-stick spray. You want these to pop out easily later, trust me.
- Spoon the dough into the molds, filling each section about three-quarters full. This allows them to expand just right without making a big mess.
- Tap the tray on the counter a few times to eliminate any air bubbles, and smooth out the tops of the treats.
- Place the tray in the freezer and let your creations chill for at least 4 hours, or until they’re solid.
- Once frozen, pop the treats out of the molds. If they stick, give the tray a little twist—like how you’d free a stubborn ice cube.
- Store the treats in an airtight container in the freezer until you’re ready to treat your furry friend.
Cool completely before serving to your dog. Enjoy the tail wags and slobbery kisses that follow!
Optional Add-ons
Now that you’ve whipped up those tasty frozen dog treats, why not kick it up a notch?
Try adding a bit of pumpkin and apple for a delightful twist. Just mix in some pure pumpkin puree and finely chopped apples before freezing.
Your pup will love the flavor explosion. It’s like a summer snack party for them—and honestly, who doesn’t want that?
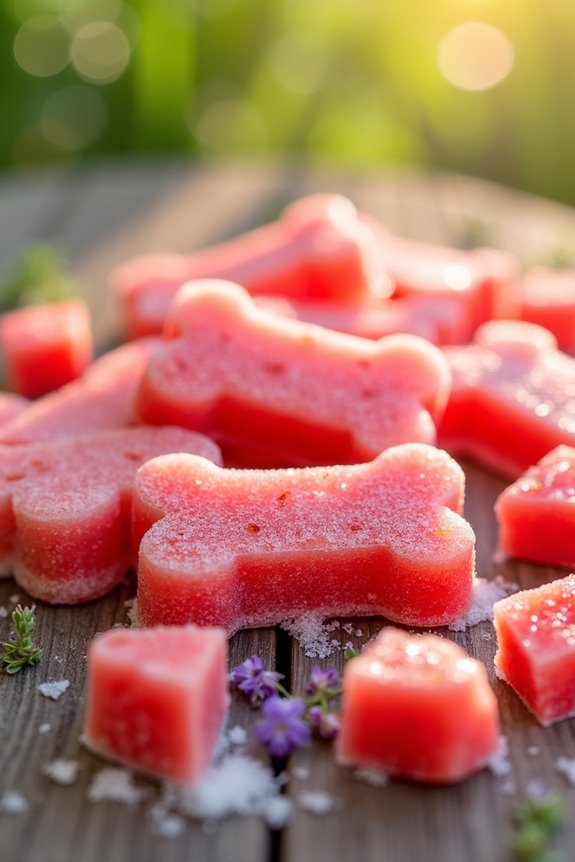
5. Frozen Watermelon Dog Treats
Ready to whip up some invigorating Frozen Watermelon Dog Treats? You’ll love how simple the ingredients are, and your pup will think you’re a culinary genius. Let’s break down the step-by-step instructions, plus I’ll toss in some optional add-ons to make these treats even more special.
Ingredients
If your pup is anything like mine, they’ll go absolutely bonkers for a cool treat on a hot day.
These Frozen Watermelon Dog Treats aren’t only a hit with your furry friend, but they’re also incredibly easy to whip up with just a few simple ingredients.
Ready to get started? Here’s what you’ll need for this invigorating recipe:
- 2 cups seedless watermelon, cubed (be sure to ditch those pesky seeds)
- 1/2 cup plain yogurt (make sure it’s dog-safe, like unsweetened Greek yogurt)
- 1 tablespoon honey (optional, but if your dog has a sweet tooth, they might appreciate the treat)
- A splash of water (just enough to help the blender if the mixture is too thick)
And there you have it! These ingredients aren’t only safe but also easy to find.
You might even have some of them in your kitchen already, making this a super convenient endeavor.
Whip these up, and your dog can join you in enjoying a little slice of summer!
Step by Step Instructions
- Start by cutting a ripe watermelon in half. Scoop out the flesh, making sure to remove all the seeds if you find any.
- Place the watermelon chunks in a blender or food processor. Blend until smooth, but not watery. You want it to be a nice, thick consistency that your dog will enjoy.
- Add a tablespoon of honey (optional, and just a tiny bit, please) to add a bit of sweetness. Blend again for a few seconds to combine.
- Grab your silicone mold or ice cube tray. Pour the watermelon mixture into the molds, filling them about three-quarters full. Leave a little room for expansion as they freeze.
- If you’re feeling fancy, toss in a few small pieces of watermelon or dog-safe treats into each mold before sealing the surprise with more puree.
- Carefully place the filled molds in the freezer. Try to keep them level to avoid any spills, unless you want a watermelon mess to clean up later (because who doesn’t love a little cleanup fun, right?).
- Freeze the treats for at least 4 hours, or until they’re completely solid.
- Once frozen, pop the treats out of the molds. If they’re being stubborn, run warm water over the bottom of the molds for a few seconds.
- Store the treats in an airtight container or a Ziploc bag in the freezer to keep them fresh.
- Cool completely before serving to your dog. Happy pup, happy life.
Optional Add-ons
When you want to elevate your homemade frozen watermelon dog treats, why not think outside the mold?
You could toss in some yogurt for a creamy twist, or sprinkle in a few blueberries for added fun. Got a pup who loves peanut butter? Mix in a dollop.
It’s all about experimenting—after all, what’s life without a little adventure, right? Your furry friend will love it.
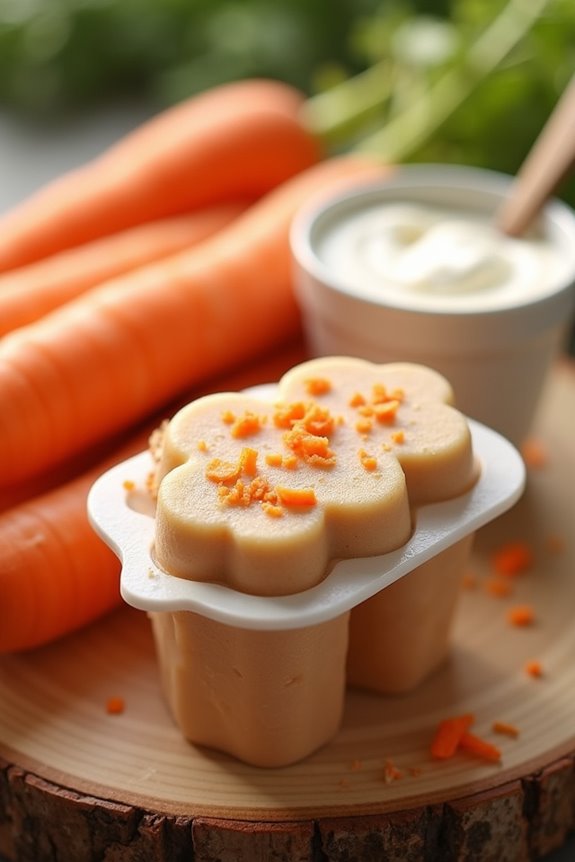
6. Peanut Butter Carrot Chillers
Now, let’s talk about those delicious Peanut Butter Carrot Chillers that your pup will absolutely love. You’ll need just a handful of simple ingredients and a sprinkle of creativity to get started. Curious about how to whip them up and maybe even add some fun extras?
Ingredients
Gathering yummy ingredients for these Peanut Butter Carrot Chillers is a breeze, and I promise your pup will thank you.
These treats aren’t only easy to make, but they’re also packed with goodness that your furry friend will love. So, let’s check out what you’ll need to whip up these delightful goodies:
- 1 cup of natural peanut butter (make sure it’s xylitol-free—trust me, your dog will be a happier pup without it)
- 1 cup of finely grated carrots (perfect for sneaking in some veggies)
- 1 banana, mashed (so ripe it could practically take a bow)
- ½ cup of plain yogurt (no artificial flavors or sugar, please—your pup deserves the best!)
- ¼ cup of water (to keep it all nice and blended)
- A pinch of cinnamon (because why not? It’s dog-safe and adds a hint of flavor)
With these ingredients in your cart, you’ll be ready to create a frozen treat that will have your dog wagging their tail in joy.
Just imagine their little face when they taste something made with love (and peanut butter). It’s sweet chaos, and I love it.
Step by Step Instructions
1. Gather all your ingredients: peanut butter, grated carrots, plain yogurt, and water.
It helps to have everything ready so you can whip these up without a hitch.
2. In a mixing bowl, combine 1 cup of peanut butter, ½ cup of grated carrots, and ½ cup of plain yogurt.
3. Stir the mixture until it’s well combined (you want to see those orange flecks of carrot throughout—don’t be shy with the mixing).
4. Gradually add ¼ cup of water to the bowl.
Mix until smooth but not watery (you want it to be easy to scoop but still hold its shape).
5. Grab your silicone molds or ice cube trays, and spoon in the doggie mixture.
Fill each mold to the top (it’s better to be generous; your pup will thank you).
6. Tap the trays gently on the counter to remove any air bubbles—no dog wants a treat with hidden pockets of mystery (or maybe they do, but let’s keep it simple).
7. Place the filled molds in the freezer.
Freeze for at least 4 hours or until solid (you can sneak a taste of the mixture first; just make sure to save some for Fido).
8. Once frozen, carefully pop the treats out of the molds.
They should come out easily if you’ve used silicone (like a little doggy ice sculpture).
9. Place the treats in a zip-top bag or airtight container and store them in the freezer until you’re ready to serve.
10. Cool completely before serving to your dog (don’t want to see him trying to eat an ice cube).
Enjoy your pup’s delighted reaction.
Optional Add-ons
If your pup has a penchant for all things peanut butter and carrot, why not take those homemade frozen treats up a notch?
Adding mashed carrots and creamy peanut butter not only boosts flavor but also packs in nutrients. Just mix ’em, spoon into molds, and freeze.
You’ll wonder why you didn’t think of this sooner—your furry friend will be begging for more.
7. Berry Bliss Frozen Treats
Ready to whip up some Berry Bliss Frozen Treats for your pup? You’ll love how simple the ingredients are and how quickly they come together—no culinary degree required.
We’ll walk you through the steps, share some optional add-ons to jazz it up, and make sure your furry friend’s taste buds are in for a real treat.
Ingredients
Perfect for those warm days when your pup needs a cool treat, these Berry Bliss Frozen Treats aren’t just delicious, but safe and healthy too.
You probably have a lot of these ingredients in your kitchen already, making it super easy to whip up a batch for your furry friend.
Just imagine the tail-wagging joy on their face when they get to enjoy this chilled delight. Let’s gather our goodies!
- 1 cup plain Greek yogurt (make sure it’s unsweetened and free from artificial sweeteners)
- 1 cup fresh or frozen blueberries (they’re like tiny superfoods for your dog)
- 1 ripe banana (bonus points if it’s a little too ripe for you)
- 1 tablespoon honey (make sure your pup isn’t too young, because honey isn’t for pups under one year)
- 1 tablespoon peanut butter (look for a brand that’s xylitol-free, please)
- A splash of water (for blending, you don’t need much)
Honestly, it’s that easy.
With just a few simple ingredients, you can treat your pup to something delightful.
And who doesn’t love a homemade treat?
Just be ready for that happy dance they do when they smell what you’re cooking up.
Step by Step Instructions
- Gather all your ingredients: blueberries, strawberries, banana, yogurt, and a blender. It helps to have everything in one spot before you start.
- Rinse the berries under cold water to remove any dirt or residue. (Your pups will appreciate this little tidbit of cleanliness.)
- Peel the banana and break it into smaller chunks for easier blending. (Trust me, your blender will thank you.)
- Add the blueberries, strawberries, banana, and yogurt into the blender.
- Blend on medium speed until the mixture is smooth and creamy, about 30-45 seconds. (You want it looking like a beautiful berry smoothie.)
- Grab some ice cube trays or silicone molds—these will be your treat holders.
- Pour the blended mixture into the trays, filling each compartment nearly to the top. (Don’t leave a lot of room; we want these to be deliciously icy.)
- Insert popsicle sticks, if using, into the center of each compartment for easy handling.
- Place the trays in the freezer. Let them freeze for at least 4–6 hours, or until completely solid. (This is the hardest part… waiting for them to freeze!)
- Once frozen, gently pop the treats out of the molds. If they’re stubborn, run warm water over the outside of the tray for a few seconds to help them release.
- Store the treats in a sealed container in the freezer until you’re ready to spoil your pup.
- Cool completely before serving to your dog. (You don’t want any excited pups causing a mess because the treats are too cold.)
Optional Add-ons
Now that you’ve got your frozen doggie delights ready to go, why not elevate those tasty treats with some optional add-ons?
Try tossing in some smashed blueberries or ripe strawberries for a fruity burst. Your pup’ll be in berry bliss.
You could even add a dollop of plain yogurt. Trust me, they’ll think you’re the best chef in town. It’s a win-win.
Chill Before Serving
Chilling those tasty dog treats before serving them might just be the secret ingredient to making your pup’s day extra special.
Envision this: a hot summer day, and you pull those frozen delights from the freezer. Trust me, your dog’s tail will wag like there’s no tomorrow.
Before you serve, let them chill in the fridge for about 10 to 15 minutes. Why? It softens them just enough to be irresistible, making every bite a cool burst of joy.
Plus, there’s nothing quite like watching your pup try to savor that treat, tongue flopping around like a little goofball.
Remember to use silicone molds for easy removal—my first attempt with plastic packs ended in a frozen disaster, and I learned my lesson the hard way.
Frequently Asked Questions
Can I Use Regular Yogurt Instead of Greek Yogurt?
Yes, you can use regular yogurt instead of Greek yogurt. It might make your treats a bit thinner, but the flavor’s still great. Just make sure it’s plain and unsweetened for your dog’s health.
How Long Can I Store These Treats in the Freezer?
You can store these treats in the freezer for up to three months. Just make sure you keep them in an airtight container to maintain their freshness and prevent freezer burn. Enjoy those hot days!
Are There Specific Fruits or Vegetables to Avoid?
Yes, avoid grapes, raisins, onions, garlic, and avocados, as they can be toxic to dogs. Stick to safe options like blueberries, carrots, and bananas for healthy, tasty treats that your dog will love.
Can I Add Peanut Butter to All Recipes?
Yes, you can add peanut butter to most recipes, but make certain it’s xylitol-free, as that ingredient’s toxic to dogs. Just confirm your dog isn’t allergic and watch portion sizes to avoid excess calories.
What Tools Do I Need to Make These Treats?
You’ll need a blender or food processor to mix ingredients, ice cube trays or silicone molds for shaping, and a freezer to set the treats. Optional: measuring cups and spoons for precision when adding ingredients.