Have you ever looked around your home and thought it could use a little more pup love? It’s amazing how those furry companions inspire creativity in design. Think about it: paw-printed wall art, unique dog bowl designs, or even custom collar styles that make a statement. I once tried to make a dog-themed throw pillow, but let’s just say it turned into more of a fabric explosion than a masterpiece. What if your space could truly reflect your bond with your dog?
Paw-Printed Design Ideas
When you think about it, there are so many creative ways to incorporate your furry friend’s paw prints into your home design.
You could make cute art pieces by using non-toxic paint to stamp their paws on canvas. Think about it—your dog’s little footprints framed on the wall, capturing their adorable essence forever.
Or what about custom pillows? You can have their paw prints sewn into fabric; it’s like a puppy love tribute in your living room. To enhance your bond and create lasting memories, consider using premium cockapoo dog supplies that ensure your pet feels cherished. Additionally, providing essential accessories for your emotional support dog will further strengthen your connection.
If you’re into sharing dog stories, Instagram ideas could include showcasing your paw print projects. Snap a pic, add a fun caption, and watch the likes roll in. It’s a great way to combine style with memories, don’t you think? Plus, consider complementing your creative designs with a premium dog food subscription to ensure your furry friend is well-nourished too.
Our Collection
Let’s talk about the goodies in our collection that’ll make your pup feel like royalty. You can find customizable dog collars that show off your furry friend’s personality, along with personalized leashes that practically shout, “Look at us!” Not only do we offer stylish options, but our products are made with luxury materials that ensure your dog’s comfort and elegance. Additionally, our luxury dog recovery collars are designed to provide both support and a touch of glamour during your dog’s healing process.
And don’t forget the dog-themed wall art, comfy beds, and throw pillows that add a wag of style to your space—because why shouldn’t home decor be as snazzy as your pooch? Our collection features luxury dog collars personalized to ensure your pup stands out on every walk!
1. Customizable Dog Collar Designs
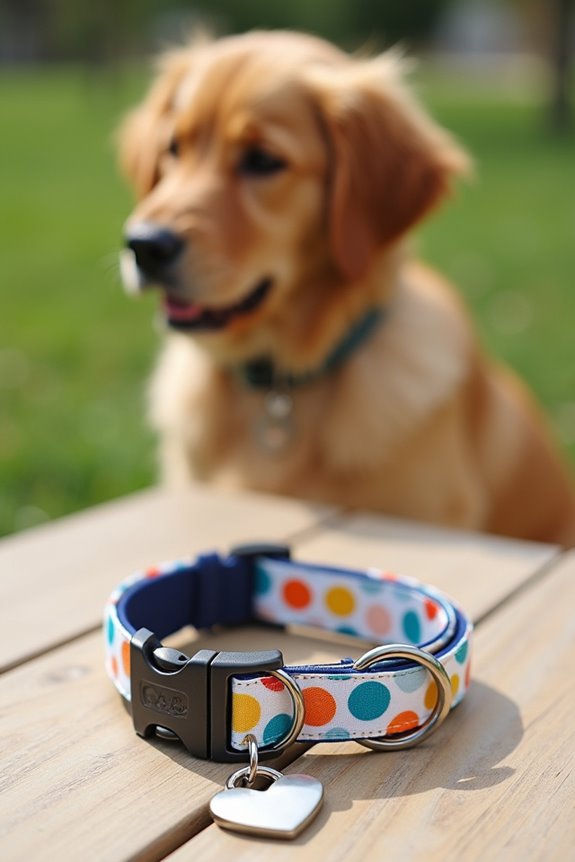
Let’s get crafty! Making your own customizable dog collar not only gives your pup a unique style that reflects their personality, but it can also save you money while keeping their comfort in mind. Plus, who wouldn’t want to impress their friends at the dog park with a collar that’s one-of-a-kind? So, grab your supplies, and let’s get started.
Materials Needed
- Fabric: Choose a sturdy, colorful fabric (cotton or canvas works great).
- Nylon webbing: An appropriate length based on your dog’s neck size.
- Buckle: A quick-release plastic or metal buckle.
- D-ring: For attaching ID tags and leashes.
- Sewing machine (or needle and thread if you’re feeling adventurous).
- Measuring tape: To get the perfect fit.
- Scissors: To cut your materials.
- Fabric glue (optional for no-sew version).
- Iron: To smooth out the fabric beforehand.
Step-by-Step Instructions
- Measure your pup’s neck. Use your measuring tape to find out how big around their neck is. Add a couple of inches for comfort and adjustment.
- Cut the fabric and webbing. Based on your measurement, cut a piece of fabric and a piece of nylon webbing. The fabric should be twice as long and a bit wider than the webbing.
- Prepare the fabric. Fold the fabric in half lengthwise, right sides together, and pin it if you want. Iron it down to make it easier to sew.
- Sew the fabric. Using the sewing machine, stitch along the edge, leaving a gap of a few inches open. If you’re sewing by hand, take your time—no speed records here.
- Turn it inside out. Once sewn, turn the fabric tube right side out, and then slide the nylon webbing inside. If you’ve got a trusty fabric glue, you can also glue the webbing into place instead.
- Attach the buckle. Thread one end of the nylon webbing through your buckle, then back through the D-ring, and fold it over. Sew it in place (make it nice and secure!).
- Finish it up. For added style, you can sew or glue the opening of the fabric to close it up. Now, the collar is ready to be personalized!
Optional Add-ons/Variations
- Different fabrics: Use patterns like polka dots, stripes, or even a funky print that matches your dog’s personality. Feeling bold? Try leather for a chic look.
- Embellishments: Consider adding some fun patches or even a little tag with your dog’s name sewn on. A little extra flair never hurt.
Pro Tip
When making collars, always double-check that the buckle is sturdy and the seams are strong. A collar that breaks can lead to a runaway puppy. Before heading out for a walk, give the collar a little tug to make sure everything’s secure. Trust me, safety first makes for happier walks. Additionally, selecting luxury dog collars can elevate your pet’s accessory game, offering premium materials and unique designs. Investing in high-quality materials ensures durability and comfort for your furry companion.
2. Personalized Dog Leash Styles
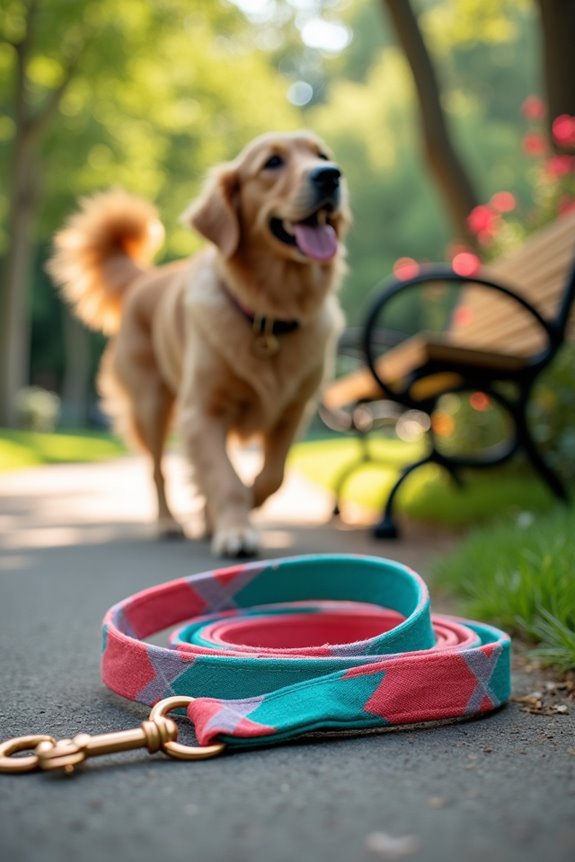
Let’s take your dog-walking game to a whole new level with a personalized dog leash! This DIY project not only showcases your dog’s unique personality but also gives you a way to stand out while strolling through the neighborhood. Plus, with a little creativity, you can save some cash and have a blast crafting something that’s truly yours. So, roll up your sleeves and let’s get started! You can complement your experience with a premium puppy feeding station to enhance mealtime for your furry friend. Additionally, using luxury dog wedding accessories can add an extra touch of elegance to any special occasion with your pup.
Materials Needed
- Nylon webbing: Choose a sturdy length based on your desired leash length.
- Fabric: Fun patterns or colors for the leash handle (like cotton or nylon).
- Clip hook: A durable snap clip to attach to your dog’s collar.
- Sewing machine or needle and thread: Depending on your comfort level.
- Measuring tape: To guarantee the perfect leash length.
- Scissors: For precision cutting.
- Fabric glue (optional for no-sew version).
- Iron: To flatten the fabric before sewing.
Step-by-Step Instructions
- Decide on your leash length. The standard leash length is about 6 feet, but you can customize it to whatever feels right for you and your dog.
- Cut your materials. Measure and cut the nylon webbing to your desired length. Now, cut the fabric to about 4 inches wide and twice the length of the webbing plus a few inches for folds.
- Prepare the fabric. Fold the fabric lengthwise, right sides together. Pin it down if you want—this will help it stay in place while sewing. Give it a quick iron to make everything neat.
- Sew the fabric. Sew along the long edge, leaving a gap of a few inches open. This is where you’ll turn it inside out later—so don’t go crazy sewing closed just yet.
- Turn it inside out. Once you’ve sewn the fabric, flip it right side out. This can be a bit tricky, but just pull from one end and poke through the opening.
- Slide in the webbing. Carefully insert the nylon webbing into the fabric tube. Use your hand or a stick to help guide it to the bottom if needed.
- Attach the clip hook. At one end of the nylon webbing, thread it through the clip hook and fold it over. You want to make sure this is secure, so stitch or glue it in place.
- Finish the handle. To close your fabric at the handle part, you can sew it shut or just glue it if you’re looking for a quick finish.
Optional Add-ons/Variations
- Unique fabrics: Use different patterns, like florals or animal prints, to mix it up. Want to be fancy? Go for something reflective or waterproof for those rainy walks.
- Decorative elements: Add patches, decals, or even your pup’s name on the leash for extra flair. It’s like giving your leash its own personality.
Pro Tip
If you’re concerned about your dog pulling on the leash, consider adding a bit of padding to the handle with extra fabric or soft material. This small touch can greatly improve comfort for your hand during long walks—and we all know those spirited pups can tug a little too hard sometimes. Just a little padding can go a long way in keeping both you and your dog happy on their daily adventures.
With your personalized dog leash ready to go, you can strut your stuff with your furry friend like the stylish duo you are! And remember, accessorizing your pup with luxury dog accessories can enhance their charm and make your outings all the more delightful!
3. Dog-Themed Wall Art
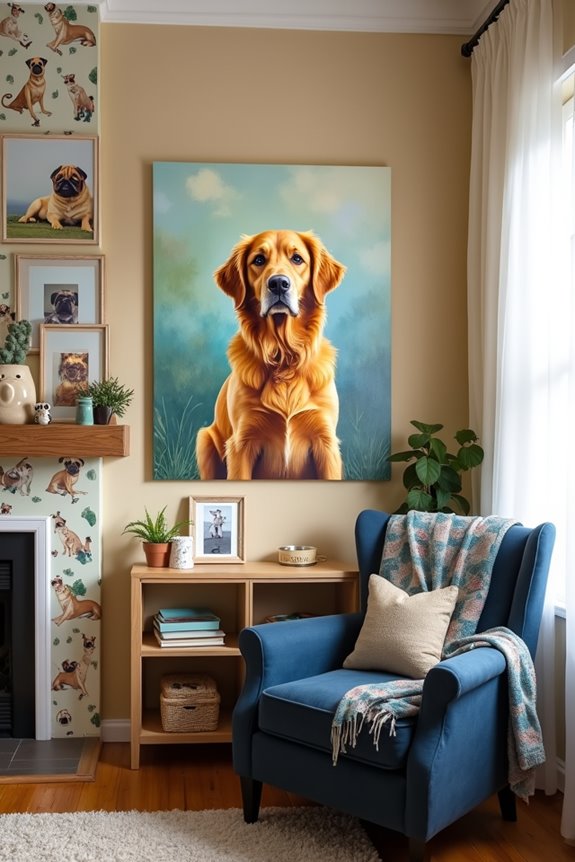
Decorating your home with dog-themed wall art is a delightful way to showcase your love for your furry friend. Not only does it create a warm and inviting atmosphere, but it also adds a touch of personality to your space. Incorporating luxury dog paintings into your collection can elevate the overall aesthetic of your home. Choosing premium dog food packages can contribute to your dog’s health, leading to happier moments you’ll want to capture in art. Additionally, adorning your walls with pug wallpaper art can serve as a charming focal point to celebrate these adorable companions.
Plus, creating your own wall art is a fun, budget-friendly way to elevate your home decor without breaking the bank. Ready to liberate your inner artist? Let’s plunge into this DIY project!
Materials Needed
- Canvas or wooden board: Choose your preferred size for the artwork.
- Acrylic paint or spray paint: Pick colors that complement your home or reflect your dog’s personality.
- Paintbrushes: A variety of sizes (small for details, larger for backgrounds).
- Stencils or prints: Consider dog silhouettes or quotes about dogs for inspiration.
- Protective covering: Old newspapers or a plastic sheet to keep your workspace clean.
- Sealant (optional): For protecting your artwork from dust and spills.
- Picture hanging hardware: If you want to display your masterpiece.
Step-by-Step Instructions
1. Choose your design. Whether you want a simple paw print, a colorful portrait of your dog, or a heartwarming quote, decide on what you’d like to create.
Sketch it out on a piece of paper first if you need a reference.
2. Set up your workspace. Lay down old newspapers or a plastic sheet to protect your surfaces.
No one needs a splatter of paint on the dining table—trust me.
3. Prepare your canvas or board. If you’re using wood, lightly sand it to create a smooth surface.
For canvases, make certain they’re stretched and taut.
4. Outline your design. Use a pencil to lightly sketch your design on the canvas or board.
If you’re using stencils, place them where you’d like and secure with tape.
5. Start painting. With your smallest paintbrush, begin filling in your design, starting with lighter colors and working your way to darker shades.
Remember, painting is all about layering—so don’t be afraid to go over areas for more intensity.
6. Add details. Once the base layers are dry, use smaller brushes for details.
This is where your pattern or dog’s unique features can shine. Take your time—perfection isn’t the goal, having fun is.
7. Seal and hang. Once everything is dry, consider applying a sealant to protect your art.
Then, pop on your picture hanging hardware and find the perfect spot on your wall for it to shine.
Optional Add-ons/Variations
- Create a collage: Mix in photos of your dog with painted artwork for a unique display that captures many memories.
- Experiment with textures: While paint is the usual medium, try using fabric or paper for added texture.
You could even use your dog’s old collars as a background frame.
Pro Tip
When painting, if you accidentally make a mistake, simply let it dry and paint over it.
Paint can be remarkably forgiving, and sometimes a “mistake” leads to an even better work of art. Embrace the creative process—you might just surprise yourself with what you come up with.
4. Dog Bed Design Inspirations
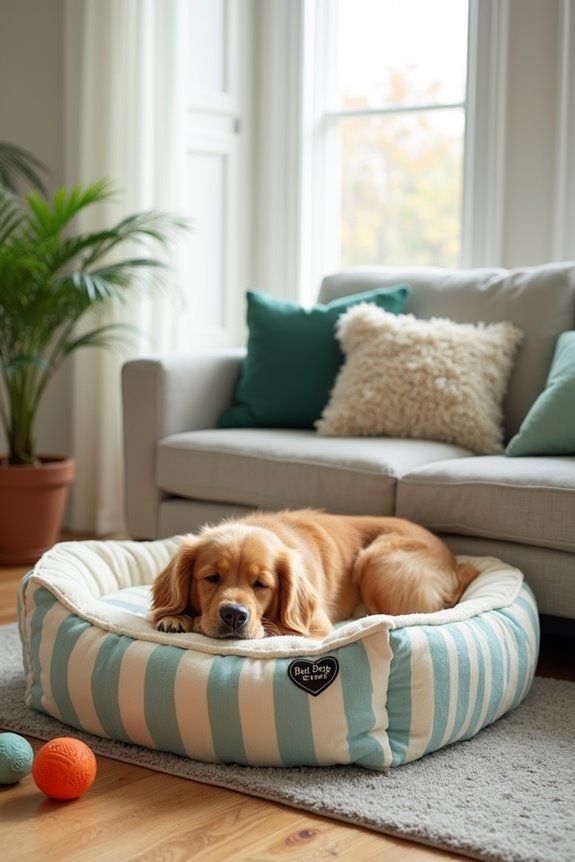
Creating a comfy and stylish dog bed is a wonderful DIY project for dog owners who want to pamper their pups while saving money. Not only does a personalized dog bed make your furry friend feel special, but it also adds a charming touch to your home decor. Plus, it’s a lot easier than you might think. Ready to bring some style and comfort to your dog’s life? Let’s get crafting!
Materials Needed
- Soft fabric: Choose a durable and cozy material like cotton, fleece, or canvas (about 1-2 yards depending on the size of the bed).
- Polyester filling or old pillows: For creating a plush cushion (you can reuse or recycle).
- Sewing machine or needle and thread: If you’re feeling adventurous, a sewing machine will speed things up, but hand sewing works too.
- Scissors: For cutting your fabric to size.
- Measuring tape: To guarantee your bed fits your dog perfectly.
- Fabric pins: To hold everything in place while you sew.
- Optional embellishments: Add fun designs, such as dog prints or stripes, using fabric paint or iron-on patches.
Step-by-Step Instructions
- Measure your pup. Start by measuring your dog’s length from nose to tail and their width while lounging. Add a few inches for comfort—trust me, they’ll appreciate it.
- Cut your fabric. Using your measurements, cut two fabric pieces—one for the bottom and one for the top. A rectangular shape works best, but feel free to get creative with shapes.
- Sew the sides together. With the good sides of the fabric facing each other, pin along the edges and sew three sides together, leaving one side open for adding the filling. If you’re using a sewing machine, this part is super quick—like, faster than your dog can steal a sock.
- Turn it inside out. Carefully flip the sewn fabric right side out. It’ll feel like unwrapping a gift. Think of your pup’s excited face when they see their new bed.
- Add the filling. Stuff your bed with plush polyester filling or those old pillows you’ve been meaning to toss. Don’t skimp on this part—your dog deserves a cloud to lounge on.
- Close it up. Once you’re satisfied with the amount of filling, fold in the edges of the open side and either sew it shut or use fabric glue for a no-sew option.
- Personalize if you’d like. Before you finish, this is your moment to embellish the bed—maybe a cute paw print or a sweet message like “Best Dog Ever.”
Optional Add-ons/Variations
- Fabric Choice: Experiment with different fabrics that match your home decor. A fun pattern or solid color can transform the bed into a stylish accent.
- Size Variation: Don’t feel limited to one size. Make small beds for your dog and even larger ones for their stuffed animal collection or a cozy corner for themselves.
Pro Tip
If you want your dog bed to last longer, consider using a well-made, removable cover. This way, you can easily throw it in the wash for a quick clean-up when your pup’s post-playtime energy results in a bit of a mess. Luxury raised dog beds can also provide elevated comfort and support for your furry friend.
Trust me, mud stains can be quite the adventure.
Now that your dog has a fresh and fabulous place to snooze, you’ll find them snuggled up, dreaming of their next adventure (or plotting how to swipe snacks from the counter).
Enjoy crafting the bed, and get ready for all the cuddly moments ahead!
5. Dog-themed Throw Pillows
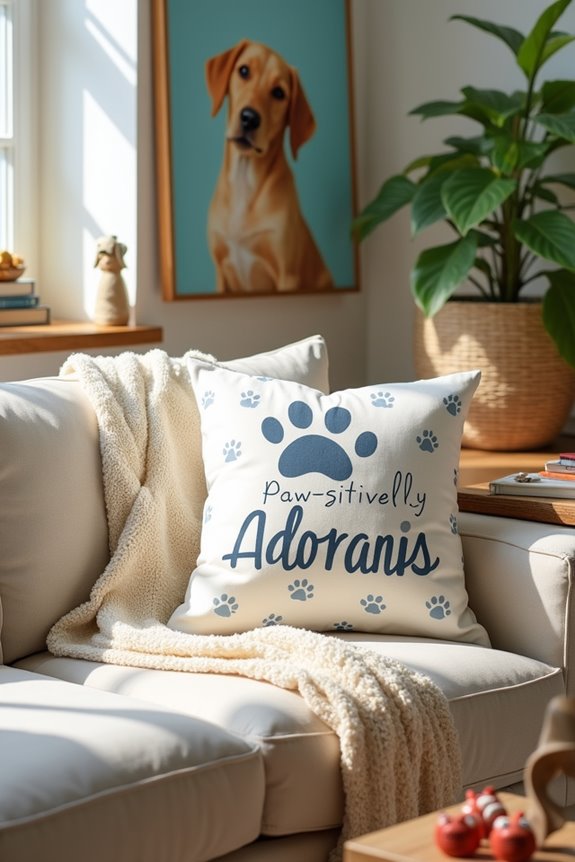
Do you want to add a touch of warmth and personality to your home while celebrating your love for dogs? Making dog-themed throw pillows is an adorable DIY project that not only enhances your decor but also offers a cozy spot for your furry friend to snuggle up against. Plus, it’s a budget-friendly way to keep your space stylish and dog-friendly. Effective dog training equipment can also help you ensure your dog behaves well around your new décor. Additionally, dog park equipment can provide your pet with fun and social interaction outside the home. To further enhance your pup’s comfort while lounging, consider investing in luxury dog beds, so they have a designated space to enjoy their new pillow. Are you excited? Let’s get started!
Materials Needed
- Fabric of your choice: A cotton or linen blend works well for durability (about 1 yard).
- Pillow insert: Choose a size that fits your desired pillow dimensions; you can also use old pillows as stuffing.
- Sewing machine or needle and thread: Sewing machines are faster, but hand-sewing can be just as fun.
- Scissors: For cutting your fabric to size.
- Measuring tape: To guarantee your pillow is the perfect size.
- Fabric pins: Use these to keep your fabric pieces together while sewing.
- Fabric paint or iron-on transfers: For adding your dog theme, like paw prints or cute quotes.
Step-by-Step Instructions
- Measure and cut your fabric. Decide on the size of your pillow (let’s say 18×18 inches). Cut two squares of fabric to those dimensions, adding an extra inch on each side for seams. It’s like planning a dog park day—you want enough space to roam.
- Pin the fabric together. With the good sides of the fabric facing each other, align the two pieces and pin along the edges. This guarantees that everything stays in place, just like a well-trained pup.
- Sew three sides. Using a sewing machine or needle and thread, sew along three edges, leaving one side open. If you make a mistake, don’t worry; every good dog owner has had a few barking mad moments.
- Turn it inside out. Flip the fabric right side out to see your nice cozy pocket. It’s like revealing a secret treat—your pillow is coming to life.
- Insert the pillow insert. Stuff your pillow with the filled insert or old pillows. Make sure it’s nice and fluffy. Dogs love comfort, and so should you.
- Close it up. Fold in the raw edges of the open side and sew it closed. Alternatively, you can use fabric glue for a no-sew approach—no judgment.
- Customize the design. Use fabric paint to add your favorite dog-related phrase or an adorable graphic. Maybe something like “Paw-sitively Adorable”? It adds that personal touch that makes the pillow uniquely yours.
Optional Add-ons/Variations
- Experiment with various fabric patterns. How about a classic plaid for a rustic look, or a bright color to pop against your sofa?
- You could even mix and match fabrics for a super charming collage effect.
- Consider using waterproof fabric if you have a naughty pup who might be prone to spills or accidents.
Pro Tip
Before using fabric paint, always do a patch test on a scrap piece of fabric. You don’t want to risk a smudge on your beautiful new pillow.
And if you’ve got any leftover fabric, think about making a matching dog bandana for your pup—talk about a picture-perfect duo!
With this DIY puppy pillow project, you’re not just sewing—you’re crafting comfort and style for both you and your furry companion.
6. Dog-Inspired Furniture Designs
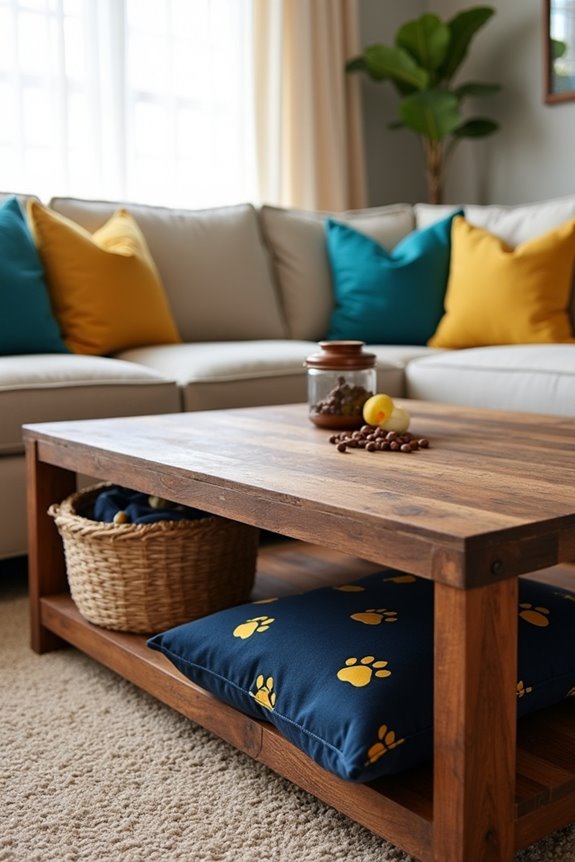
Looking to transform your home into a haven for you and your pup? Let’s explore some fabulous dog-inspired furniture designs that not only elevate your decor but also keep your furry friends’ comfort in mind.
These pieces are about saving money while improving your home’s aesthetic—consider it a win-win. Plus, don’t forget to make use of dog treat making equipment to create a special touch for your pup’s space. Additionally, incorporating a professional dog grooming kit into your home can help maintain your pet’s cleanliness and comfort.
Materials Needed
- Wooden boards or an old furniture piece: Think pallets, crates, or any unwanted furniture ready for a makeover.
- Screws and brackets: To add stability to your new creations.
- Sandpaper: A medium and fine grit will make everything nice and smooth.
- Wood stain or paint: Choose your favorite color to match your decor.
- Cushions or fabric: For seating or bedding, take a cue from your pup’s favorite colors.
- Measuring tape: For accuracy in your dimensions, so that everything fits just right.
- Screwdriver: Handy for assembling your design.
- Paintbrush or cloth: For applying your stain or paint.
Step-by-Step Instructions
- Choose Your Design. Think about what you need. Maybe a pet-friendly coffee table with storage or a bench that doubles as a dog bed? Sketch it out; it’s like picking a new dog breed, you want to find the perfect match.
- Measure and Cut. Use your measuring tape to get the right dimensions. Cut your wooden boards to size. Don’t panic if your cuts aren’t perfect—every dog knows that life is about embracing imperfections.
- Sand it Smooth. Take your sandpaper and smooth out all the edges and surfaces. You don’t want any splinters waiting to surprise you or your pup. Think of it as a pet grooming session—making things nice and tidy.
- Assemble Your Piece. Use screws and brackets to put the furniture together, following your design. If it feels wobbly, just tighten those screws. Picture yourself as a dog trainer, making sure everything is sturdy and secure.
- Stain or Paint. Now’s the fun part! Apply wood stain or paint to match your style. Let it dry completely—just like waiting for your pup to stop chasing their tail before taking a picture.
- Add Cushions or Fabric. Once everything is dry, set up cushions or fabric where needed. It’s like setting up the best dog bed in the house. Plush and inviting, right?
- Finishing Touches. Inspect your masterpiece. Make any final adjustments or add some cute accessories, like a small cart for toys or dog treats. Your new piece is ready to shine, just like your dog when they’ve just gotten a bath.
Optional Add-ons/Variations
- Color Palette: Go for vibrant colors if you’re a fan of fun or stick with earthy tones for a more rustic vibe. Personal preference rules here.
- Theme Integration: Consider matching the furniture to a particular theme, like nautical for a beachy home or vintage if you love that chic charm.
Pro Tip
Always use non-toxic wood stain or paint if your dog is likely to sniff or explore your new furniture. Safety first—just like keeping your pup away from the snack table at a doggy party.
Creating dog-inspired furniture isn’t just about style; it’s about making your home a comfy place for you and your pet. With these steps, you’ll blend functionality and flair seamlessly.
Now, let’s get to work making your space a little more paw-some.
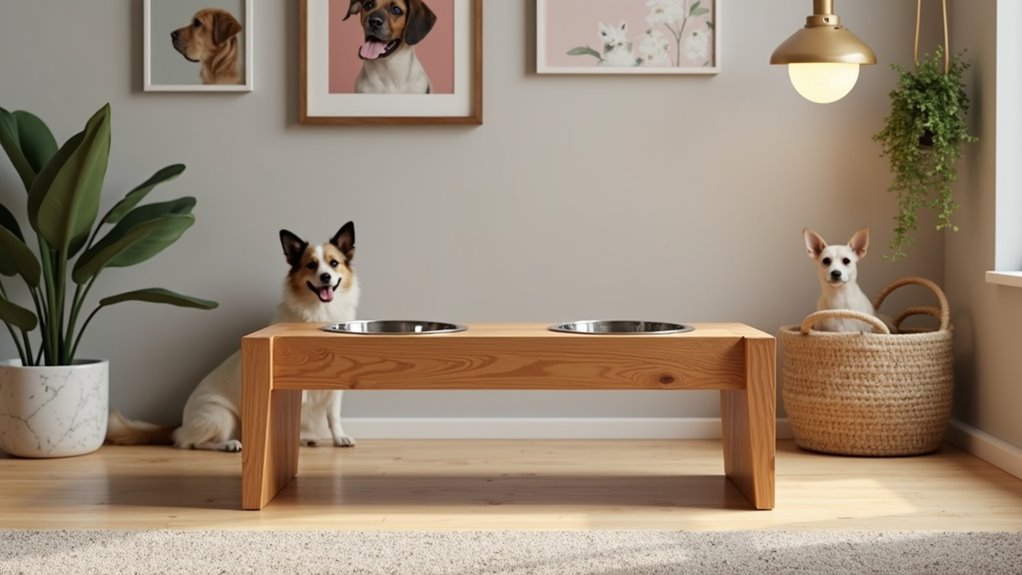
7. Unique Dog Bowl Designs
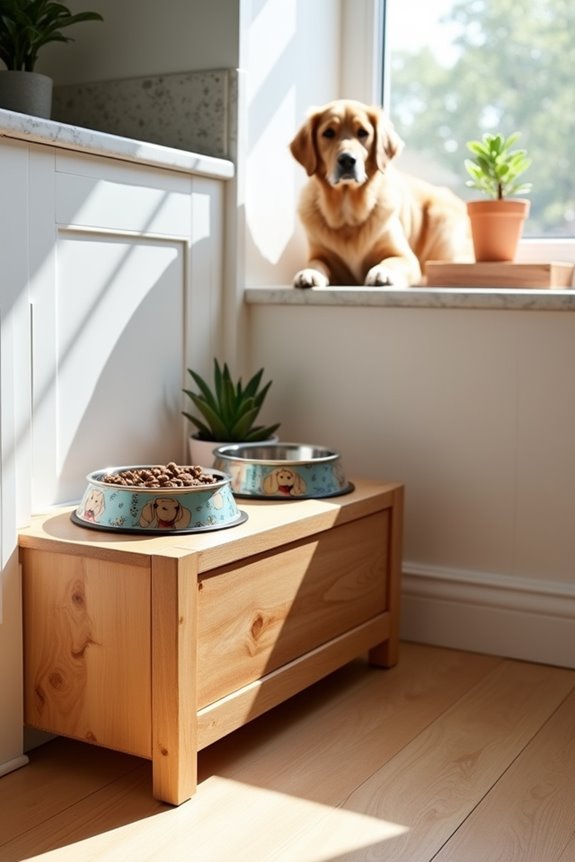
Want to elevate your dog’s dining experience (quite literally)? This DIY dog bowl stand is a perfect project for dog owners looking to add a stylish touch to their home while keeping their pup’s mealtime comfortable and organized.
Plus, why settle for boring store-bought options when you can create something unique, functional, and budget-friendly?
Materials Needed
- Wooden boards (for the stand and base): Go for something sturdy like pine or plywood.
- Non-slip rubber pads: To keep the stand from sliding around (and avoid spilled kibble).
- Two stainless steel bowls: Choose sizes based on your dog’s breed and eating habits.
- Wood screws: To hold your stand together securely.
- Wood glue: Added strength for those inevitable tail wags.
- Sandpaper (medium and fine grit): You’ll want to make everything smooth and splinter-free.
- Paint or wood stain: Pick a color that matches your home decor.
- Measuring tape: For precise measurements.
- Saw: A miter saw or circular saw works well.
- Drill: For making holes and securing screws.
- Paintbrush or cloth: For applying your chosen finish.
Step-by-Step Instructions
- Design Your Stand. Decide on the height of your dog bowl stand — it should be around the level of your pup’s belly so they don’t have to crane their neck, which isn’t ideal after a day of chasing squirrels. An adjustable height might also be an option if you have a growing puppy.
- Measure and Cut. Using your measuring tape, determine the dimensions based on your dog’s bowls. Cut the wood pieces accordingly. Remember, neat cuts are great, but dog bowls won’t judge you for a little roughness.
- Sand the Edges. Take your sandpaper and smooth everything down to prevent any rough edges that might scratch your pet or your floor. Think of it as giving your wood a mini spa day.
- Assemble the Stand. Start by assembling the base with wood screws and wood glue. Make sure it’s stable—just like the way your dog can balance a treat on its nose. If you’ve got a creative flair, you could even add fun cut-out designs on the sides.
- Add Bowl Holders. Create holes in the top part of your stand that perfectly fit your bowls. A slightly snug fit will keep everything secure during mealtime, stopping any messy situations, which you know your dog is always keen to create.
- Finish with Paint or Stain. Once assembled, it’s time to add some color. Use paint or wood stain to match your decor. Let everything dry—giving you a brief moment for a well-deserved coffee break while you wait for your masterpiece to be ready.
- Finish with Non-Slip Pads. Attach the non-slip rubber pads to the bottom of your stand to keep it from sliding around when your dog’s enthusiasm for dinner kicks in. It’s a cringe-worthy sight to see a food-filled bowl go airborne, trust me.
Optional Add-ons/Variations
- Customize the Colors: Use pet-safe acrylic paint to jazz it up with bright colors or patterns. Think polka dots for a playful touch, or a minimalist monochrome look—whatever fits your style best!
- Personalized Engraving: Add a little flair with custom engravings of your dog’s name or a quirky slogan. Who wouldn’t want “King [Dog’s Name] Eats Here” on their dining stand?
Pro Tip
Before starting your project, take a moment to verify you’re working in a well-ventilated space, especially when using paint or wood stain.
It keeps you safe and also gives your dog a break from the smell of freshly painted wood—those are some olfactory sensitivities to be thankful for!
Creating this DIY dog bowl stand not only enhances your decor but also shows your pup just how much you care about their comfort while they chow down. Happy crafting, and may your dog’s meals be merrier than ever!
Extra Tips & Ideas
When it comes to designing spaces inspired by our furry friends, adding a sprinkle of creativity can make a world of difference.
Think about repurposing items you already own—those old crates? They can be transformed into stylish dog beds. And why not hang a dog-themed art piece near their play area? It adds flair and personality. A well-chosen luxury dog bed can truly enhance your pup’s comfort while elevating the overall aesthetic of your home.
You might even create a doggie ‘gallery’ with photos of your pup in their silliest poses. Cozy blankets tossed around? Perfect for snuggling. Additionally, incorporating luxury designer dog beds can elevate your pup’s comfort and enhance your living space.
Or use vibrant colors that reflect your dog’s playful spirit; after all, they bring joy to your life. If all else fails, embrace your pup’s quirks and let those inspire your next design project—after all, they’re the true connoisseurs of comfort. Consider investing in luxurious large dog beds, as they provide the ultimate relaxation for your beloved pet.
Frequently Asked Questions
How Do I Choose the Right Dog for My Lifestyle?
To choose the right dog for your lifestyle, assess your activity level, space, and time available for training and companionship. Research breeds that match your preferences, and consider adopting from shelters or rescues for extra support.
What Are Common Health Issues in Certain Dog Breeds?
Certain breeds face specific health issues. You might see hip dysplasia in Labradors, breathing problems in Bulldogs, or heart conditions in Cavaliers. Understanding these concerns can guide you in choosing a healthy canine companion.
How Can I Train My Dog to Be Well-Behaved?
To train your dog to be well-behaved, start with consistent commands and positive reinforcement. Use short sessions, reward good behavior, and remain patient. Socialize them regularly to help them adapt to different environments and situations.
What Are Some Good Dog-Friendly Home Decor Ideas?
You wouldn’t want your pup to think your fancy sofa’s a chew toy, right? Opt for durable fabrics, washable rugs, and stylish pet beds. Create a chic, cozy space that welcomes both you and your four-legged friend.
How Do I Organize Dog-Related Events or Gatherings?
Start by choosing a venue that’s dog-friendly, then advertise through social media and local pet groups. Plan fun activities, gather supplies for snacks, and guarantee there’s ample space to play and socialize. Don’t forget to promote safety!
Conclusion
So, whether you’re painting paw prints on your wall or whipping up a cozy corner for your pup, remember that every design choice is a celebration of the joy they bring into your life. You’re not just decorating your space; you’re creating a heartfelt homage to the furry friend who fills your days with wagging tails and slobbery kisses. Embrace these ideas, and let your home reflect the love and laughter only dogs can inspire. Isn’t that what it’s all about?