Your backyard can be more than just grass—it can be a doggie wonderland, like a mini amusement park for your furry pals. Imagine them dashing through agility tunnels or digging up treasures in a sand pit, all while you watch in amazement (and maybe a bit of envy at their energy). So, how do you turn that dream into reality? Let’s explore some fun, easy DIY ideas that’ll have your pups begging for playtime as we go along.
Playful Obstacle Course Ideas
If you’re looking to transform your backyard into a canine wonderland, creating a playful obstacle course is a paws-itively great way to keep your dog entertained and engaged.
Envision this: tunnels made from cardboard boxes, weave poles crafted from broomsticks, or even a sturdy chair for a leap over—these playful items spark joy for both you and your pup.
You can get creative with challenges too, like a low balance beam or a splash zone with a kiddie pool.
Trust me, watching your dog navigate their own mini-agility course is hilarious and heartwarming. Plus, there’s no better bonding moment than cheering them on, right?
Give it a shot. Who knew backyard DIY could bring so much tail-wagging fun?
Our Collection
Let’s talk about our collection of fun features that’ll transform your backyard into your pup’s favorite playground.
Picture an agility tunnel set up just waiting for your dog to zoom through, or a tire jump station that they’ll tackle like a pro—only to land in their very own muddy bath afterward.
You’ve got plenty of options, from a corner fetch zone to a sand digging pit, so get ready to release creativity and a whole lot of tail wags.
1. Agility Tunnel Setup
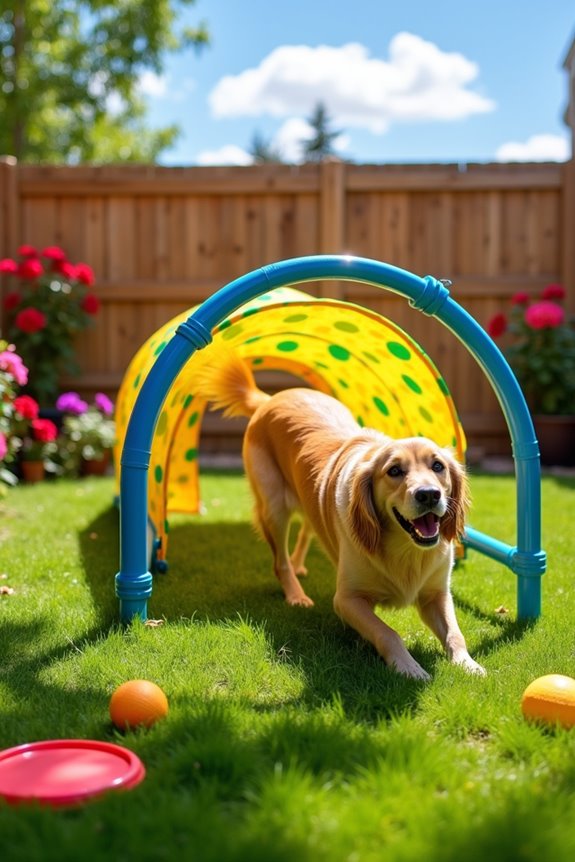
Creating a DIY agility tunnel for your furry friend can be an exciting project that brings hours of fun and exercise. Not only does it give your dog a stimulating way to burn off energy, but it also saves you money compared to store-bought options.
Plus, you get the satisfaction of creating something special just for your dog—a unique piece of agility equipment to enhance their playtime. Additionally, consider pairing the tunnel with a quality outdoor dog fence system to create a safe and enclosed area for your dog to play.
Materials Needed:
- PVC pipes (2 inches in diameter, about 10 pieces, each 4 feet long)
- PVC pipe connectors (elbows and T-joints)
- Heavy-duty fabric (like a tarp or canvas, about 10-15 yards)
- Scissors or a utility knife
- Tape measure
- Rope or bungee cord (for securing the fabric)
- Ground stakes (optional, for anchoring the tunnel)
Step-by-Step Instructions:
- Plan Your Tunnel Shape: Decide how long you want your tunnel to be. A single straight tunnel is great for beginners; consider a length of around 8-10 feet. Also, map out your layout so you know how many pipes and connectors you’ll need.
- Assemble the Pipe Frame: Using the PVC pipes and connectors, create a rectangular structure. Connect the pipes horizontally with T-joints on both ends and two vertical pipes for support. Make sure it’s sturdy; you don’t want it collapsing when your dog zooms through.
- Cut and Attach the Fabric: Measure and cut your heavy-duty fabric to fit the length of your pipe frame. It should be wide enough to drape over the frame with some excess for securing it down.
- Secure the Fabric: Drape the fabric over your PVC structure. Use the rope or bungee cord to attach the ends firmly. You can tie them to the pipes or use clips to keep everything in place. Make certain it’s a snug fit to avoid any flappage while your dog is zipping through!
- Anchoring (Optional): If your tunnel likes to wander when your pup runs, use ground stakes to secure it into the grass or dirt. This extra step can help keep it in place during intense play sessions.
- Test It Out: Before letting your dog loose, give the tunnel a gentle shake to verify everything is secure. Crawling through becomes the ultimate test; you can even try it yourself for fun. Just be careful—watch your head.
- Let the Fun Begin: Introduce your dog to the new tunnel slowly. Use treats or toys to encourage them to go through. Soon enough, they’ll be running the course like a pro!
Optional Add-ons/Variations:
- Add Some Color: Use fabric in various fun patterns or colors to brighten up the tunnel. It’s a great way to match it with your backyard decor or your dog’s personality.
- Customizable Length: Want a longer or shorter tunnel? Simply adjust the number of PVC pipes and connectors when building the frame. You can even create curved sections if you’re feeling adventurous.
Pro Tip:
Always supervise your dog while they’re using the tunnel, especially in the beginning. Some pups might get a little too enthusiastic, and we wouldn’t want them to make a flying leap.
Plus, check regularly for wear and tear—it guarantees your DIY agility tunnel stays safe and fun for playtime.
A DIY agility tunnel isn’t just another project; it’s a fantastic way to bond with your furry friend while enhancing their physical and mental fitness.
2. Tire Jump Station
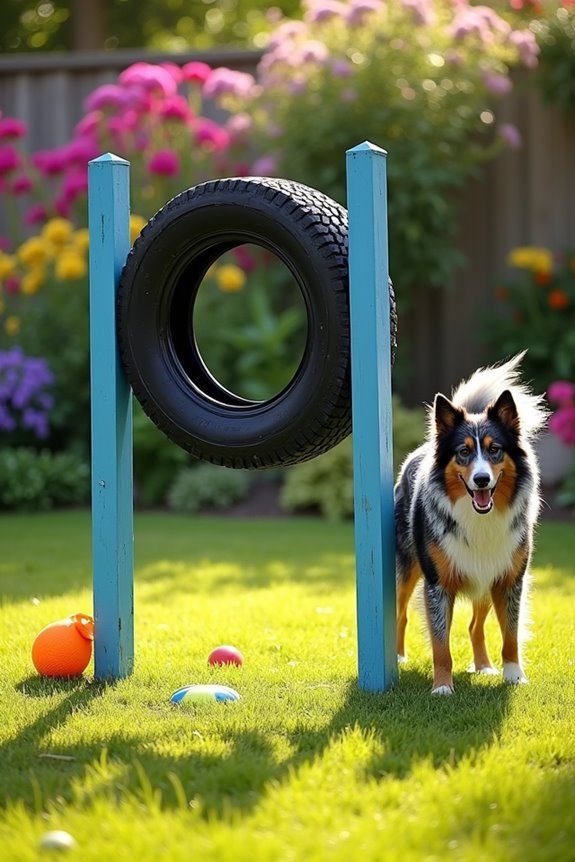
If you’re looking to spice up your dog’s playtime, then a DIY tire jump station is just the ticket. This fun and functional piece of play equipment not only provides great exercise but also challenges your pup in a positive way. It’s a fantastic way to save some cash compared to commercial options and get your hands a little dirty in the process—all while creating a joyful space for your furry friend. Plus, you get to boast about your DIY skills to other dog owners. Additionally, consider including a dog food processor appliance to create homemade treats for your pup as they enjoy their new playground.
Materials Needed:
- Old tire (you can find them at garages, tire shops, or even in your garage)
- Strong rope or bungee cord (about 10 feet)
- Wooden posts (4×4 inches, 2 pieces, each 4 feet long)
- Drill and drill bits
- Heavy-duty screws (to secure the tire to the posts)
- Paint (optional, for a pop of color)
- Sandpaper (for smoothing any rough edges)
Step-by-Step Instructions:
- Find Your Tire: Hunt down an old tire. The bigger, the better, but make sure it’s not worn out or has any cracks. You want something that can withstand some serious jumps.
- Prepare Your Posts: Get your wooden posts ready. Use sandpaper to smooth out any rough edges. Safety first—nobody wants a splintered dog.
- Drill the Rod: Depending on how high you want the jump, measure and mark where you’ll attach the tire to the posts. Drill holes straight through the tire and one at the top of each post. You may want to place the tire about 18-24 inches above the ground for ideal jumping fun.
- Attach the Tire: Securely fasten the tire onto the posts using heavy-duty screws. If you’re feeling fancy, add some rope or bungee cord around the tire for extra stability. This could also be a safety feature, in case a wild pup decides to take a flying leap beyond what you imagined.
- Add Some Color (Optional): If you want to jazz things up, grab that paint and splash some colors on your posts. Let it dry completely before letting your pup test the setup. Rainbow tire jump, anyone?
- Test It Out: Before you let your dog go wild, do a little jump test yourself. If you can survive a gallant leap, your pup can too—hopefully with a bit more grace.
- Introduce Your Pup: Use treats or their favorite toy to coax your dog towards the jump. Some might be instinctively wary—so patience is key. Encourage them gently, and soon they’ll be flying over with their tails wagging in delight.
Optional Add-ons/Variations:
- Create a Multi-Level Jump: If you’re feeling a bit adventurous, you can build additional levels using smaller tires or make the jump height adjustable with some creative use of ropes or chains.
- Personalization: Use dog-safe paint to create fun designs or names on the tire. Imagine how cute it’ll be seeing “Rover’s Jump Zone” in your backyard.
Pro Tip:
Keep in mind, dogs have their own flair for creativity when it comes to jumps. Make sure the area is free from obstacles and soft ground for landing. Even if you think they’re the Olympic champions of jumping, cushioning won’t hurt for a gentle landing. Make their play safe so they can get back up and try again!
3. Corner Fetch Zone
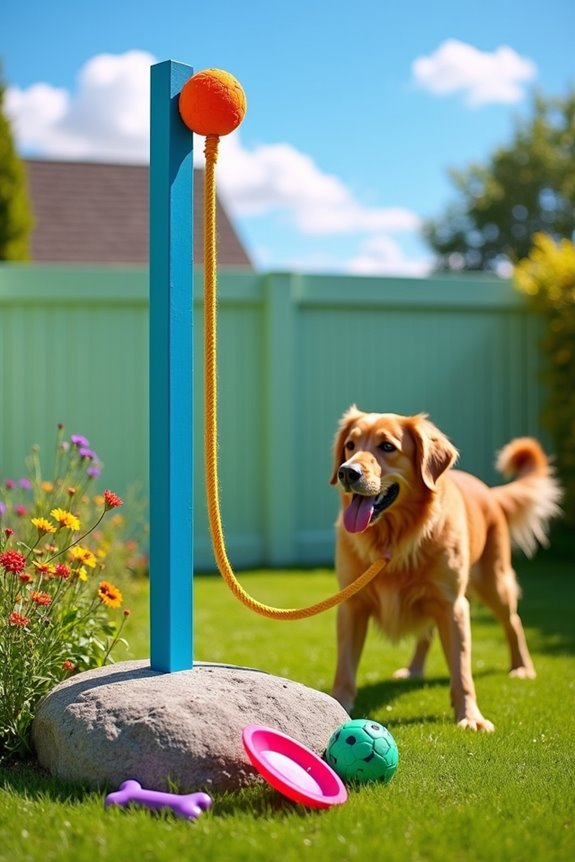
Imagine a space where your dog can dash, grab, and play fetch to their heart’s content—sounds delightful, right? A DIY corner fetch zone is perfect for turning any underutilized corner of your yard into a haven of fun and exercise for your dog.
Not only does it keep your pup engaged and active, but it also helps you save money by avoiding expensive playground equipment. Plus, it adds a touch of charm to your yard, making it look more inviting for your furry friend and guests alike. Incorporating interactive dog puzzle toys can further stimulate your dog’s mind while they enjoy physical play.
Materials Needed:
- Soft, durable ball (like a tennis ball or rubber fetch ball)
- A sturdy stick or small wooden pole (about 3-4 feet long)
- String or rope (about 10-15 feet, depending on the size of your space)
- A secure anchor (like a sandbag or a heavy rock)
- Paint (optional, to colorize your poles)
- Drill (if you need to make holes for the anchor)
- Measuring tape
Step-by-Step Instructions:
1. Choose Your Spot: Find a corner of your yard that’s free from debris and provides enough space for your pup to run around. Make sure it’s a little away from fences and roads for safety.
2. Prepare Your Anchor: To keep things stable, fill a heavy-duty bag with sand or find a large rock. This anchor will hold your pole in place while your dog goes wild fetching.
3. Set Up Your Stick: Secure the stick or pole vertically into the anchor. You can either drill a hole in your anchor to place it firmly, or if you’re using a heavy rock, simply shove the pole into it deep enough to stay upright.
No one wants it falling over mid-fetch; that’s like dropping your pizza on the floor.
4. Attach the Rope: Tie one end of the rope around the stick near the top. The other end will be used to attach your ball, so make sure it’s secure. If you have a soft ball, tying a knot around it should do the trick.
5. Test the Setup: Give the ball a gentle tug to verify everything is secure. You wouldn’t want your pup to experience a “fetch malfunction.” Plus, if it’s sturdy enough for you to yank on, your dog will have no trouble with it.
6. Introduce Your Dog: Grab some treats and bring your dog over. Show them how the rope works and encourage them to jump and tug on the ball. Celebrate their excitement with treats and cheers—dogs love a little pomp.
7. Let the Games Begin: Once your pup understands how to interact with the fetch zone, let them play! Just sit back and enjoy watching them run in circles, tail wagging with sheer joy.
Optional Add-ons/Variations:
- Color It Up: Make your fetch pole stand out by painting it in your dog’s favorite colors (or let’s face it, your favorite colors). Bright colors not only add personality but also help you spot it easily from a distance.
- Add a Challenge: For a twist, consider attaching multiple balls at different heights. This can create varying levels of difficulty, ensuring your dog has to work a little harder for their fetch rewards.
Pro Tip:
Always supervise your dog when they’re playing. It’s a great time to bond, plus it helps you keep an eye out for any hazards.
Also, if they tend to chew, choose a super durable ball that won’t fall apart after just a few tug-of-war sessions. It’s like buying a good pair of shoes—make sure they can handle some wear and tear.
4. Mud Bath Area
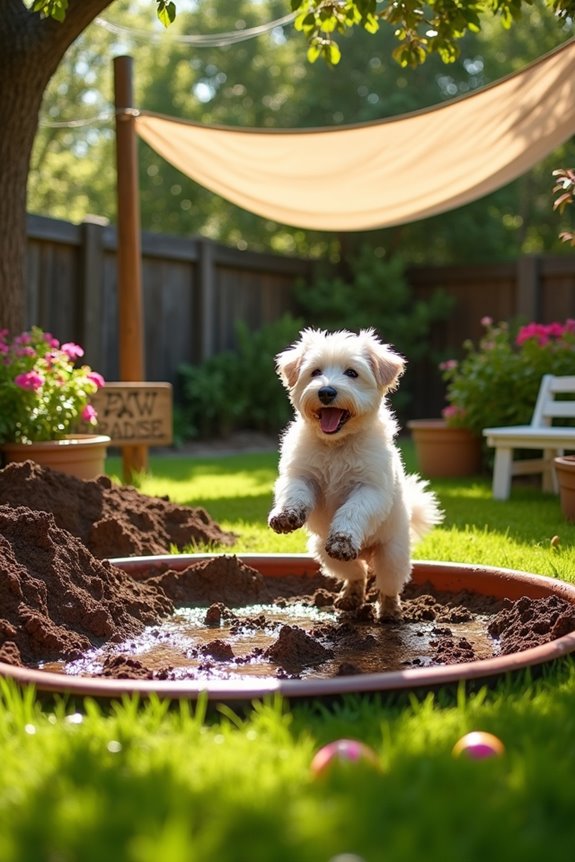
Imagine a lovely little spot in your yard, dedicated to pure canine joy—yes, we’re talking about a mud bath area for your pup! This DIY project isn’t just about letting your dog indulge in some messy play; it’s about providing them with their own private oasis for relaxation and fun.
Dogs love to dig and roll around in the mud, and it can be a great way to keep them cool on warm days. Plus, having a designated mud area can save your gardens and flowerbeds from being turned into a doggie disaster zone. Who doesn’t want a happy pup and a garden that remains intact?
Materials Needed:
- A designated area in your yard (preferably shaded for those hot days)
- A shovel or spade
- Several bags of organic topsoil or sand
- A kiddie pool (optional)
- Water hose or buckets for soaking
- Mulch (optional, for easier cleanup)
- Plastic tarps (for added control of the mud area)
Step-by-Step Instructions:
1. Choose the Location: Find a shaded area in your yard for your mud bath. Look for a spot away from plants and flowers—you don’t want to see your prized petunias turned into a muddy pulp.
2. Clear the Ground: Use a shovel or spade to clear away any grass, weeds, or debris. Create a space that’s about 4-6 feet wide. It doesn’t need to be huge; just enough for your pup to roll around in.
3. Prepare the Base: Depending on your space and preference, you can layer the bottom with a few inches of topsoil or sand. Consider making a small pit for the mud.
This can easily be done by digging a little deeper on one side for better mud retention, kind of like creating a dog-friendly swimming pool.
4. Water Time: Soak the area with a hose or buckets of water until it’s nice and muddy. Remember, it’s not meant to be a swimming hole, just a cool, muddy paradise.
If you’re using a kiddie pool, fill it halfway with mud and water for some extra fun.
5. Add Mulch: If you’re worried about the clean-up, you might want to add a layer of mulch around the mud area. This can help absorb some of the mess and keep it contained, plus it makes it look a little nicer.
6. Introduce Your Dog: Bring your pup over and let them explore! Trust me, the joy on their face when they discover their new mud playground will make all the effort worth it.
7. Supervise and Enjoy: While your dog indulges in their mud-loving antics, keep an eye on them to confirm they’re safe and happy.
Feel free to join in on the fun—just don’t blame them for muddy paw prints on you.
Optional Add-ons/Variations:
- Customize Your Look: Paint or decorate the sides of your kiddie pool (if you use one) with dog-friendly, non-toxic paint or simple designs. You could even create a sign like “Paw Paradise” to make it special.
- Add A Canopy: Consider putting up a small canopy or shade cloth above the mud bath to keep your pup cool during those sunny days.
Pro Tip:
Keep a towel handy since a muddy dog can lead to a muddy home. Also, using a dog-friendly shampoo after they’ve had their fun can help avoid bringing that muddy scent into the house.
Remember, a clean dog is a happy dog—well, technically, a muddy dog is a happy dog too, but you get the point.
Creating a mud bath area isn’t just fun—it’s a great way to allow your pup some messy enjoyment while keeping your yard and your relationship intact. Happy mudding!
5. Sand Digging Pit
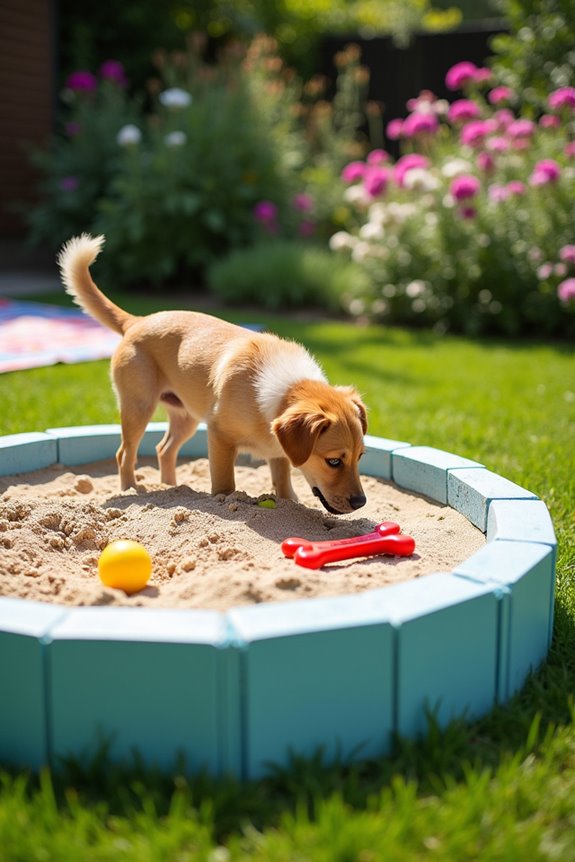
Let’s face it, dogs love to dig. It’s in their nature, and as dog owners, we understand that trying to stop them can sometimes lead to a backyard war. Instead of battling your pup’s digger instincts, why not create a designated sand digging pit? This DIY project is both fun and practical, providing your furry friend with their own special place to let loose. It can save your garden from becoming a battlefield and serves as an entertaining and safe outlet for your dog’s energy. Plus, it’s pretty easy and budget-friendly!
Materials Needed:
- A designated area in your yard (a flat space works best)
- Shovel (or your hands, if you want to get really personal)
- Sand—about 1-3 cubic yards, depending on your space (play sand works great)
- Landscape fabric (to prevent weeds)
- Optional: Small toys or bones for extra digging fun
- Optional: Wooden landscape edging or concrete blocks (to outline the pit)
Step-by-Step Instructions:
- Pick the Perfect Spot: Choose a sunny part of your yard where your dog can dig freely. Ideally, it should be in a spot where you won’t mind a little sandy mayhem.
- Clear and Outline: Use your shovel to clear out any grass, rocks, or debris from your chosen spot. You want to create a space roughly 4-6 feet in diameter—large enough for a good dig session but not so big that it starts resembling the Sahara Desert.
- Lay the Base: Once you’ve cleared the area, lay down landscape fabric on the ground. This helps keep the sand clean and prevents pesky weeds from popping up in your dog’s paradise.
- Fill with Sand: Pour in your sand until the pit is at least 8-12 inches deep. That’s enough for your pup to dig to their heart’s content. Make sure it’s even and smooth—no one likes a bumpy pit, right?
- Add Fun Elements: If you want extra flair, toss in some toys or bones to make it even more enticing. You could also consider edging the pit with wooden landscape edging or concrete blocks to keep the sand contained and give it a nice finished look.
- Introduce Your Pup: Lead your dog over to the digging pit, and watch the magic happen. At some point, they might look at you like you just opened the gates to doggie heaven. Enjoy the moment.
- Supervision Time: Keep an eye on your fur baby as they dig away. Make sure they’re happy, and every so often, join in. You might even pick up a shovel and help them unearth those hidden treasures.
Optional Add-ons/Variations:
- Creative Edging: Instead of the basic concrete blocks, painted wood or even sturdy bricks can add a pop of color, making the pit blend nicely with your yard’s aesthetic.
- Sand Variety: Try using different colored sand for a more playful twist; it’s like a day at the beach but in your backyard!
Pro Tip:
To keep the pit looking fresh, consider raking the sand weekly. This not only helps maintain a clean play area but also mixes in any doggy surprises that might’ve been left behind. I once found a sock in my dog’s digging pit—so you never know what treasures might come out.
Creating a sand digging pit is a great way to give your dog a designated space for digging without the guilt of ruining your flower beds or grass. With just a little effort, you can create a delightful space that brings joy to your pup while saving your garden from an undisclosed amount of chaos. Trust me, they’ll love you for it!
6. Water Splash Zone
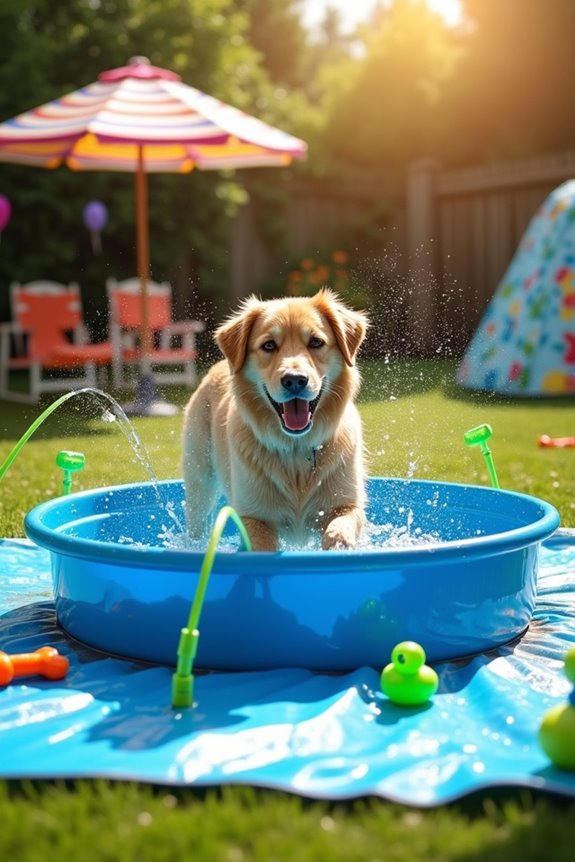
If your pup loves splashing around as much as mine does, a DIY water splash zone is the perfect summer project. Not only does it provide your furry friend with a revitalizing way to cool off, but it also adds an element of fun to your backyard, keeping your dog entertained for hours. You can elevate the experience further by considering the benefits of luxury dog winter gear to ensure your dog stays comfortable and protected during colder months.
It’s a cost-effective alternative to expensive doggie day spas and can easily be customized to fit your space.
Materials Needed:
- A kiddie pool (choose a size suitable for your dog)
- A tarp or large mat (to catch excess water)
- Tethered sprinklers or a hose with a spray nozzle
- Water toys or floating balls (for extra splashy fun)
- Optional: Shade structure (like an umbrella) for sunny days
Step-by-Step Instructions:
- Choose Location: Find a flat area of your yard that’s safe and away from any sharp objects. Ideally, this spot should have some shade for those particularly hot days, or have enough space for your pup to run around.
- Prepare the Ground: Clear the area of any debris, sticks, or rocks. Lay down a tarp or large mat to help collect excess water and keep the area from turning into a muddy mess.
- Set Up the Pool: Place the kiddie pool on the tarp. Fill it with water to a depth that your dog comfortably enjoys—this could be just a few inches or enough for them to paddle around.
- Add Splash Features: Set up your tethered sprinklers around the pool. Adjust the hoses or spray nozzles so they spray water directly into the kiddie pool, creating a fun splash zone. Be sure to test it out first to make sure your pup won’t be scared or overwhelmed!
- Toss in Some Fun: Add some water toys or floating balls to the pool. Dogs love to chase and retrieve; it’ll keep them entertained while you enjoy watching the antics.
- Introduce Your Pup: Bring your dog over to their new splash zone. Encourage them to explore and play. A couple of treats might help; after all, who doesn’t love a reward for being adventurous?
- Supervision Time: Keep an eye on your pup while they play. If they’re new to water play, they might need a bit of guidance to get started. Join in the splash fun—you might be surprised how much you enjoy it too.
Optional Add-ons/Variations:
- Create a colorful and playful atmosphere by adding some floating pool decorations like beach balls or soft toys. You could even tie colorful streamers around the pool for a festive vibe.
- For extra shade, set up a small pop-up tent or umbrella nearby. Dogs can get sunburned too, so providing a spot to cool off in the shade can be a great idea during hot days.
Pro Tip:
Make sure to change the water regularly and check for debris to keep things clean and safe for your furry friend. If you have multiple dogs, rotating the area they play in can help keep the splash zone fresh and exciting!
Remember, a happy pup makes for a happy owner.
Who knew a little water could create so much joy? Now, go get your paws wet and enjoy a fun day in the sun with your best friend.
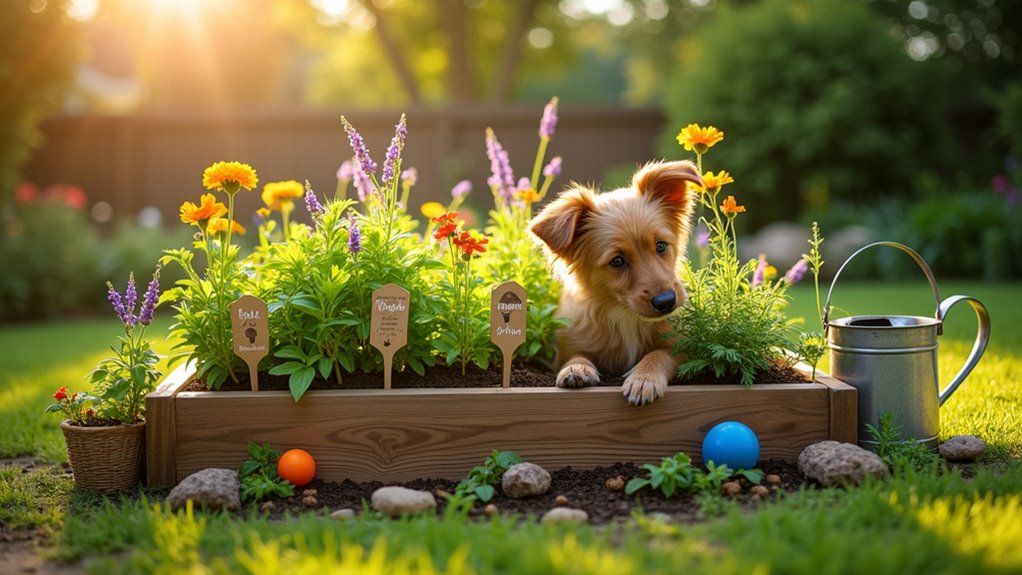
7. Enrichment Sniffing Garden
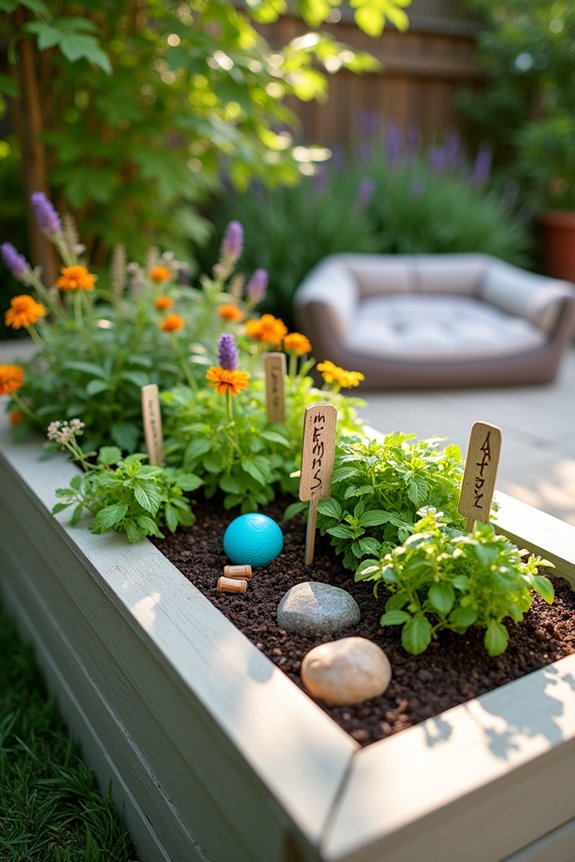
Creating an enrichment sniffing garden is the perfect project for dog owners looking to stimulate their furry friend’s mind while providing endless fun. It’s not only an engaging way for your dog to explore and use their natural instincts, but it also saves money compared to buying fancy interactive toys. Best of all, it adds vibrant life to your yard, giving your pup a sniff-tastic outdoor experience. Additionally, incorporating elements of luxury pet furniture into your yard can enhance both comfort and style while your dog enjoys their outdoor play.
Materials Needed:
- A small garden bed or planter (wooden or raised would be best)
- Soil (enough to fill your garden bed/planter)
- Dog-friendly herbs (such as parsley, mint, basil, or rosemary)
- Scented flowers (e.g., marigolds or lavender – just make sure they’re non-toxic!)
- A few toys or hidden treats (to encourage scavenging)
- A watering can (for keeping the garden hydrated)
- Gardening gloves (to save your hands from dirt)
- Plant markers (for labeling your herbs)
Step-by-Step Instructions:
1. Choose Your Spot: Find a sunny, well-drained area in your yard. Dogs love to explore, so placing it in a visible spot will help keep both you and your pup engaged.
2. Prepare the Bed: If you’re using a garden bed, clear the area of weeds and rocks. If you’ve got a planter, make sure it has drainage holes. Loading it up with some soil will be your next step.
3. Fill with Soil: Pour in your soil until it’s just about 1-2 inches from the top. Give it a gentle pat to make sure it’s nice and snug.
4. Plant Your Herbs and Flowers: Choose the herbs that excite your dog’s nose the most. Dig small holes and plant your selections—keep them slightly apart to give each plant room to grow.
If you’re feeling fancy, slap those plant markers in too, so you can show off your gardening prowess.
5. Add Toys or Treats: This is where the fun begins! Hide a few toys or tasty treats under the foliage. Your dog will love sniffing around and discovering the surprises you’ve hidden.
6. Water Your Garden: Using the watering can, give your new garden a good soak. Just don’t drown the poor plants—think of it as giving them a invigorating drizzle, not a monsoon.
7. Encourage Exploration: Introduce your pup to their new sniffing garden. Give them some time to explore, sniff, and play. Trust me, watching them dive nose-first into the herbs will be priceless.
Optional Add-ons/Variations:
- Spice things up by incorporating different colors of flower pots or using an elevated planter for a unique twist. You could mix in some decorative stones around the base of the plants to give it that extra flair.
- For a wilder look, scatter some pinecones or sticks among the plants—a little natural chaos can make the sniffing experience even more enticing.
Pro Tip:
Make sure to do a quick check on any plants before choosing them, as some foliage may not be safe for your pup. A little research goes a long way in keeping your furry friend safe while they enjoy their sniffing adventure.
Plus, not only does this project become a fun sensory experience, but a lightly scented yard will make your outdoor area a delightful oasis for you too. Happy gardening!
Extra Tips & Ideas
Have you ever wondered how to take your dog playground to the next level?
Think about adding some fun obstacles for dog training. A simple tunnel or jump can make playtime exciting while reinforcing commands like “jump” or “go through.” Safety measures are key, of course. Use non-toxic materials and soft, cushioned surfaces to prevent any oops moments.
Why not toss in a splash zone for those hot days? A kiddie pool filled with water can be a joy.
And don’t forget about cozy spots for lounging; your pup deserves a comfy corner. Trust me, my lab once claimed my old bean bag as his throne.
Just remember, the fun never stops when you design with love and consideration.
Frequently Asked Questions
What Are the Best Materials for Building a Dog Playground?
When building a dog playground, consider treated wood options for safety and longevity. Focus on durability factors like weather resistance and structural integrity to guarantee it withstands playful paws and changing outdoor conditions for years.
How Much Space Do I Need for a Dog Playground?
You’ll need at least 100 square feet for a dog playground, but if you’re dreaming big, aim for 300 square feet! Picture your pooch frolicking around ideal playground layouts with dog park dimensions worthy of their royal highness!
Are There Any Budget-Friendly Options for Dog Playground Equipment?
You can create a budget-friendly dog playground using DIY agility equipment made from repurposed materials. Think old tires for jumps, wooden pallets for obstacles, and PVC pipes for tunnels. Get creative and have fun!
How Do I Keep My Dog Safe in the Playground?
Imagine a knight protecting their castle; you’ll want to guarantee your dog’s safety like that. Keep an eye out for playground hazards, supervise playtime, and use safety gear to guard against potential dog safety issues.
Can I Include Water Features in My Dog Playground?
You can definitely include water features for water play in your dog playground! Just guarantee they’re safe, shallow, and supervised to avoid accidents. Always prioritize dog safety when designing fun, engaging spaces for your furry friend.
Conclusion
Creating a dog playground is not just fun—it’s a great way to keep your pup active. Did you know that dogs need at least 30 minutes of exercise each day? By building this playground, you’re not only providing physical activity but also mental stimulation, which keeps your furry friend happy and healthy. So grab those old tires and PVC pipes, let your creativity run wild, and watch your backyard transform into a magical canine kingdom. Your dog will thank you!