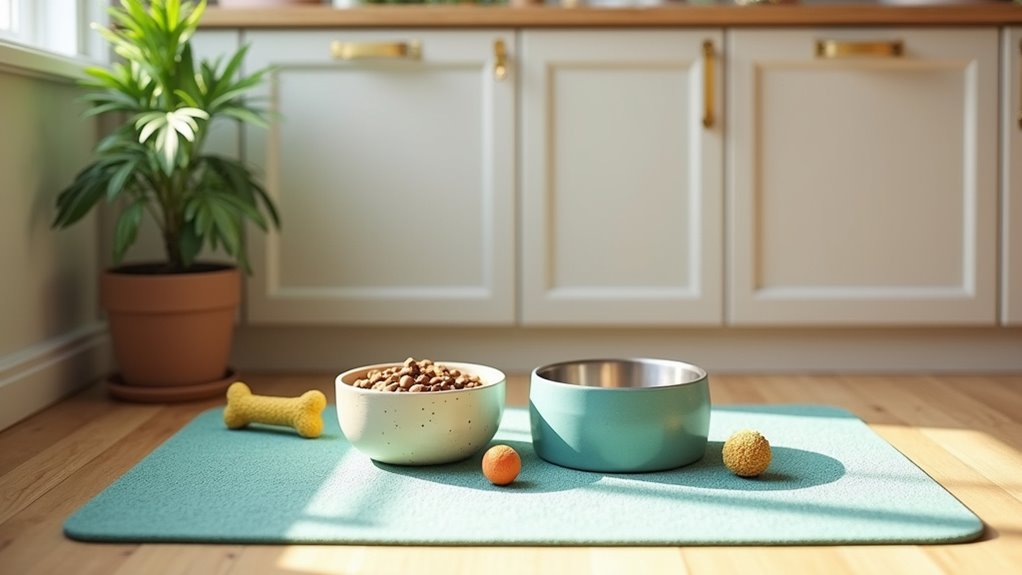
Remember the time you tried to make your kitchen feel like a gourmet dog café? Well, your pup deserves a feeding station that’s just as fancy, without the price tag of a five-star restaurant. How about transforming that plain old feeding area into a stylish, organized space? With these seven creative DIY ideas, you can craft a feeding station that’s all about your dog’s vibe. Stick around, and you might just find your next weekend project waiting for you.
Unique Feeder Designs
When it comes to feeding your furry friend, why settle for ordinary?
Consider a dog feeding station DIY that’s both functional and stylish. Imagine crafting a raised feeder from reclaimed wood. You’ll find plans online that show you how to create a chic stand that suits your space. A simple paint job or stain gives it personality.
Or think about using an old suitcase—you know, the one collecting dust in the attic? It could become a unique, vintage-inspired feeding nook.
Add bowls that fit snugly inside, and voilà—your pup’s dining area is now a conversation starter.
Personalize it with your dog’s name or favorite quote. After all, shouldn’t their eating experience be as special as they are?
Our Collection
Let’s take a quick look at our collection of feeding stations designed just for your pup.
You’ve got options like raised wooden stations that elevate mealtime and customizable bowls that’ll make your dog’s dining setup uniquely theirs.
Whether you fancy paw-print etched ceramics or sleek stainless steel, there’s something perfect waiting for you and your furry friend.
1. Raised Wooden Feeding Station
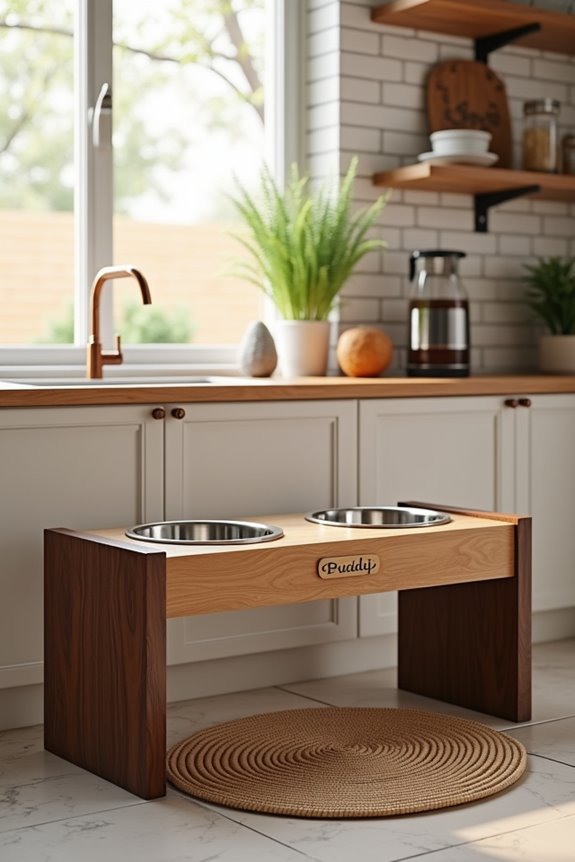
Creating a raised wooden feeding station for your dog can transform mealtime from a messy chore into an organized and stylish affair. Not only does it help your pup eat comfortably without straining their neck, but it also keeps your living space tidy. Plus, incorporating a luxury dog treat dispenser can elevate your dog’s dining experience even more!
Materials Needed:
- 1 large wooden board (1″ x 12″ x 6′)
- 2 shorter wooden boards (for the sides, usually 1″ x 4″ x 3′)
- 2 wooden dowels (about 1″ diameter)
- Dog food/water bowls that fit your dog’s needs
- Wood screws
- Wood stain or paint (optional)
- Sandpaper
- Drill
- Saw (if you need to cut the wood to size)
- Measuring tape
- Safety goggles
Step-by-Step Instructions:
- Measure and Cut: Start by measuring the height that works for your dog. A good rule of thumb is to have the bowls at chest height. Cut the large board to your desired length—typically around 36 inches works for medium to large breeds.
- Create the Sides: Cut each of the shorter wooden boards to the desired height of your feeding station. A height of 10-12 inches is usually comfy for most dogs.
- Drill Holes for Bowls: Mark where you want the bowls to sit on the large wooden top. Make sure to space them apart based on the size of the bowls. Drill holes just a bit smaller than the diameter of your bowls—this will help them fit snugly.
- Attach the Sides: Position your shorter boards (the sides) perpendicular to the large board. Use wood screws to fasten them securely, making sure they’re flush against the bottom.
- Add Stability: If you’re feeling fancy, you can add the two wooden dowels as supports on the sides. Just cut them down to size, drill holes into the sides, and insert. They’ll provide extra stability and a little extra flair.
- Smooth & Stain: Use sandpaper to smooth out all the edges and surfaces. If you want to give it a pop of color or keep it natural, apply your wood stain or paint for that polished look—you might find yourself doing this while singing an impromptu concert.
- Final Touches: Once everything is dry, place the bowls in their holes, and voila! Your raised feeding station is complete and ready for gourmet kibble or fresh water.
Optional Add-ons/Variations:
Get creative with this project. You can personalize it by choosing a quirky color or fun pattern for your stain or paint. Or, add a nameplate with your dog’s name for a special touch. Maybe include hooks on the side for leashes or treat bags. The possibilities are endless!
Pro Tip:
When you’re placing your feeding station, make sure it’s on a surface that’s easy to clean. Accidents happen; trust me, nothing pairs worse with dog food than grout lines ready to hold onto every bit of kibble. And for extra comfort, you may want to fit the bowls with rubber non-slip bottoms—this helps to keep the bowls steady and reduces those delightful “oopsies” that happen during enthusiastic meal times.
Now, grab your tools and let’s get crafting. Your best friend is waiting for a stylish upgrade to their mealtime routine. How awesome is that?
With a little time and effort, you’ll create something that looks great and makes your pup wag their tail with joy at every meal. Happy building!
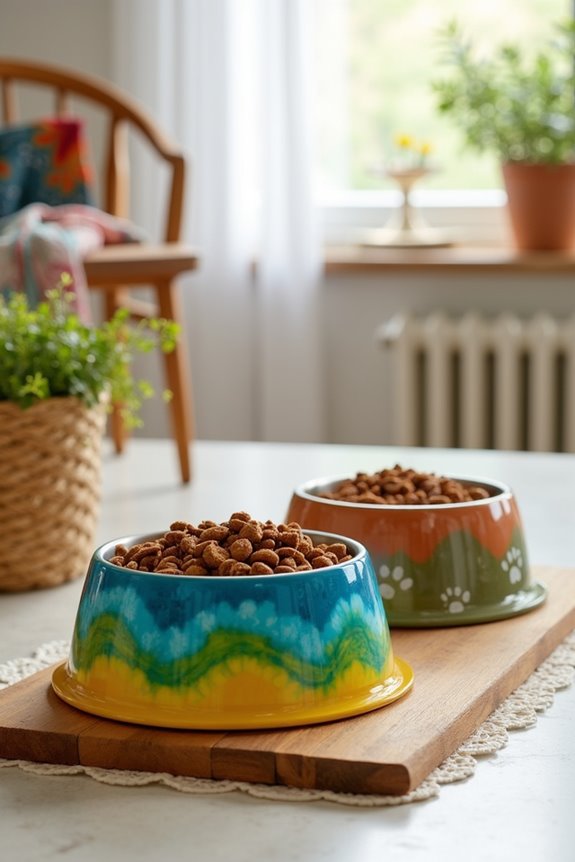
2. Paw-Print Etched Ceramic Bowls
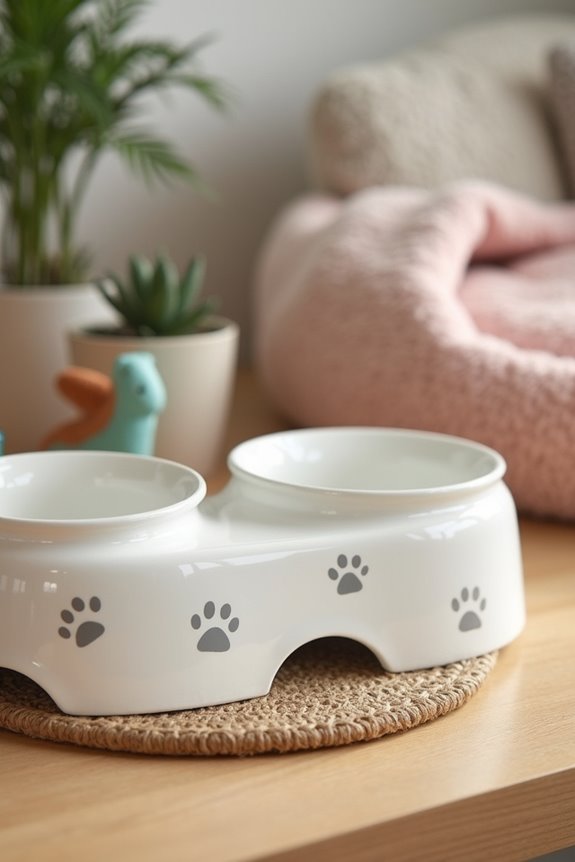
If you’re looking to add a personal touch to your dog’s dining experience, why not try making cute paw-print etched ceramic bowls? This simple DIY project not only looks adorable but also often proves to be a lot cheaper than those fancy store-bought options. Plus, your pup will enjoy eating from their very own custom bowls, and they’ll stand out beautifully in your home décor, much like bichon frise luxury supplies that elevate feeding experiences.
Materials Needed:
- Plain ceramic bowls (two or more, depending on your needs)
- Etching cream (like Armour Etch)
- Stencils of paw prints (you can find these online or create your own)
- Small paintbrush or sponge
- Masking tape
- Safety goggles
- Gloves (preferably rubber or latex)
- Scrub brush
- Water for rinsing
Step-by-Step Instructions:
1. Prep Your Area: Start by finding a clean workspace where you can let your creativity flow without worrying about the mess.
Don your safety goggles and gloves to keep your eyes and skin safe—safety first, right?
2. Apply the Stencil: Take your paw print stencil and place it onto the ceramic bowl.
Use masking tape to secure the edges, so it doesn’t budge during the next steps. Make sure to press it down firmly—nobody likes a rogue paw print.
3. Brush on the Etching Cream: Using your small paintbrush or sponge, carefully apply a thick layer of etching cream over the stencil.
Get it nice and even. Trust me, a thick layer is key here—think icing a cake, not painting a wall.
4. Wait Patiently: Here comes the hardest part (besides not eating the materials).
You’ll need to let the etching cream sit for about 15 minutes. Use this time to admire your work, brainstorm puppy names, or even plan your next Pinterest project (but try not to get carried away).
5. Rinse and Reveal: After the 15 minutes are up, it’s time for a reveal.
Carefully remove the stencil and rinse off the etching cream under running water. Use a scrub brush to get rid of any excess cream and reveal your beautiful paw prints. *Cue the triumphant theme music.*
6. Final Touches: Once the bowl is completely rinsed and dried, admire your custom creation.
Your dog is about to dine like royalty—and you can feel pretty proud, too!
Optional Add-ons/Variations:
If you’re feeling extra crafty, consider adding colors to your bowls using ceramic paint, or maybe even a fun name for your pup right under the paw prints.
Who wouldn’t love a “Finn’s Food” bowl? Go wild with patterns, or even mix and match sizes for variety!
Pro Tip:
For extra durability, bake your bowls in the oven after allowing the paint or etching cream to dry completely.
This helps set the design and makes your bowls more resistant to scratches. Just be sure to follow the specific instructions for your ceramic type.
And remember—puppy drool can’t be entirely avoided, but easy-to-clean surfaces can make life a little easier.
3. Personalized Stainless Steel Bowls
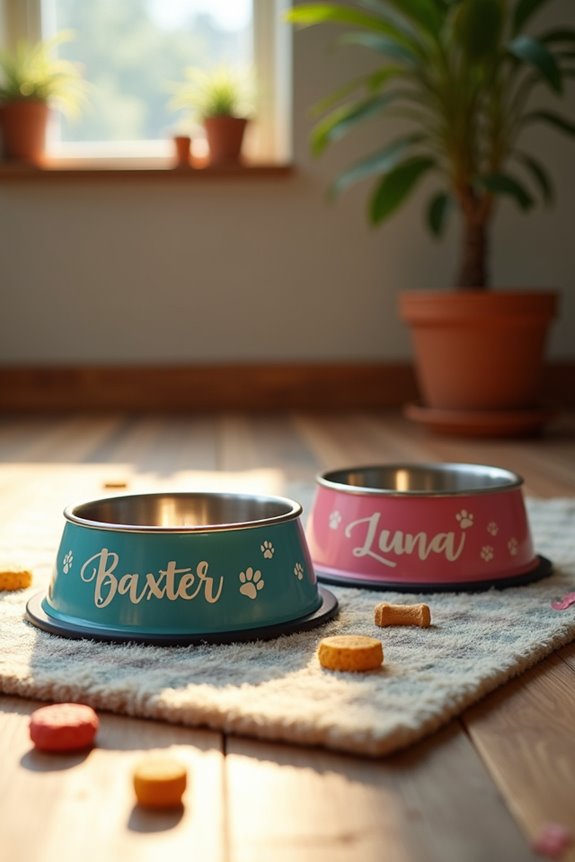
Are you tired of the plain and boring bowls that don’t quite reflect your pup’s personality? Let’s level up with this DIY project: personalized stainless steel bowls. A durable option that stands up to your dog’s enthusiastic eating, these bowls are easy to clean and, best of all, you can customize them to fit your style.
Not only does this save you money compared to buying fancy bowls, but it also adds a special flair to your home. Your dog deserves it!
Materials Needed:
- Stainless steel bowls (one or two)
- Food-safe paint or vinyl (make sure it’s dog-safe)
- Paintbrush or sponge applicator
- Stencil or vinyl cutter (for names and designs)
- Adhesive spray (if using vinyl)
- Clear sealant (optional, for extra durability)
Step-by-Step Instructions:
1. Choose Your Bowls: Start with some good-quality stainless steel bowls. They should be simple and smooth, which makes decorating easier. Remember, you want a surface that paints or vinyl can stick to well.
2. Design Your Look: Decide on the personal touch you want to add. Do you want your dog’s name in cute letters? Or maybe some fun designs to match your decor?
Sketch it out on paper first. Visualizing it helps—trust me, I once painted a bowl with a doodle that looked suspiciously like a potato.
3. Prepare the Surface: If you’re using paint, make sure to clean the inside and outside of the bowls thoroughly. Let them dry completely.
This step might seem boring, but it makes a world of difference in how well the paint adheres.
4. Apply the Design: Time to get crafty. If you’re using paint, carefully apply it with your brush or sponge. If you opted for vinyl, cut out your designs, peel off the backing, and stick them onto the bowl.
Use the adhesive spray if necessary to keep them in place. Oh, and avoid globbing on the paint—less is often more. It took me two tries to learn that by slathering on far too much paint and getting some seriously bizarre splatters.
5. Seal the Deal: If you want your design to last and withstand puppy chewing, consider spraying a clear sealant over your artwork to protect it.
Just make sure that it’s food-safe and follow the instructions on the product label.
6. Cure Time: Let your bowl dry and cure according to your paint or sealant’s instructions.
This waiting time can be hard, especially with your dog giving you the sad eyes, but it’s worth it.
7. Enjoy and Admire: Once everything is dry, give your pup a proper introduction to their new dining set.
Snap some pics because how cute is your dog eating from a bowl that shines their name?
Optional Add-ons/Variations:
Want to add a little flair? Consider using different colors or patterns for the letters on the bowl.
You could even opt for seasonal designs, like pumpkins for Halloween, snowflakes for winter, or bright summer flowers. Perhaps your dog would love a bowl with wavy lines—whatever fits their personality best.
Pro Tip:
Always double-check that any paint or vinyl you use is non-toxic and food-safe.
And for the love of all things dog, don’t forget to add a fun touch your pooch will appreciate, like a silly paw print or a heart!
4. Custom Painted Pet Bowls
Are you looking to transform your dog’s feeding area into a stylish showcase? Custom painted pet bowls could be just the solution you need! Not only do these bowls reflect your fur baby’s unique personality, but they also keep mealtime fun and visually appealing. Plus, it’s a fantastic way to save money while giving your home the extra touch of charm it deserves. Additionally, consider filling those bowls with high-quality premium dog food brands to enhance your dog’s nutrition and well-being.
Materials Needed:
- Two plain, stainless steel bowls
- Non-toxic, food-safe acrylic paint or ceramic paint
- Paintbrushes (various sizes)
- A palette or paper plate for mixing paint colors
- Painter’s tape (for clean edges)
- Design stencils (optional)
- Clear, food-safe sealant (for longevity)
Step-by-Step Instructions:
- Pick Your Bowls: Start with a pair of sturdy stainless steel bowls. Basic bowls work best, as they’ve a smooth surface for painting. Plus, they’ll hold up against your dog’s enthusiastic dining habits.
- Plan Your Design: Grab some paper and sketch out your ideas. Think of your dog’s name, fun patterns, or even small paw prints. My first attempt turned into a rainbow explosion that looked a bit like a misplaced art project. Don’t be afraid to experiment!
- Prepare for Painting: Clean the bowls with soap and water, then dry them thoroughly. This helps the paint stick better. If you’re using painter’s tape, apply it along the edges where you don’t want paint to go—think of it as your bowl’s stylish border.
- Start Painting: Now comes the fun part. Use your paintbrush to apply your chosen colors. If you’re feeling bold, try layering colors for depth. I remember my first try; I painted with such enthusiasm that my entire kitchen ended up with multicolored splatters. Keeping a drop cloth handy is always a smart move!
- Let It Dry: Once you’ve painted your masterpiece, set the bowls aside to dry completely—this could take a few hours. Resist the urge to pick them up; the anticipation will only make the reveal sweeter.
- Seal the Deal: After your bowls are dry, protect your artwork with a clear sealant that’s safe for food. This extra step will keep the designs intact, even if your pup decides they’re a little too scrumptious to resist nibbling on.
- Time to Shine: Once the sealant is dry, place the bowls in your pet’s favorite feeding spot. Enjoy watching your furry friend chow down from a bowl that not only serves a function but also adds flair to your home.
Optional Add-ons/Variations:
Want to take it a step further? Consider using multiple colors for a vibrant, tie-dye effect. Or, for a more rustic feel, try painting designs in earthy tones and using stencils of leaves or paw prints instead of freehand. The possibilities are nearly endless!
Pro Tip:
Always double-check that the paint and sealant are food-safe. Have you ever seen your dog try to eat something they shouldn’t? Let’s not give them a taste of toxic paints or harmful chemicals.
And, if you want a cost-saving tip, check for multi-use paint sets at craft stores—they often include great colors for a fraction of the price!
In a world full of basic pet supplies, let these custom painted bowls tell your dog’s story. Happy crafting!
5. Magnetic Bowl Holders
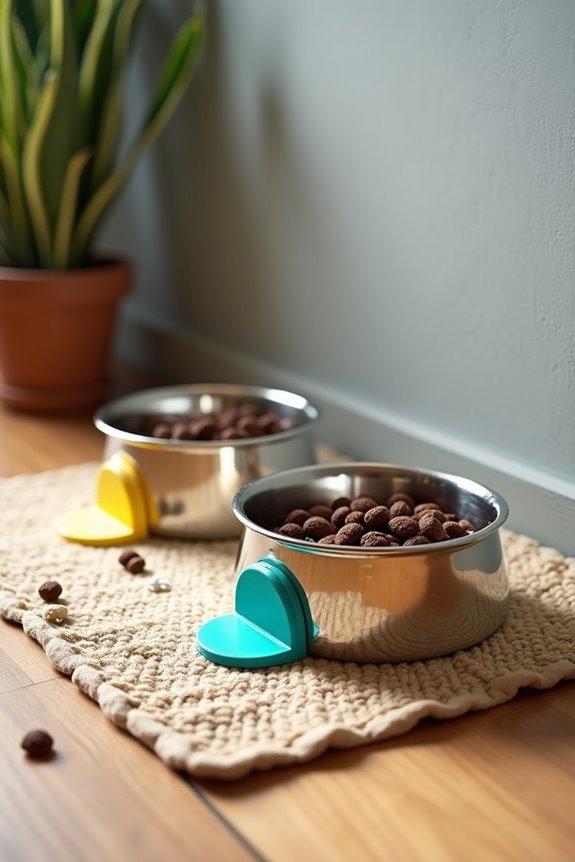
Have you ever experienced the frustration of your dog pushing their food bowl all around the floor during dinner time? It’s time to put that hassle to rest with magnetic bowl holders! These clever gadgets securely keep your dog’s bowls in place, allowing them to enjoy their meals without making a mess. Not only does this save you the headache of cleanup, but it also enhances your dog’s eating experience while giving your home a polished look. Additionally, using premium dog supplies can elevate your pet’s feeding area.
Materials Needed:
- Two stainless steel dog bowls (or more, depending on your needs)
- Two strong, food-safe magnets (available at craft stores or online)
- Heavy-duty adhesive (like E6000 or super glue)
- A cutting mat or piece of cardboard (for working)
- Painter’s tape (optional, for securing)
Step-by-Step Instructions:
- Gather Your Bowls: Start with clean and dry stainless steel bowls. Easy to grip, incredibly durable, they’re ideal for this project. You won’t want any bowls that are too flimsy. Trust me, my first attempt involved a light plastic bowl that ended up airborne during dinner!
- Prepare Your Magnets: Choose strong magnets that can hold the weight of the bowl full of food and water. The last thing you want is a magnet that gives up midway through a meal. Make sure they’re safe for food contact, just to be on the safe side.
- Attach the Magnets: Apply a liberal amount of heavy-duty adhesive to the bottom of each bowl. Stick the magnet onto the adhesive. For extra security, you can place painter’s tape on the magnet to hold it in place while it dries. Let it cure according to the adhesive instructions; this usually takes at least 24 hours.
- Prepare the Surface: If you’re placing the bowls on a mat or a specific area, make sure it’s clean and dry. You want to create a nice little spot for your pup, not a chaotic one.
- Positioning Time: Decide where you want the bowls to go. It could be on a feeding mat or straight on the floor. Place the bowls down gently, and watch as they cling firmly to the floor without any fuss.
- Test Them Out: Give it a test run! Normally, my dog would nudge and slide his bowl in delight, but now? It’s a meal-time miracle.
Optional Add-ons/Variations:
- Colorful Magnets: You can even paint the magnets with non-toxic paint to match your home décor or your pet’s personality. Just remember to verify the paint is completely dry and safe before placing it near food.
- Decorative Bowl Mats: Take it a step further by adding a cute mat under the bowls to catch any stray kibble or water splashes. You can sew one with fun fabrics you love, or just buy pre-made ones—easy-peasy!
Pro Tip:
Verify the adhesion is strong by closely following the instructions on the adhesive you choose. Safety first, right? Also, consider using non-slip mats under the bowls if they’ll be placed on tiles or wood floors. This tiny detail can add extra stability for your dog during mealtimes, preventing slipping and sliding, which equals a happier pup and a tidier home!
Now you’re all set to create a stylish and functional feeding station that you and your pet will love. Happy DIY-ing!
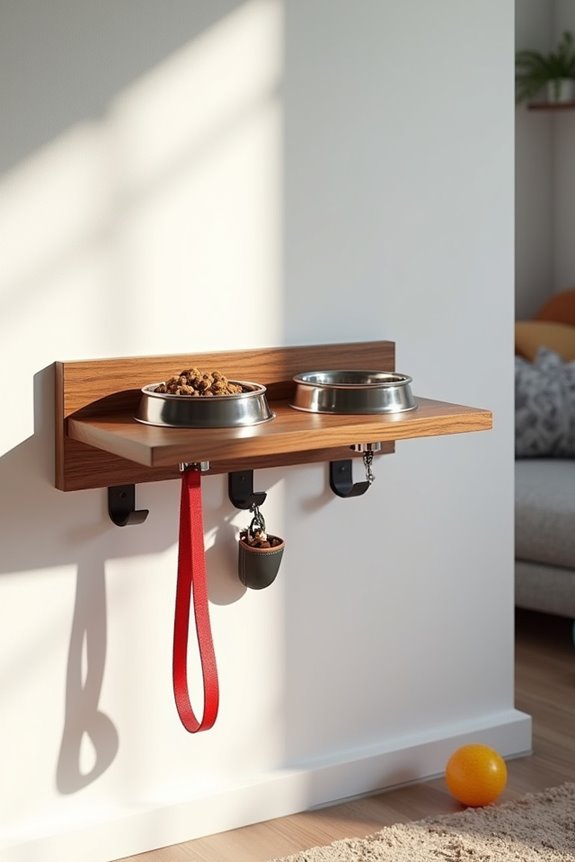
6. Wall-Mounted Feeding Station
Materials Needed:
- A sturdy wooden shelf (size varying based on your space and dog’s needs)
- Two stainless steel dog bowls (appropriate for your dog’s size)
- Four wall brackets (to secure the shelf)
- Screws and wall anchors (for installation)
- Drill
- Measuring tape
- Level
- Pencil
Step-by-Step Instructions:
1. Measure and Mark: Start by deciding where you want to place the feeding station. Use a measuring tape to find an appropriate height for your dog, marking the position with a pencil.
For my pup, I found that about 12 inches off the ground is ideal – just high enough to avoid a messy splash zone.
2. Install the Wall Brackets: First, line up the brackets on the wall at your marked height. Use a level to verify they’re even, then mark the screw holes with your pencil.
Drill holes for the wall anchors, then insert them. Finally, attach the brackets securely to the wall using screws, verifying they’re firmly in place.
3. Attach the Shelf: With the brackets installed, it’s time to place the shelf on top. Make sure it sits snugly on the brackets, so there’s no wiggle.
Check again with the level – nothing says “professional” like a perfectly aligned shelf, and we definitely don’t want it to look like an amusement ride for your dog.
4. Position the Bowls: Place the stainless steel bowls onto the shelf. Space them apart based on your dog’s feeding habits—some dogs prefer their food and water closer together, while others like them a little on the side.
Just remember, less mess means fewer trips to the mop.
5. Test the Setup: When everything’s lined up and securely placed, try it out with your pup! It’s best to supervise the first mealtime just to verify everything feels right for your furry friend.
My dog took to his new station like a pro; all I needed was a picture of his delighted face.
Optional Add-ons/Variations:
– Personalized Finish: Give your feeding station a pop of personality by painting or staining the shelf in a color that matches your home decor or your dog’s toys.
You could even stencil their name on the front. Just remember to use non-toxic finishes.
– Extra Storage: Consider adding hooks underneath the shelf for leashes or treats, making the feeding station a one-stop spot for everything your pup needs.
Pro Tip:
Always double-check that your wall brackets can support the weight of the shelf plus the bowls filled with food and water.
You don’t want an unexpected collapse during dinner time. Reinforcement is key if your dog is a little on the heavier side. Adding extra screws or using sturdier brackets can help guarantee your DIY feeding station stays rock solid.
Creating this wall-mounted feeding station not only keeps your space tidy but also provides a customized dining experience for your dog. An outdoor dog washing station can complement your dog care setup, ensuring both feeding and cleaning are effortlessly integrated. Happy building!
7. Pet-Friendly Waterproof Mat
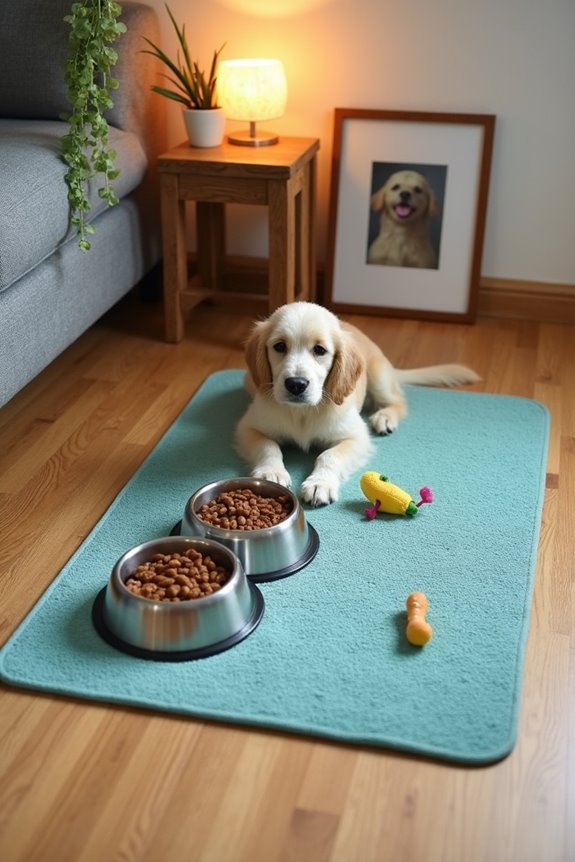
If your doggo is like mine, meal times can be a whirlwind of fur, food, and maybe a bit too much excitement. A pet-friendly waterproof mat isn’t just a practical solution; it’s a stylish way to keep the feeding area neat and tidy. Not only does it protect your floors, but it also makes clean-up a total breeze.
And let’s face it—who doesn’t want to spend less time scrubbing floors and more time playing with their pup?
Materials Needed:
- Waterproof pet mat (available at pet stores or online)
- Soft scrub brush (for easy clean-up)
- Dish soap (preferably biodegradable)
- Measuring tape (to fill available space)
- Scissors (if cutting the mat to size)
Step-by-Step Instructions:
- Choose the Right Spot: Decide where your dog usually eats. This could be the kitchen, dining area, or a cozy nook. Measure the space to guarantee your mat fits perfectly without leaving any excess room for messes to escape.
- Select a Mat: Consider purchasing a waterproof mat from your favorite pet supply store. Look for one that’s not only functional but also complements your home decor. You want your pup’s dining area to look appealing, not like a doggy disaster zone.
- Check the Fit: Before placing the mat down, lay it out in the chosen spot to see how it looks. If it’s too large, carefully trim it down to size with scissors. Just remember, less is more—no need to accidentally create a DIY booby trap for your dog.
- Place it Down: Now, put the mat in the designated area and confirm it’s flat and secure. No wobbly corners, please. If your dog likes to excitedly get up and down, you want to prevent any slips and slides.
- Position the Bowls: Set your dog’s food and water bowls back on the mat, confirming they’re settled and stable. Make sure there’s enough room around the bowls for your pup to dig in without stepping outside the safe zone.
- Test it Out: Time for the real test—bring your dog to the mat and let them enjoy their meal. Supervise the first feeding so you can see how everything holds up. Watching them enthusiastically munch away is pretty heartwarming—especially when there’s no mess to clean up afterward.
Optional Add-ons/Variations:
- Custom Colors: If you’re feeling crafty, consider painting or dyeing the mat to match your home’s color scheme. Just be sure to use pet-safe materials. A colorful personality for the mat can make feeding time feel more special.
- Personal Touch: Add a fun design with some fabric paint, like paw prints or your pup’s name. It’s a cute way to show off your love for your furry friend—plus, serious style points will be awarded.
Pro Tip:
Invest a bit in high-quality waterproof mats. They might cost more upfront, but they save you from constantly replacing cheaper options.
Also, when it comes to cleaning, a quick wipe with a damp cloth and a gentle scrub with warm, soapy water will keep it fresh. Who knew keeping things clean could be so easy and fun?
Now, you’re one step closer to a fuss-free feeding area that looks as good as it’s functional. Enjoy the extra time with your pup instead of mopping up their mess!
Extra Tips & Ideas
While you’re crafting the perfect feeding station for your furry friend, don’t forget that a few extra touches can really elevate the whole setup. Think about adding some fun decals or personalized name tags. You could even paint the bowls to match your home decor.
Ever tried a raised feeder? It helps with your pup’s posture and adds a bit of flair.
Have some leftover wood? Consider a small shelf for treats or toys—it keeps things tidy and organized. If your dog’s a messy eater, why not stash some wipes nearby for quick clean-ups? Trust me, you’ll thank yourself later.
With a little creativity, you’ll have a feeding station that’s not only functional but also a charming part of your home.
Frequently Asked Questions
Can I Use Recycled Materials for My Dog Feeding Station?
Yes, you can definitely use recycled materials for your dog feeding station! Old furniture, crates, or bowls can be repurposed, making it eco-friendly and unique. Just make sure everything’s safe and suitable for your furry friend!
How Do I Choose the Right Height for My Dog Feeder?
When it comes to choosing the right height for your dog feeder, you’re walking a tightrope. Measure your dog’s shoulder height, and guarantee the feeder aligns with it, making mealtime comfy and enjoyable for your furry friend.
What Types of Food Bowls Work Best for DIY Feeders?
Stainless steel bowls work best for DIY feeders since they’re durable and easy to clean. You could also consider ceramic or elevated bowls for aesthetic appeal, but make sure they’re suitable for your dog’s size.
How Can I Decorate My Dog’s Feeding Station?
You can decorate your dog’s feeding station with colorful mats, personalized bowls, and wall art featuring your pup’s photos. Adding themed toys or plants nearby can enhance the space, making it vibrant and inviting.
Are There Any Safety Concerns With DIY Feeding Stations?
Yes, there’re safety concerns with DIY feeding stations. Guarantee materials are non-toxic and stable, preventing tipping. Avoid sharp edges and small parts your dog could ingest. Regularly check for wear to keep your pup safe.
Conclusion
In the grand scheme of life, a dog’s happiness is only a bowl away. With these creative DIY ideas, you can turn mealtime into a joyful experience for your pup and a delightful spot in your home. So, roll up your sleeves, grab those tools, and let your imagination run wild. After all, a little effort goes a long way in crafting a feeding station that shows off both style and love. Your furry friend deserves it, don’t they?