Imagine turning that messy dog bath time into a breeze with a DIY dog washing station in your backyard. It sounds great, right? You can customize it just the way you want, from the rustic charm of pallet wood to features like a dog-friendly showerhead—because let’s face it, no one wants to wrestle a wet pup. So, where do you even start? Let’s explore the essentials for creating this perfect wash station together.
Pallet Wood for Rustic Charm
When you think about building a DIY dog washing station, have you ever considered using pallet wood? It’s the perfect choice for achieving that charming rustic aesthetic.
With its weathered look and unique texture, pallet design adds character to your outdoor space. You can easily find reclaimed pallets at stores or online. Just gather ’em up, and you’re off to the races.
Sand down any rough spots to avoid splinters—trust me, Fido doesn’t need any extra ouchies during bath time. You can create a sturdy base, maybe adding a simple fence for containment.
Plus, it’s an affordable way to craft something unique. With a little creativity, your dog washing station can become a delightful spot, all thanks to the beauty of pallet wood.
Our Collection
When you’re setting up your DIY dog washing station, think about what’ll make the experience smooth for both you and your pup.
Imagine a dog-friendly showerhead that adjusts to just the right height, non-slip flooring to avoid those comical slip-and-slide moments, and, of course, a fenced area for your furry friend’s privacy.
Plus, built-in storage for all those shampoos and towels means you won’t be scrambling like a chicken with its head cut off when it’s bath time.
1. Dog-Friendly Showerhead Option
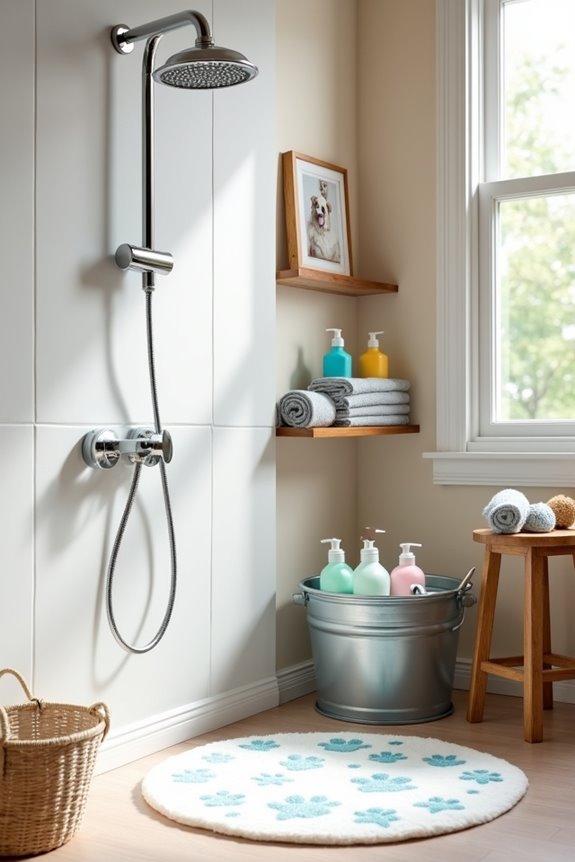
What if I told you that giving your furry friend a bath could be less messy and a whole lot more fun? A DIY dog washing station featuring a dog-friendly showerhead is just what your home needs. Not only does it save you the hassle of messy bath times, but it also adds a touch of comfort for your pup and elegance to your bathroom. Plus, who doesn’t want to turn their home into a spa for their dog? Plus, you can enhance the experience further with premium dog food packages that make bath time even more rewarding.
Materials Needed:
- Adjustable showerhead (preferably high pressure for a quick rinse)
- Shower hose (make sure it fits with your existing plumbing)
- Shower diverter if necessary (to switch water flow)
- Basic hand tools (like a wrench and pliers)
- Teflon tape (to prevent leaks)
- Bucket or storage bin (for collecting dog goodies)
- Anti-slip mat (for the dog’s comfort)
Step-by-Step Instructions:
- Turn Off the Water: Safety first! Locate your water shut-off valve and turn it off. No one wants a surprise shower while working on this project—you can thank me later.
- Remove Existing Showerhead: Use your adjustable wrench to unscrew your old showerhead. Be careful; some water might drip out, so have a towel handy.
- Attach New Showerhead: Wrap Teflon tape around the threaded end of your shower hose and screw your new showerhead onto it. Make sure it’s snug, but don’t go Hulk on it; just hand-tighten it.
- Connect the Hose: Attach the free end of the hose to your shower pipe. Again, use Teflon tape for a snug and leak-proof fit, and secure it gently with your wrench.
- Test It Out: Turn the water back on slowly. Watch for leaks; adjust the connections as needed. This is the moment of truth, so don’t hold your breath.
- Set Up a Dog Area: Place the anti-slip mat in your bathing space, fill your bucket with dog shampoo and brushes, and keep some towels nearby for drying. Set the mood with some soft music—it’s spa day after all.
- Introduce Your Dog: Bring your pup to the station, and let them sniff around. Turn on the showerhead at a low-pressure setting for their initial introduction. With a little coaxing (and maybe a treat or two), your dog will be ready for bath time.
Optional Add-ons/Variations:
- Think about swapping the color of your showerhead to match your bathroom décor. A pretty brass finish? Or how about a trendy matte black look? It can be fun.
- Want to get creative? Personalize your anti-slip mat with your dog’s name or fun paw prints. You could even paint or stencil on the bucket to give it some flair.
Pro Tip:
Consider using a handheld showerhead instead of a fixed one. This way, you can aim the water just where it’s needed (bubbles, beware). Also, it’s easier to control the water pressure to make bath time less intimidating for your four-legged friend. And trust me, your back will thank you too after years of leaning down awkwardly.
2. Adjustable Height for Convenience

Have you ever found yourself bending too low or straining your back while washing your dog? It’s like trying to do squats while wrestling a wet noodle. An adjustable height for your DIY dog washing station is a game-changer, making bath time easier on you and more enjoyable for your pup. Plus, having access to luxury dog collars can add a stylish touch to your furry friend’s look after bath time.
With the ability to customize the height, you’ll save yourself from unnecessary aches and pains, making this simple addition truly invaluable for dog owners.
Materials Needed:
- Adjustable shower riser (these typically fit with shower heads)
- Mounting brackets (to secure the riser)
- Screwdriver (for installation)
- Level tool (to verify it’s straight)
- Measuring tape (to get the height just right)
- Anti-slip mat (optional, for extra comfort)
Step-by-Step Instructions:
- Gather Your Materials: Make certain you have all your supplies ready. Grab your adjustable shower riser, brackets, and tools.
- Measure the Ideal Height: Before getting started, measure how high you’d like the showerhead to be. Consider your height as well as your pup’s. Think about how you want to comfortably wash them without bending too low.
- Mark the Wall: With your measuring tape, mark where you want to mount the adjustable riser on your shower wall. It should be at a height that’s easy for you to reach while standing. That’s important, trust me.
- Install the Brackets: Using your screwdriver, attach the mounting brackets to your wall at the marked spots. Make sure they’re level; no dog wants a shower with a slope, right?
- Attach the Adjustable Riser: Follow the manufacturer’s instructions to secure the adjustable riser at the preferred height. This part is usually quite straightforward, just slide it into place and lock it down.
- Add the Showerhead: If you haven’t done it yet, now’s the time to attach your dog-friendly showerhead to the top of the adjustable riser.
- Test the Height: Give it a run! Adjust the height and see how it feels. Does it work well for you and your pup? Make any necessary tweaks to guarantee maximum comfort.
Optional Add-ons/Variations:
- Want to spice things up? Consider painting the mounting brackets in a color that complements your bathroom’s theme. You could go bold with a splash of color or keep it chic with classic white or black.
- If you’re feeling crafty, you could use decorative adhesive vinyl on the riser or create a custom holder for dog shampoo and tools at the base, elevating both functionality and aesthetics.
Pro Tip:
Always keep a spare towel within reach. You never know when a sudden doggy shake will occur, and trust me, your bathroom walls will thank you for being prepared.
Plus, it saves you from those surprise puddles that magically appear just when you think everything is under control.
3. Non-slip Flooring Material
Creating a DIY dog washing station is a fantastic way to bond with your furry friend, but don’t forget to think about the flooring. Non-slip flooring is vital for your dog’s safety during bath time, especially when they’re wet and slippery like a fish out of water. Plus, having a durable and easy-to-clean surface saves you time on post-bath clean-up, making this DIY project a true win-win.
Materials Needed:
- Non-slip vinyl flooring or rubber mat (choose a material that’s water-resistant)
- Measuring tape (to get your area right)
- Utility knife (for cutting the flooring to size)
- Adhesive (if needed) (verify it’s suitable for wet environments)
- Roller or flooring squeegee (to smooth things out)
- Floor cleaner (to keep it sparkling clean)
Step-by-Step Instructions:
- Measure the Area: Utilize your measuring tape to find out the dimensions of the washing station area. Measure twice, cut once, right?
- Choose Your Flooring: Pick a non-slip flooring material. Vinyl flooring is often a great choice because it’s water-resistant and easy on the paws.
- Cut the Material: Using your utility knife, cut the flooring material to fit the measured area. Be careful! We don’t want any “oops” moments where you take off a finger instead of just cutting the floor.
- Clean the Surface: Before applying the flooring, make sure the surface underneath is clean. This not only helps with adhesion but also makes sure your dog isn’t slipping on dirt.
- Adhere the Flooring: If your flooring requires adhesive, spread it evenly across the area and then lay down your cut piece of flooring. If using adhesive isn’t necessary, just place the mat where it belongs.
- Smooth It Out: Use a flooring roller or a squeegee to eliminate any air bubbles and validate it’s fully adhered. You want it stable, so your pup feels secure!
- Let It Set: If you used adhesive, give it some time to set according to the manufacturer’s instructions before the first wash. It’s like waiting for cookie dough to chill – hard, but necessary.
Optional Add-ons/Variations:
- Feeling adventurous? Consider adding a fun pattern to your flooring. Some non-slip vinyl options come in colorful prints or textures that can jazz up your washing station. It can go from functional to fashionable in no time.
- For extra comfort, add a soft, washable mat on top of the flooring where your pup stands. Choose a playful color or design that matches your space to tie everything together.
Pro Tip:
Always opt for flooring that has a textured surface to enhance grip, especially when it’s wet. This not only keeps your pup safe but also reduces the chance of slipping accidents for human bathers too, especially if you’re a clumsy one like I am.
Plus, consider adding a towel rack nearby for quick drying post-bath – nothing beats a snuggly dog wrapped in a warm towel.
4. Fenced Area for Privacy
Setting up a fenced area for your DIY dog washing station is more than just about keeping your pup secure; it’s about giving them a space that feels private and safe during bath time. What’s better than having a little spot where they can feel at ease, even when they’re being scrubbed like a dirty dish?
Plus, a fenced area keeps your fur baby contained while you tackle the messy business of washing, guaranteeing a better experience for both of you. Let’s turn that backyard into a comforting oasis for bath day. Additionally, consider incorporating luxury pet ramps and stairs to enhance your pet’s comfort as they enter or exit the washing station.
Materials Needed:
- Dog-safe fencing (wood, vinyl, or chain link – your pick)
- Measuring tape (to mark your territory)
- Post hole digger (or a shovel for the old-school vibe)
- Wooden posts or fencing panels (whatever suits your style)
- Screws or nails (to keep everything together)
- Level (so your fence doesn’t look like it’s had a rough day)
- Gate hardware (for easy access)
- Gardener’s gloves (because splinters aren’t your friend)
- Eye protection (safety first – especially when digging)
Step-by-Step Instructions:
- Measure Your Space: Grab that measuring tape and mark out where you want your fenced area. Think about how much room your pup will need to maneuver. A little extra space never hurt anyone.
- Choose Your Fencing Style: Decide what type of fence you want. Wood looks great but needs a little TLC; vinyl is easy-peasy; chain link is durable—there’s an option for every need.
- Dig the Holes: Using a post hole digger, create holes for your fence posts. Keep them deep enough (around a foot or so) to make sure your fence stays upright and proud.
- Set the Posts: Place your wooden posts or panels in the holes. Use the level to validate you’re not working with a wobbly fence. Throw in some gravel for stability—because who likes a shaky fence?
- Secure Everything: Fasten the posts together with screws or nails. Consider putting up a cross brace for extra support if your pup is particularly enthusiastic.
- Install the Gate: Don’t forget about access. Put your gate in place using the hardware, and double-check that it swings open easily. You don’t want to feel like you’re wrestling with a stubborn door while trying to get your dog in or out.
- Decorate (Optional): Got some leftover paint or fun stickers? Add a personal touch to your fence! It could be a design that matches your home or just a fun splash of color—your dog will appreciate the extra flair.
Optional Add-ons/Variations:
- For a pop of personality, consider using colorful panels or vinyl decals that match your dog’s personality. Maybe a whimsical dog bone graphic or your pup’s name? It’s a great way to show off your creativity.
- Another option is to create a shaded area within your fenced space with a small canopy or some potted plants. It gives them a comfy spot when they’re not getting their wash and makes the overall area more inviting.
Pro Tip:
Before starting, check with your local regulations about fence height and spacing. Some neighborhoods have rules about how tall or how close to the property line your fence can be.
Save yourself the headache of redoing your hard work just because you forgot about the rules. Plus, consider the materials’ durability based on your local climate—you want your fence to last as long as your dog’s enthusiasm for bath time.
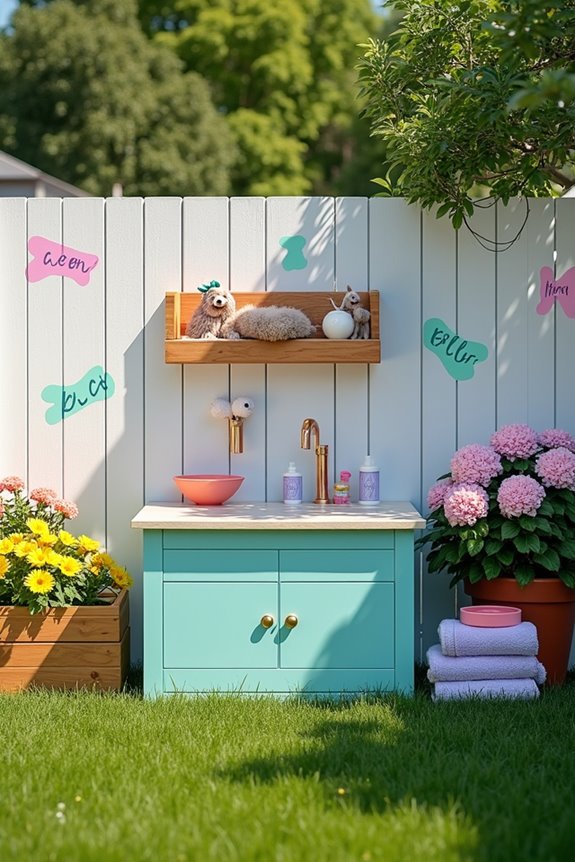
5. Built-in Storage for Supplies
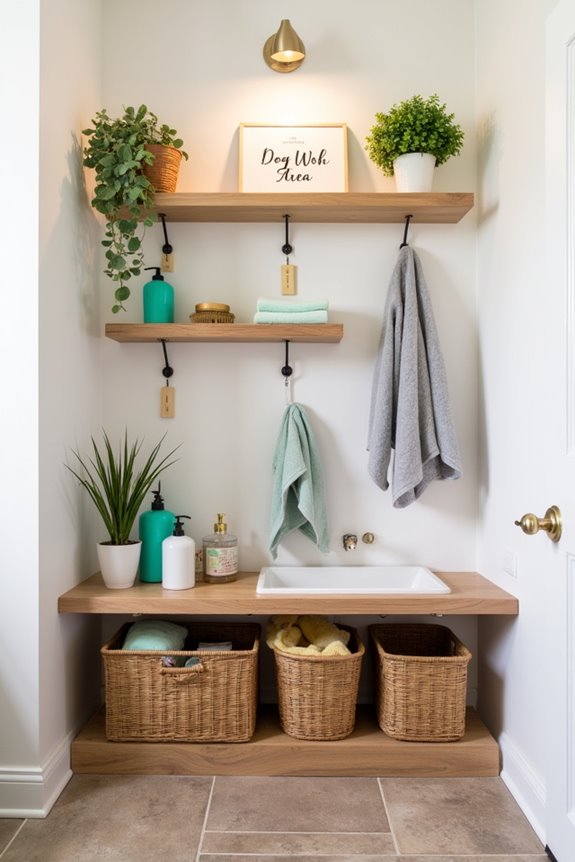
Creating a built-in storage solution for your dog washing station is a game-changer for any dog owner. Not only does it help you keep all those grooming supplies organized and within reach, but it also converts a cluttered corner into a neat, stylish area that complements your home. Who wouldn’t want an easy way to access shampoos, brushes, towels, and treats, all while making bath time smoother for both you and your furry friend? Additionally, incorporating a dog food storage cabinet can enhance the functionality of your pet care area.
Let’s immerse ourselves in this fun DIY project that brings both functionality and flair to your dog washing station.
Materials Needed:
- Wood boards (for shelves and framing)
- Wood screws (to keep it all sturdy)
- Drill (for all those drilling needs)
- Saw (if you need to cut boards to size)
- Measuring tape (for measuring twice, cutting once)
- Sandpaper (to smooth out rough edges)
- Paint or wood stain (for that personal touch)
- Wall anchors (if you’re securing to drywall)
- Storage baskets or bins (for easy organization)
- L-brackets (for added shelf support)
Step-by-Step Instructions:
- Plan Your Design: Take a moment to sketch out your storage layout. Decide how many shelves you want and where they’ll go. Consider your most used items—those should be at arm’s reach.
- Measure and Cut the Wood: Using your measuring tape and saw, cut the wood boards to your desired lengths. Remember, accuracy is key; there’s no one-size-fits-all when it comes to your space.
- Sand the Edges: Grab that sandpaper and smooth out all the edges of the cut wood. This not only prevents splinters but also gives your storage a polished look.
- Install the L-brackets: Attach the L-brackets to the wall at your marked spots, making sure they’re level. Use wall anchors if you’re mounting to drywall—nobody wants a shelf coming down mid-bath!
- Attach Your Shelves: Place the wood boards on top of the L-brackets and secure with screws. If possible, add a few more brackets in between for additional support, especially if you’re planning to store bulky items.
- Add Storage Baskets or Bins: Now, it’s time for the fun part! Divide your supplies into attractive storage baskets or bins that fit your shelves. If your dog has a favorite shampoo or if your wipes always go missing, this is a great way to keep everything organized.
- Personalize It: Give your storage space a little flair with paint or wood stain. You can even label baskets for easy identification, making it simple to grab what you need when it’s go time for bath time.
Optional Add-ons/Variations:
- Color it Up: Use cheerful colors to paint your shelves, or opt for a fun pattern if you’re feeling adventurous. Maybe even try out chalk paint for that extra customizable, artsy vibe!
- Styling with Plants: Add some low-maintenance indoor plants or dog-safe herbs on top of your storage. Not only do they provide a pop of color, but they also improve the air quality around your washing station.
Pro Tip:
When installing your storage, consider including a designated spot for a towel or bathrobe. This simple addition can make the shift from bath time to cuddle time a breeze, keeping your pup cozy and dry while you tackle the cleanup.
With a little effort and creativity, this built-in storage solution will turn your dog washing station from a chaotic experience into a charming and organized retreat for you and your furry friend.
6. Water Drainage System Design
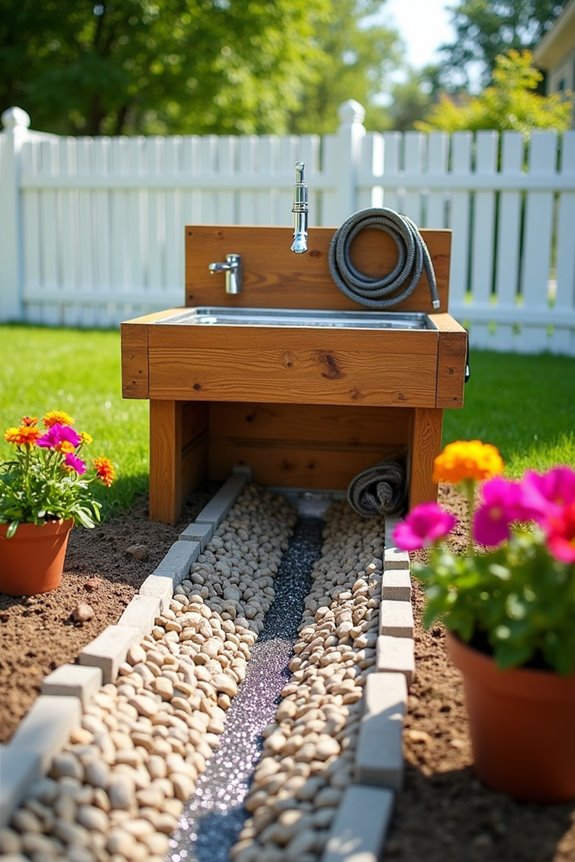
If you’ve ever experienced a mini lake forming in your yard after giving your dog a bath, you know just how critical a good drainage system can be for your DIY dog washing station.
This project helps prevent that slippery mess and keeps your washing area tidy, guaranteeing your furry friend stays clean and your yard stays dry. Plus, it saves a lot of heartache—and water—by reducing the chances of slippery spills. Additionally, considering interactive training gear can enhance your dog’s bathing experience, making them more comfortable during the process.
Materials Needed:
- PVC drainage pipe (to channel water away)
- Shovel (for digging)
- Drainage gravel or stones (to help with filtration)
- Landscape fabric (to keep dirt from filling in the drain)
- Connectors and elbows (to create a proper water flow path)
- Bucket (to collect excess water)
- Hose (for connecting to your washing station if needed)
Step-by-Step Instructions:
- Plan Your Layout: Before you start digging, take some time to map out where the water will flow. Aim for a slope leading away from your washing area to guarantee effective drainage.
- Dig the Trench: Using your shovel, dig a trench where you’ve marked the drainage route. Aim for about 6-12 inches deep, or enough to bury the PVC pipe and let gravity do its work.
- Add the Gravel: Pour a layer of drainage gravel or stones at the bottom of your trench. This will help absorb some water and create a pathway for it to flow away from your dog washing station. Think of it as the drainage system’s cozy foundation.
- Lay the Pipe: Carve out a path for your PVC drainage pipe, fitting it on top of your gravel layer. If you have any bends or dips in your layout, use connectors and elbows to keep things moving in the right direction—much like trying to navigate a crowd at the dog park.
- Cover with Landscape Fabric: Lay down landscape fabric over the pipe. This will prevent dirt and debris from clogging up your drainage system, making certain your flow remains clear.
- Fill in the Trenches: Gently pour more gravel or dirt over the fabric to finish filling in the trench. Pat it down lightly to create a smooth surface, but avoid compacting it too much. You want to leave space for future debris to settle.
- Test Your System: After everything’s covered up, give your washing station a test run. Turn on the water and see how it drains. Check for any puddles and adjust your trenches as needed. A little fine-tuning can make all the difference, much like how a good dog trainer adjusts their tactics.
Optional Add-ons/Variations:
Feel free to get creative with your drainage system. For a more aesthetic touch, consider using decorative stones instead of standard gravel.
You can also paint your PVC pipe to match your dog washing station’s decor—because who says plumbing can’t be pretty?
Pro Tip:
If you’re aiming for an eco-friendly approach, consider using a rainwater collection system combined with your drainage setup.
It’ll reduce water waste and keep your plants happy too. Just make sure to keep a bucket nearby to catch any water that tries to escape unexpectedly—because let’s be honest, things can get a bit messy out there.
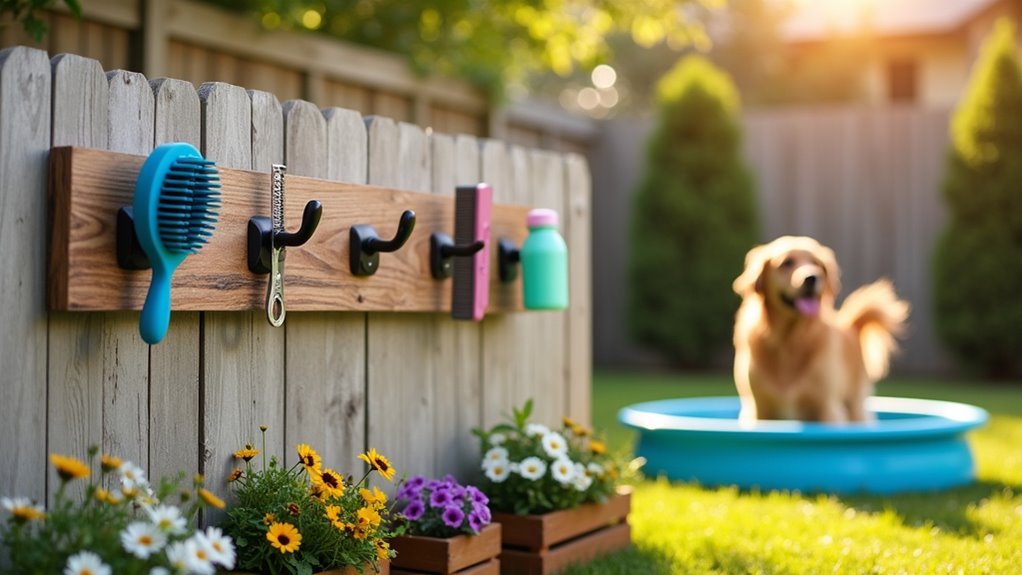
7. Grooming Tool Hooks
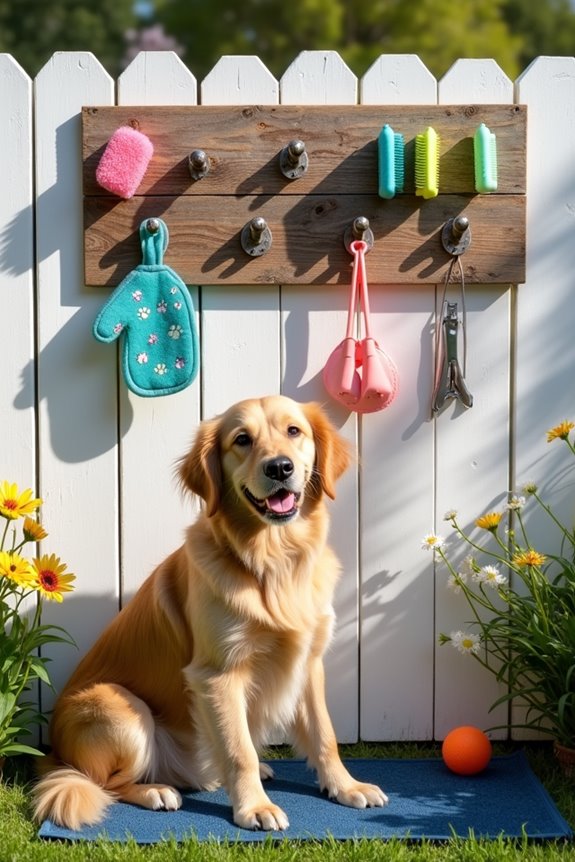
If you’re a dog owner, you know that grooming can get a bit chaotic. Fur everywhere, brushes scattered about, and a serious lack of organization. Enter the DIY grooming tool hooks. This simple project can transform your grooming routine, keeping your tools neatly hung and easily accessible. No more fishing through drawers or losing your favorite brush—just smooth sailing (or should we say brushing) ahead. Not only does it save you time, but it also adds a dash of charm to your grooming station.
Materials Needed:
- Wood board (about 1 x 6 inches, and the length is up to you)
- Hooks (small utility hooks work great)
- Screws (appropriate size for your hooks)
- Drill (or screwdriver if you’re feeling adventurous)
- Sandpaper (for a smooth finish)
- Paint or stain (optional, for aesthetics)
- Measuring tape (to get it just right)
- Pencil (for marking positions)
Step-by-Step Instructions:
- Choose Your Board: Pick out a piece of wood that fits your style and available wall space. If you want a rustic look, reclaimed wood could add a beautiful touch.
- Prep the Wood: Use sandpaper to smooth the edges and surface of your board. This way, you won’t accidentally snag your hand on a rough edge. Ouch!
- Plan Hook Placement: Measure and mark where you want to place your hooks on the board. Leave enough space between each hook so that your tools don’t get all tangled up—trust me, no one wants a hairbrush in an embrace with a nail clipper.
- Drill in Hooks: If you’re using a drill, pre-drill holes for your screws to make it easier. Secure your hooks in place according to the markings you made. If you’re feeling crafty and adventurous, you can stagger them for a fun look.
- Finish the Board: If you want a pop of color, now’s the time to paint or stain your board. Let it dry completely so it looks sharp and is free of smudges. This step is optional, but a little flair never hurts anyone.
- Hang It Up: Find a spot near your grooming area to hang your newly crafted hook board. Use screws or heavy-duty adhesive strips to make certain it’s secured. Imagine how great it will feel to see all your grooming supplies neatly displayed.
- Organize Your Tools: Finally, hang your grooming tools! Take a moment to admire your work. Doesn’t it feel rewarding to see everything organized just the way you want?
Optional Add-ons/Variations:
- You could paint your board in bright colors or with fun dog-themed designs for a playful touch. A dog paw print motif might just be the perfect accent!
- For a rustic vibe, try using twine or rope hooks instead of traditional metal ones.
Pro Tip:
To guarantee your hooks hold up over time, consider using heavier-duty hooks for more substantial grooming tools; they’ll handle the weight without bending. And remember to check those screws now and then—just like our furry friends, tools can sometimes get a little wiggly with use.
You’re all set to start organizing your grooming tools! Plus, your pup will thank you for making their grooming time smoother and more efficient, and who doesn’t love a happy dog?
Extra Tips & Ideas
While having your pup washed at a professional groomer might seem like the easy route, setting up your DIY dog washing station can bring you both some quality bonding time—and let’s face it, some pretty hilarious moments too.
To make dog grooming even more fun, try adding some outdoor aesthetics. Think colorful tiles or a fun sign that says, “Paw-sitively Clean Zone.”
Don’t underestimate the power of treats—keep some within reach to reward your furry friend for being a champ during bath time.
To avoid a slippery situation, consider a rubber mat; trust me, you don’t want to be chasing a wet dog.
Ultimately, why not grab a camera? Those soapy goofball moments deserve to be shared.
Frequently Asked Questions
What Materials Are Best for Building a Dog Washing Station?
For building a dog washing station, you’ll want durable materials like pressure-treated wood, PVC, or stainless steel. Explore various construction techniques, and consider material alternatives such as recycled plastic for an eco-friendly option.
How Can I Ensure Proper Drainage for My Washing Station?
You wouldn’t want a flooded yard, right? To guarantee proper drainage for your washing station, consider effective drainage solutions like a sloped surface and gravel. Regular maintenance tips will keep it functioning smoothly and prevent clogs.
Is It Safe to Use Regular Shampoo for My Dog?
It’s best not to use regular shampoo on your dog. Instead, opt for dog-friendly alternatives to avoid potential skin issues. Their skin’s pH differs from ours, so specialized formulas keep their coat healthy and safe.
What Dimensions Are Suitable for the Washing Station?
For an ideal size, aim for at least 3 feet wide by 2 feet deep. Consider space considerations like your dog’s size and the area available, ensuring there’s enough room to move comfortably during bath time.
Can I Add a Roof to My Outdoor Washing Station?
Yes, you can add a roof to your outdoor washing station. Consider roof options like a simple canopy or a permanent structure for better weather protection. It’ll keep your setup functional regardless of the elements.
Conclusion
So, why not transform your outdoor space into a dog washing oasis? After all, isn’t it fun to make bath time less of a chore and more of an adventure? With a bit of pallet wood, a splash of creativity, and some thoughtful features, you can create a spot where your pup feels pampered and you feel proud. Remember, nothing says “I love my dog” like a DIY washing station where every shower feels like a spa day—tail wags included.