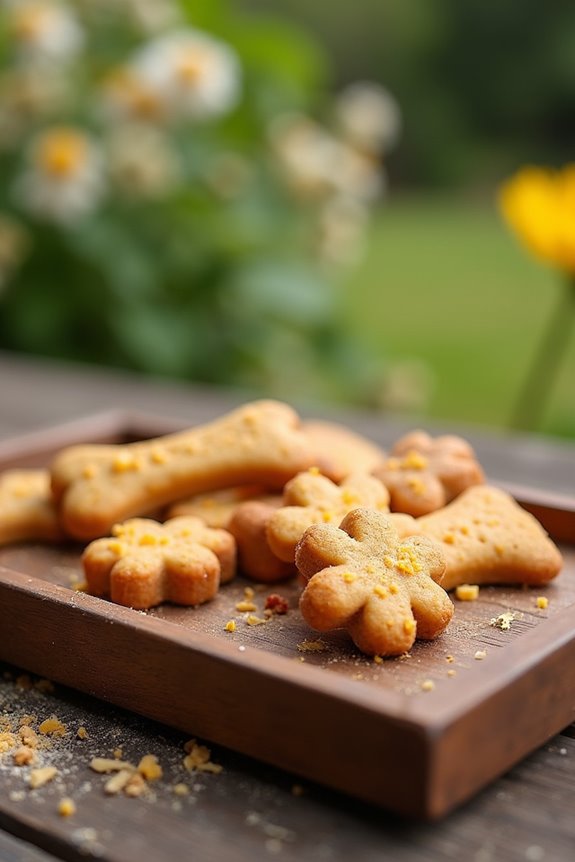
Are you thinking about selling homemade dog treats? It’s a fantastic way to channel your love for pets into something profitable. Imagine this: your furry friends munching on delicious, wholesome goodies made from ingredients you trust. Sounds simple, right? But what flavors really get tails wagging? And how do you make sure they’re not just tasty but healthy too? Stick around, and let’s explore some mouthwatering treat ideas that can make your venture a success.
Why Homemade?
When you think about it, why wouldn’t you make homemade dog treats? You get to control the ingredients, ensuring your pup eats something healthy and safe.
Remember the last time you checked the labels on store-bought goodies? Yikes! There are so many weird additives. Plus, whipping up treats at home can save you cash in the long run. It’s like giving your wallet a break while spoiling your furry friend. Making your own dog food can also ensure nutritional benefits for your pup, promoting better health. Dogs thrive on safe and healthy foods, which you can provide through homemade treats.
And let’s face it, dogs love the scent of freshly baked goodies. Just imagine their wagging tails as you pull that warm batch out of the oven. Homemade dog treats can also be made with natural ingredients, promoting better health and nutrition for your pet.
You’ve got the power to tailor flavors to your pup’s preferences too. Got a picky eater? No problem! Mix in their favorite ingredients, like peanut butter or pumpkin, and watch them devour your creations. Furthermore, using homemade dog treats allows you to ensure quality and health benefits for your pet.
It’s a win-win; your dog’s happy, and you get all the bragging rights. Why not give it a shot?
Homemade Treats Ideas
Looking to whip up some tasty treats for your furry friend? You’re in for a treat—pun intended. Many dogs enjoy snacks made with homemade bacon dog biscuits, which can be a fantastic addition to your treat-making repertoire. Using quality ingredients is essential to ensure your dog’s safety and enjoyment while indulging in these delicious snacks. Making dog treats at home can also lead to more nutritious options that are tailored to your pet’s dietary needs.
From Peanut Butter Delights to Sweet Potato Chew Sticks, let’s explore some easy and delicious homemade options that’ll have your pup wagging their tail in no time. Additionally, don’t forget to try making homemade cheese dog biscuits, as they are a delightful option that many dogs love.
1. Peanut Butter Delight Treats

If your pup loves peanut butter, you’re in for a treat—literally! Let’s whip up some Peanut Butter Delight Treats using just a few simple ingredients. You’ll love how easy the step-by-step process is, and I’ll even toss in some optional add-ons to make them even more special. Plus, these treats are delicious and packed with nutrition thanks to the peanut butter apple sauce combination. You can also enhance the flavor and nutrition by incorporating dog-friendly fruits like mashed bananas, which many pups adore!
Ingredients
If you’re looking to whip up some tasty treats for your furry friend, you’re in the right spot. Homemade dog treats aren’t only a fun way to spoil your pup, but they also let you know exactly what’s going into their snacks.
Plus, who doesn’t want to impress their dog with some gourmet goodies? Let’s explore making these Peanut Butter Delight Treats, which your pup will absolutely love.
- 1 cup of whole wheat flour
- ½ cup of natural peanut butter (make sure it’s xylitol-free, please)
- ¼ cup of rolled oats
- 1 egg
- ¼ cup of water (you might need a little more if the dough is too dry)
- Optional: 1 tablespoon of honey for a touch of sweetness
And there you have it, a simple list of ingredients that are safe, easy to find, and sure to make your dog’s tail wag with joy.
Now, let’s roll up our sleeves for some treat-making fun!
Step by Step Instructions
- Preheat your oven to 350°F (175°C). This helps guarantee your treats bake evenly and come out just right.
- Gather your ingredients: 1 cup peanut butter (make sure it’s dog-safe), 1 cup whole wheat flour, 1/2 cup rolled oats, and 1/2 cup water. Be sure to check ingredient labels—no xylitol, please; it’s a no-no for dogs.
- In a large mixing bowl, combine peanut butter and water. Stir until smooth and well mixed (don’t be shy—give it some muscle).
- Add in the whole wheat flour and rolled oats. Mix until everything is combined; the dough may be a bit sticky, but that’s okay (no need for a pastry chef here).
- Dust a clean surface with a little flour to prevent sticking. Turn your dough out onto the surface, and knead it gently for a minute or two until it holds together nicely.
- Roll out the dough to about 1/4-inch thick. Use a rolling pin if you’re fancy, or just press down with your hands—whatever works for you.
- Grab some cookie cutters (bone shapes are a classic, but any fun shape will do), and cut out your treats. Place them on parchment-lined baking sheets—give them a little space; they’ll puff up a bit.
- Bake in the preheated oven for 25–30 minutes, or until the edges are golden brown. Keep an eye on them at the 20-minute mark, because nobody likes burnt treats—not even your dog.
- Remove from the oven and let them cool on a rack. This step is super important—hot treats can be a real party foul for your pup.
- Cool completely before serving to your dog. Trust me, they’ll be worth the wait. Enjoy watching your furry friend enjoy their homemade goodies.
Optional Add-ons
You’ve just baked up a batch of tasty dog treats, but why stop there?
Slather on some peanut butter for a delightful twist. It’s easy—just mix in a bit of creamy peanut butter with your dough, and get ready for tail wags.
Your pup won’t know what hit ’em! Plus, you’ll feel like a top chef, and that’s always a bonus.
2. Pumpkin Oatmeal Dog Biscuits

Ready to whip up some delicious Pumpkin Oatmeal Dog Biscuits? You’ll need just a few simple ingredients and clear step-by-step instructions to get started. Plus, if you want to jazz things up a bit, I’ll share some optional add-ons that’ll make your pup’s tail wag like crazy.
Ingredients
Making your own dog treats can be a fun way to spoil your furry friend, and what could be better than pumpkin oatmeal biscuits?
Not only are these treats simple to whip up, but they also use ingredients that are safe and healthy for your pup. So, let’s gather the essentials and get baking—your dog will be drooling just from the smell alone.
- 1 cup canned pumpkin (make sure it’s pure pumpkin, not the spiced pie filling)
- 2 cups rolled oats
- 1/2 cup peanut butter (get the unsweetened kind with no xylitol)
- 1/2 cup whole wheat flour (or a gluten-free option if needed)
- 1 egg (just one, don’t worry—it’s a treat, not a feast)
- 1/4 cup water (adjust if needed to get the right dough consistency)
There you go! With these straightforward ingredients, you’ll be channeling your inner doggie chef in no time.
Just remember, if your kitchen turns into a flour explosion, it’s all part of the fun.
Step by Step Instructions
- Preheat your oven to 350°F (175°C). It’s time to get that kitchen smelling like a bakery.
- In a large mixing bowl, combine 1 cup of canned pumpkin puree and 1/2 cup of peanut butter. Mix together until they form a smooth, glorious blend.
- Add 2 cups of rolled oats to the mixture. Stir until everything is well incorporated—no sneaky dry bits hiding in there.
- If you want a bit of flavor, throw in 1 tablespoon of honey. It’s like giving your treats a sweet little hug.
- Gradually add 1/2 cup of flour. Fold it in gently; don’t overmix, just until everything is combined.
- Lightly flour your counter or a cutting board to keep things from sticking.
- Roll out the dough to about 1/4-inch thick.
- Cut out bone shapes using a cookie cutter (or any fun shape you like). Get creative; your dog won’t judge your artistic skills.
- Place the biscuits on a lined baking sheet, spaced about an inch apart. They’re not growing anymore, I promise.
- Bake for 25–30 minutes, or until they turn a lovely golden brown. It’s like a treasure hunt for gorgeous treats.
- Remove from the oven and let them cool completely before serving to your dog. Trust me, they’ll be drooling, and you want to avoid puppy burns.
Optional Add-ons
If your furry friend loves variety as much as my dog does, you’ll want to spice up those pumpkin oatmeal biscuits with some optional add-ons.
Try tossing in peanut butter or mashed bananas for sweetness. A sprinkle of cinnamon might just make their tails wag faster.
You could even mix in some chopped apples—just watch for those little crumbs flying everywhere. Trust me, it’s a messy but fun adventure!
3. Sweet Potato Chew Sticks

Ready to whip up some tasty Sweet Potato Chew Sticks for your pup? These homemade treats are super easy, and you won’t believe how simple the ingredients are. Let’s go through the step-by-step instructions and explore some fun optional add-ons to make them even more special!
Ingredients
Making your own dog treats can be such a rewarding experience. Plus, it’s a great way to pamper your furry friend with something special. Today, let’s whip up some tasty sweet potato chew sticks. Your pup will love these, and you can feel good knowing exactly what’s going into them. So, let’s gather our ingredients.
- 1 large sweet potato (about 250-300 grams)
- 1 tablespoon olive oil
- 1/2 teaspoon cinnamon (optional, but it adds a nice flavor)
- 1 cup oat flour (you can make this by blending rolled oats)
- Water (as needed, for consistency)
See? Just a handful of simple ingredients that you can easily grab at the grocery store. And trust me, the look on your dog’s face when they get to munch on these homemade goodies will be priceless. So, roll up those sleeves, and let’s get cooking—your pup is counting on you!
Step by Step Instructions
- Preheat your oven to 350°F (175°C). It’s time to warm things up!
- Wash and peel 2 medium sweet potatoes. You want them nice and clean to make tasty treats.
- Cut the sweet potatoes into thin slices, about 1/4-inch thick. Think of them like little chips ready for the oven.
- Place the sweet potato slices in a pot and cover them with water. Bring the water to a boil over medium heat.
- Once boiling, reduce the heat and simmer for about 15 minutes, or until the sweet potatoes are tender.
- You’ll know they’re ready when you can easily pierce them with a fork.
- Drain the sweet potatoes and allow them to cool for a few minutes. We don’t want you burning your fingers, after all.
- Once cooled, mash the sweet potatoes in a mixing bowl until smooth. No lumps, please.
- Line a baking sheet with parchment paper. This will help prevent sticking and make cleanup a breeze.
- Drop spoonfuls of the mashed sweet potato onto the lined baking sheet, flattening each mound slightly. They should look like little blobs of deliciousness.
- Bake in the preheated oven for 25–30 minutes, or until they’re golden brown and firm.
- Keep an eye on them; you want a delightful crunch, not a burnt offering!
- Remove from the oven and let cool completely before serving to your dog.
- Trust me, no one likes hot treats, not even Fido.
Now, enjoy the happy wagging tails when your furry friend gets to taste these homemade delights!
Optional Add-ons
You’ve just finished baking those sweet potato blobs, and your dog is probably eyeing you like you just whipped up a Michelin-star meal.
If you want to jazz things up, consider adding a pinch of cinnamon or a dash of peanut butter.
These add-ons not only boost flavor but make those chewy sticks even more irresistible.
Trust me, your furry friend will thank you.
4. Blueberry Banana Crunch Bites
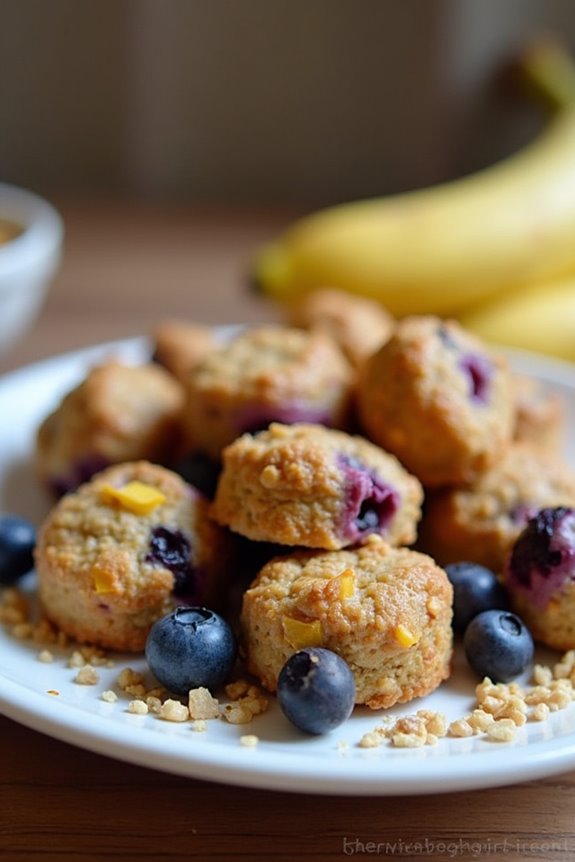
Ready to whip up some delicious Blueberry Banana Crunch Bites for your pup? These tasty treats use simple ingredients you probably have at home—perfect for avoiding yet another trip to the store. Let’s walk through the steps together, and you might even discover some fun optional add-ons to make them extra special.
Ingredients
When it comes to whipping up some tasty treats that your furry friend will adore, these Blueberry Banana Crunch Bites are a fantastic choice. Not only are they easy to make, but they also combine the goodness of whole foods that are safe for pups.
So, grab your apron and let’s get this party started! Here’s what you’ll need to gather from your kitchen or the local store:
- 1 ripe banana, smashed (the more spots, the better)
- 1 cup fresh blueberries (or frozen, just make sure they’re thawed)
- 1 ½ cups whole wheat flour (or oat flour for a gluten-free twist)
- ½ cup rolled oats (because crunch is key)
- 1 egg (for binding and a protein boost)
- 2 tablespoons peanut butter (make sure it’s xylitol-free)
- ½ cup unsweetened apple sauce (for moisture and sweetness)
And there you have it! With these ingredients ready to go, you’ll be on your way to creating some delightful snacks that your dog will wag their tail for.
Just be careful not to eat all the dough yourself; I mean, who can resist a little nibble, right?
Step by Step Instructions
- Preheat your oven to 350°F (175°C) to get things warm and ready for baking.
- Line a baking sheet with parchment paper for easy cleanup—who really wants to deal with stuck-on treats?
- In a bowl, mash 2 ripe bananas until smooth. It’s okay if there are still a few lumps; we’re not making baby food here.
- Add 1 cup of fresh or frozen blueberries to the mashed bananas. Mix gently to combine, but don’t smush the blueberries too much; we want those juicy bites intact.
- In a separate bowl, mix 1 ½ cups of whole wheat flour with 1 teaspoon of baking powder. Whisk until well blended—think of it like a mini workout.
- Gradually add the flour mixture to the banana and blueberry bowl. Fold the ingredients together gently; you want a nice dough, not a gluten mess (don’t over-mix, it can get tough).
- Scoop out tablespoon-sized portions of the dough and place them on your lined baking sheet, leaving some space between each one—these little treats will spread out a bit while baking.
- Bake in the preheated oven for 25–30 minutes, until the bites are golden brown on the edges. If they’re looking too soft, give them a few extra minutes; crunchy is the goal here!
- Once they’re done, remove the treats from the oven and let them cool completely on a wire rack—no one likes a hot treat, not even dogs.
Cool completely before serving to your dog. Enjoy their wagging tails and happy faces!
Optional Add-ons
Who doesn’t love a little extra something to jazz up their dog’s treat game?
Try these Blueberry Banana Crunch Bites. Just mash ripe bananas, mix in blueberries, and add oats for texture. Bake until crispy, and watch your pup go wild.
You’ll feel like a doggie gourmet chef. Honestly, if only my cooking skills translated to human food, right?
Your furry friend will thank you.
5. Savory Chicken and Carrot Bites
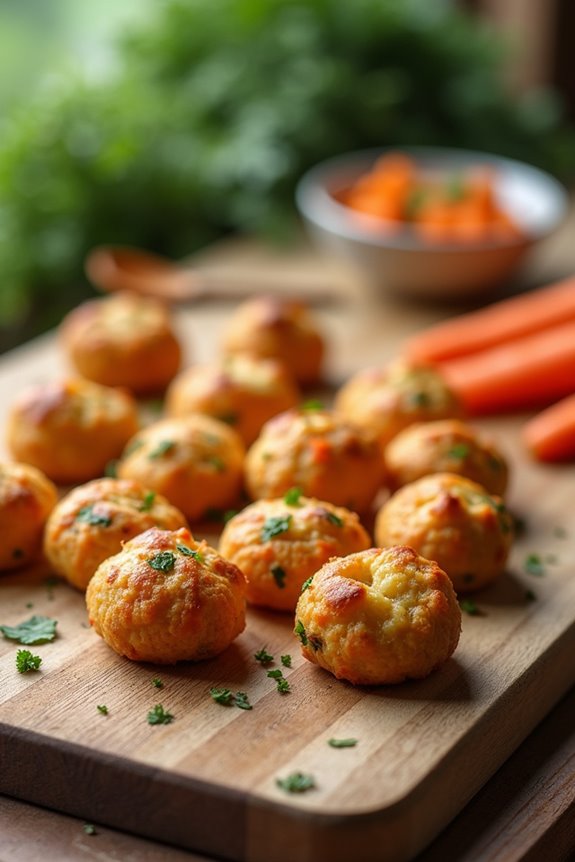
Let’s whip up some Savory Chicken and Carrot Bites that your pup will love. You’ll need just a few simple ingredients to get started, and I promise it’s easier than trying to teach your dog to roll over. With step-by-step instructions and some fun optional add-ons, you’ll have tasty treats ready in no time.
Ingredients
Making treats for your furry friend at home can be a delightful experience, and there’s nothing quite like watching their tail wag with excitement when they’re about to get a tasty snack. These savory chicken and carrot bites aren’t only easy to whip up, but they’re also packed with flavors and nutrients that your dog will love. Plus, you probably have most of these ingredients hanging around in your kitchen already, so let’s get to it.
- 2 cups of cooked chicken, shredded (any leftover rotisserie chicken will do just fine)
- 1 cup of finely grated carrots (the fresher, the better—trust me, no one wants a rubbery carrot)
- 1/2 cup of whole wheat flour (if your pup is gluten-sensitive, you can substitute with oat flour)
- 1/4 cup of unsweetened applesauce (just make sure it’s the no-sugar-added kind)
- 1 egg (this helps bind everything together, plus dogs love eggs, right?)
- 1 tablespoon of olive oil (a little healthy fat never hurt anyone)
Don’t worry, this list isn’t intimidating at all. In fact, you could probably find most of this stuff in your pantry right now—or at least that’s what I keep telling myself when I plunge into a recipe. So, grab your ingredients, and let’s get ready to spoil your dog in the healthiest way possible!
Step by Step Instructions
- Preheat your oven to 350°F (175°C). Get that energy rolling; the oven should be nice and toasty by the time we’re ready to bake.
- In a medium pot, bring about 2 cups of water to a boil. This is where the water works its magic, prepping to cook the chicken.
- Once the water is boiling, drop in 1 cup of diced chicken. Let it boil for 10 to 12 minutes until fully cooked and no longer pink. Just imagine the heavenly smell filling your kitchen.
- Carefully remove the chicken and let it cool for a few minutes. Don’t burn your fingers—it’s tempting, but let it chill for a sec.
- Shred the chicken into small, bite-sized pieces. You can use two forks for this, or your hands (if you’re feeling brave).
- In a large bowl, combine the shredded chicken, 1 cup of grated carrots, and 1 cup of whole wheat flour. The chicken and carrots are about to mingle.
- Crack in 1 egg and mix everything together with your hands or a spatula until well combined. (It might get a little messy—embrace it).
- If the mixture seems too dry, add a splash of water, one tablespoon at a time, until it’s moist but still holds together.
- Scoop out tablespoon-sized portions of the dough and roll them into little balls. Place them on a baking sheet lined with parchment paper, spacing them a couple of inches apart.
- Flatten each ball gently with the back of a fork or your palm (maybe slightly underwhelming, but it helps with baking).
- Bake in the preheated oven for 20 to 25 minutes, or until they turn golden brown. Your nose will guide you; nothing like that warm aroma wafting around.
- Once baked, remove the treats from the oven and let them cool completely on a wire rack. This is the hardest part—let your pup just wait a bit longer.
- Store the treats in an airtight container. They should last up to a week, but I doubt they’ll hang around that long, right?
Cool completely before serving to your dog. They’ll thank you, probably with puppy eyes or a little happy dance.
Optional Add-ons
After those scrumptious chicken and carrot treats are out of the oven, why stop there?
You can jazz them up with a pinch of parsley or a dash of turmeric for added flavor and health benefits.
Maybe even toss in some pumpkin puree for a seasonal twist.
Your furry friend won’t know what hit them when they taste these paw-sitively delicious add-ons.
6. Bacon and Cheddar Snaps
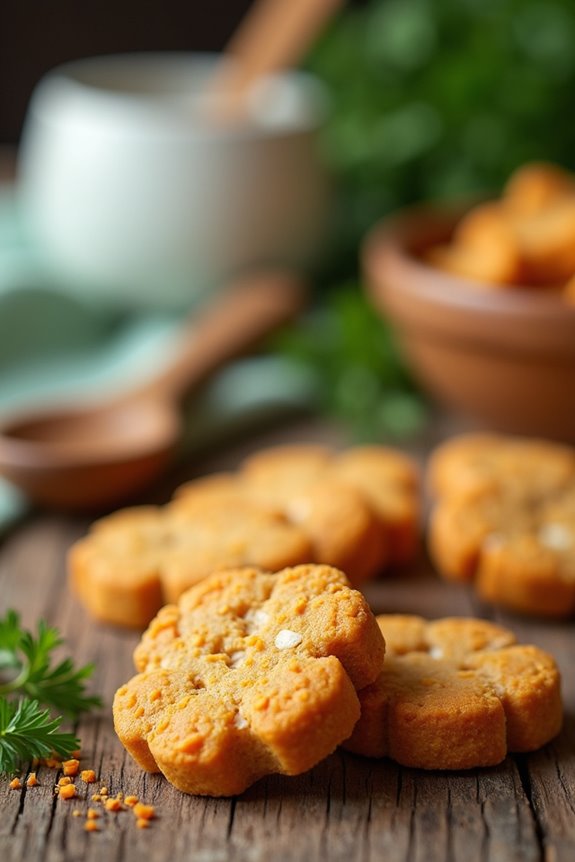
If your dog loves bacon and cheese, you’re in for a treat (literally). Let’s whip up some Bacon and Cheddar Snaps together, using just a few simple ingredients. And don’t worry, I’ll walk you through each step—plus, I’ll share some fun add-ons to customize these bites just for your pup.
Ingredients
When it comes to spoiling our furry friends, there’s nothing quite like homemade treats. Trust me, those puppy eyes will melt your heart as you whip up some Bacon and Cheddar Snaps in your kitchen.
These ingredients aren’t just simple—they’re safe and delicious for your pup, and as an added bonus, your house will smell amazing. Plus, you might want to keep a couple for yourself, if you can resist the temptation.
So, let’s gather what we need for these tasty bites.
- 1 cup whole wheat flour
- ½ cup rolled oats
- 1 cup shredded cheddar cheese
- ½ cup cooked bacon, crumbled (hi, breakfast leftovers!)
- 1 large egg
- ¼ cup low-sodium chicken broth
See? Just six ingredients to a wagging tail. The whole process is pretty easy, so let’s get those tails wagging with some drool-worthy treats!
Step by Step Instructions
- Preheat your oven to 350°F (175°C) so it’s nice and hot when you’re ready to bake those treats.
- In a large bowl, mix together 2 cups of whole wheat flour, ½ cup of cheddar cheese, and ½ cup of cooked, crumbled bacon (because who doesn’t love bacon?).
- In a separate bowl, whisk together 1 large egg and ½ cup of low-sodium chicken broth until well combined.
- Pour the egg mixture into the dry ingredients and stir with a spatula until a dough forms (it might be a little sticky, but that’s okay—dough is supposed to be a little rebellious).
- Roll the dough out on a floured surface to about ¼ inch thick (you want it thin—but not see-through).
- Use cookie cutters to cut out fun shapes. Feel free to use any shape you want—dogs appreciate a little creativity, after all.
- Place the cutouts on a baking sheet lined with parchment paper, giving them room to spread out a bit (they like their space).
- Bake in the preheated oven for 25–30 minutes or until the edges turn golden brown (so keep an eye on them; you don’t want any treats that look like they’ve had a rough day).
- Remove from the oven and let the treats cool on a wire rack.
- Cool completely before serving to your dog (no one likes a hot snack, especially not our furry friends).
Optional Add-ons
While your dog’s tail may be wagging wildly at the thought of homemade treats, adding some optional ingredients can take those bacon and cheddar snaps to the next level.
Think about mixing in some pumpkin puree for extra flavor, or maybe a pinch of parsley for fresh breath.
Trust me, your pup won’t be able to resist—just be ready for a lot of happy tail wagging.
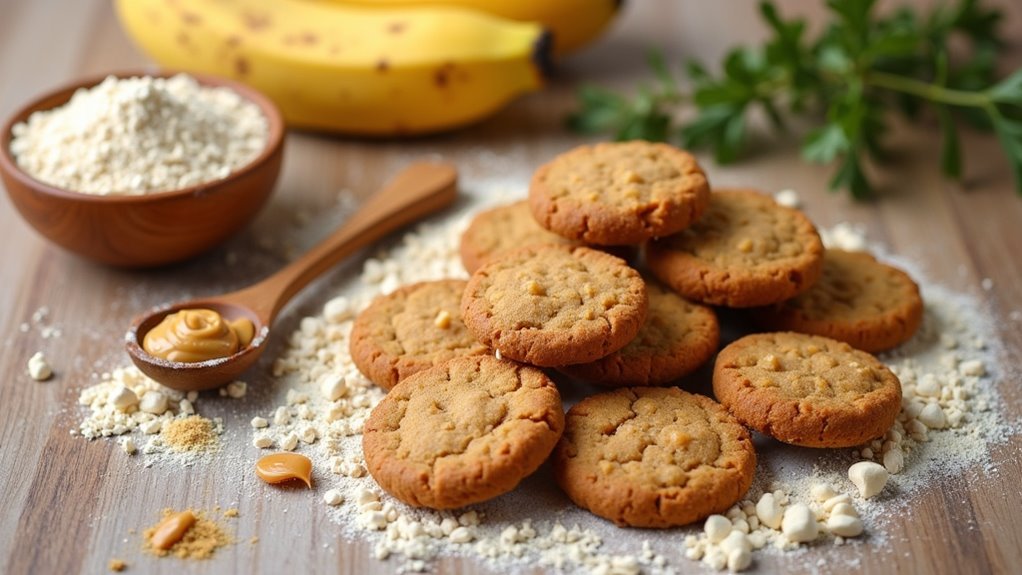
7. Peanut Butter Banana Bites
Ready to treat your pup to something special? Peanut butter banana bites are a tasty, easy option that uses just a few simple ingredients.
We’ll walk through each step, plus some fun add-ons that can really take these treats to the next level.
Ingredients
When it comes to whipping up some tasty treats for your furry friend, simplicity is key. These Peanut Butter Banana Bites aren’t only drool-worthy but also easy to make with just a handful of ingredients you probably already have in your kitchen.
Plus, they’re packed with yummy flavors that dogs go crazy for. So let’s get down to business, shall we?
- 1 ripe banana, mashed (the riper, the better—think of it as banana’s version of a cozy sweater)
- ½ cup of peanut butter (just make sure it’s free from xylitol, because, trust me, your pup doesn’t need any surprises)
- 1 cup of rolled oats (you can use quick oats if that’s what you have, no judgment here)
- ½ cup of whole wheat flour (or coconut flour for a gluten-free option, if your dog is fancy like that)
- ½ cup of chicken or vegetable broth (low sodium is the way to go – we’re all about keeping it healthy)
- Optional: a sprinkle of cinnamon (it’s not just for your coffee; a little bit is safe for dogs and adds a nice touch)
Gather these ingredients, and let’s get ready to make your dog the happiest pup on the block.
Can’t wait to see those wagging tails!
Step by Step Instructions
- Preheat your oven to 350°F (175°C). This is the first step to making those drool-worthy treats.
- In a large mixing bowl, mash 1 ripe banana until smooth. Go ahead, get a little messy—it’s just banana and it’s not like you’re using your best china.
- Add 1 cup of natural peanut butter to the mashed banana. Make sure it’s good quality peanut butter—your pup deserves the best.
- Stir the banana and peanut butter together until they’re combined. You want a nice creamy texture, think smooth but not your morning smoothie kind of smooth.
- Next, add 1 ½ cups of whole wheat flour to the bowl. Fold it in gently until it’s just combined.
- (Don’t overmix; we want a bit of playfulness in the texture.)
- If the dough feels too sticky, sprinkle in a little more flour a tablespoon at a time until it’s manageable. You want it to be moldable—like playdough, except tastier.
- Roll the dough into small balls, about the size of a tablespoon.
- Place them on a baking sheet lined with parchment paper. Leave a little space between them; they need some room to breathe.
- Flatten each ball slightly with the back of a fork. This gives them that classic dog treat look and helps them bake evenly.
- Bake in the preheated oven for 15–20 minutes, or until they’re golden brown. Your kitchen will smell heavenly by this point, and your dog may begin to hover around expectantly.
- Remove from the oven and let the treats cool completely on a wire rack. Patience is key; you don’t want to burn your furry friend’s tongue.
Cool completely before serving to your dog. Enjoy the blissful tail wags that follow.
Optional Add-ons
If you’re looking to take your homemade dog treats to the next level, why not whip up some Peanut Butter Banana Bites?
These tasty morsels only need ripe bananas, peanut butter, and oats.
Mash the ingredients together, scoop them into bite-sized balls, and bake. Your pup’s tail will wag like crazy.
Seriously, who can resist that adorably happy face? Plus, they’re super easy to make!
Use Quality Ingredients
Using quality ingredients makes all the difference when you’re whipping up tasty treats for your furry friend.
Think about it—would you want to eat just anything? Your dog deserves the best, too. So, skip the mystery ingredients and grab fresh items, like whole grains, lean meats, and organic fruits and veggies.
Ever tried using peanut butter? Dogs go wild for it, but make sure it’s xylitol-free!
And yes, those apples? Just chop them up, but don’t forget to remove the seeds; they’re not a good snack buddy.
Oh, and don’t get me started on oatmeal—it’s like a nutritious party for their tummies!
Frequently Asked Questions
What Packaging Is Best for Selling Dog Treats?
You should use resealable bags or eco-friendly containers that keep treats fresh. Clear packaging showcases your products, while labels with ingredients and branding attract customers. Consider adding a window for visual appeal to catch buyers’ attention.
How Should I Price My Homemade Dog Treats?
Price your homemade dog treats by calculating ingredient costs, labor, and packaging. Research competitors’ pricing and consider your target market. Don’t forget to factor in your profit margin while remaining competitive and appealing to customers.
What Local Regulations Apply to Selling Pet Food?
You need to check local health department regulations, labeling requirements, and any necessary permits. Some areas may require specific commercial kitchen standards or inspections, so make certain you’re compliant to avoid potential legal issues while selling.
How Can I Promote My Dog Treat Business Effectively?
You can promote your dog treat business by leveraging social media, attending local pet events, offering promotions, collaborating with pet influencers, and building a website. Don’t forget to engage with your community and gather customer feedback.
What Shelf Life Can I Expect for Homemade Dog Treats?
You can expect homemade dog treats to last about one to three weeks if stored in an airtight container at room temperature. Refrigerating them may extend their freshness to up to two months.