
If you’ve ever found yourself wrestling with a way to keep your furry friend safe while adding style to your space, you’re not alone. Sure, you could just grab any old gate, but why not have some fun? From rustic barn doors that charm the socks off your visitors to sleek metal options that shout modern chic, there’s a whole world of DIY dog gates awaiting you. Curious about which designs might just steal your heart? Keep on exploring.
Pet-Friendly Design Ideas
Designing a pet-friendly space isn’t just about slapping up a gate and calling it a day; it’s a chance to release your creativity while keeping your furry friends safe.
Imagine turning a plain doorway into a stylish entryway with your own diy dog gates indoor. You could use reclaimed wood—it’s trendy and eco-friendly. Or perhaps, stick with a fabric mesh design for a softer look.
Remember, your four-legged buddy loves a good view, so keep it open yet secure. Feeling extra crafty? Hang some decorative art above the gate.
You’ll blend functionality with aesthetics seamlessly. Plus, you’ll impress your friends, who’ll think you’re a DIY genius (even if it took you three tries).
Our Collection
Now that you’re all set with some pet-friendly design ideas, let’s chat about our collection of DIY dog gates.
Whether you’re into the rustic charm of a wooden barn door gate or the sleek look of a metal wire dog gate, there’s something here for every taste.
And trust me, with options like a retractable fabric barrier or a decorative folding screen gate, you’ll find a gate that fits your space—no more makeshift solutions with old blankets, right?
1. Wooden Barn Door Gate
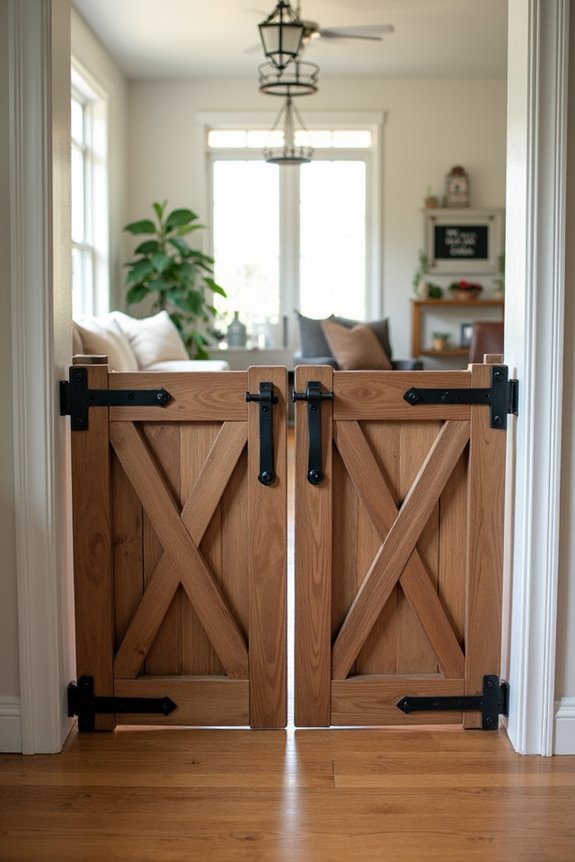
If you’re looking for a stylish and functional way to keep your furry friends safe, a wooden barn door gate is a fantastic DIY project. Not only can it help you manage your dog’s space in your home, but it also adds a touch of rustic charm that can elevate your decor. Plus, creating your own gate saves you money, and trust me, your dog will appreciate having their own designated area without compromising your beautiful living space. Integrating luxury dog crate furniture can further enhance your pet’s comfort and style.
Materials Needed:
- Two large wooden boards (for the gate frame)
- One wooden board (for the center support)
- Two hinges
- A latch
- Sandpaper
- Wood stain or paint (optional, for finishing)
- Wood screws
- Measuring tape
- Saw (hand saw or power saw)
- Drill
- Paintbrush (if using stain or paint)
- Safety goggles (always important)
Step-by-Step Instructions:
- Measure and Mark: First things first, measure the opening where you want to install the gate. Make sure to account for the height and width, plus a few extra inches for hinge placement. Mark these measurements clearly on your wooden boards.
- Cut the Wood: Using your saw, carefully cut the boards to the desired lengths based on your measurements. Don’t worry if it takes a couple of tries; remember, measure twice, cut once, right?
- Sand the Edges: Take some sandpaper and smooth out all the cut edges. This is essential for making sure your gate is safe (no splinters for you or your pup) and looks nice. Think of it as giving your gate a little spa day.
- Assemble the Frame: Arrange the two large wooden boards vertically, then place the center support board horizontally across them. Use wood screws to secure everything together. Make sure it’s sturdy, because you know your dog will try to test its strength.
- Attach the Hinges and Latch: Position the hinges on one side of the gate frame and attach them with screws. Next, attach the latch on the opposite side, ensuring it’s at a height that’s easy for you to reach but not for your dog.
- Finishing Touches: If you want to, this is the time to stain or paint your gate. Choose a color or finish that matches your home and feels welcoming. Applying a fresh coat can feel like a mini renovation project.
- Install the Gate: Finally, install your beautiful new gate in the opening. Make sure it swings freely and locks securely. After all your hard work, don’t forget to stand back and admire your masterpiece.
Optional Add-ons/Variations:
Feeling creative? Try adding decorative barn door hardware to give your gate even more character.
Or, if you’re feeling especially adventurous, incorporate a chalkboard paint section where you can write fun messages, like “Beware of Dog—Loves Cuddles!”
The sky’s the limit!
Pro Tip:
Before you install your gate, double-check that it swings away from high-traffic areas to prevent any unexpected collisions with kids, furniture, or your own feet. No one wants to trip over a flying dog gate while trying to get to the kitchen for that well-deserved snack.
Creating a wooden barn door gate isn’t just about function; it’s about making your home a better space for you and your furry friend.
2. Farmhouse-Style Picket Fence Gate
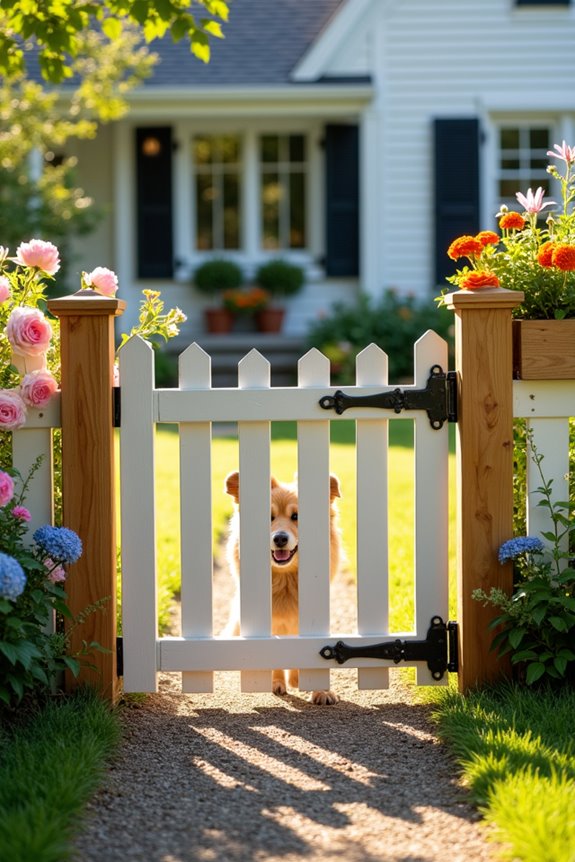
If you want to add a charming touch to your yard while keeping your pooch safe, then a farmhouse-style picket fence gate is just the project you need. Not only will it help define your outdoor space, but it also brings that cozy, rustic vibe that makes any home feel more inviting. Additionally, incorporating luxury dog grooming products as part of your pet care routine can enhance your pup’s overall well-being and happiness.
Plus, making it yourself means you’ll save some cash – valuable for those unexpected vet visits, right?
Materials Needed:
- Wooden pickets (enough to cover your desired width and height)
- Two wooden boards (for the top and bottom rails)
- Wood screws
- Hinges
- Latch
- Sandpaper
- Wood stain or paint (if desired)
- Measuring tape
- Saw (hand saw or power saw)
- Drill
- Paintbrush (if using stain or paint)
- Safety goggles
Step-by-Step Instructions:
1. Measure and Cut: First, grab that measuring tape and find out the size of the opening where the gate will go. It’s a good idea to leave an inch or so of extra space for the hinges.
Once you’ve got those measurements, cut the wooden pickets and boards to the appropriate lengths. You want those right angles to be just right – every little bit counts.
2. Sand It Down: Use your sandpaper to smooth all the edges of your cut wood. This step is essential for creating a gate that won’t snag on your clothes or, more importantly, your dog’s curious nose.
Trust me; nobody wants splinters.
3. Assemble the Gate Frame: Lay your top and bottom boards parallel to each other. Space your pickets evenly in between, making sure to maintain that classic picket fence look.
Secure them all together with wood screws. Don’t be shy with your screws; this gate needs to be sturdy enough to withstand the enthusiasm of your four-legged friend.
4. Add Hinges and Latch: Attach the hinges to one side of the gate frame at the top and bottom. Then, place the latch on the opposite side at a height that’s easy for you to reach — just out of reach for your dog.
It’s a simple but important detail.
5. Finishing Touches: If you want, now’s your chance to give your gate a personal touch with stain or paint. Choose a color that matches your home, or go bold if that’s your style.
It’s all about making this gate feel like a part of your family.
6. Installation: Finally, attach your gate in the desired location. Check to confirm it swings freely and locks securely.
Take a moment to admire your handiwork — you did it.
Optional Add-ons/Variations:
Want to make it even more unique? Consider adding decorative elements, like a little flower box to the top or a cute sign that says “Beware of Dog.”
You could even choose to paint the pickets in different pastel colors for a fun, whimsical look. Whatever you decide, infuse your personality into it!
Pro Tip:
Always double-check the hinges and latch after installation. Dogs, bless their hearts, can be surprisingly clever when it comes to figuring out locks.
If you want extra security, consider using a more advanced latch system that includes a slide bolt.
3. Retractable Fabric Pet Barrier
If you’re looking for a smart way to keep your furry friend in one place without the mess and hassle of traditional gates, then a retractable fabric pet barrier is the perfect DIY project for you. Not only does it help manage your pup’s roaming, but it also adds a sleek and modern look to your home—because who said pet solutions can’t be stylish? Plus, it’s a budget-friendly option that saves you from costly alternatives. Dog food storage containers can also help keep your pet supplies organized and fresh!
Materials Needed:
- Retractable fabric pet barrier kit (available online or at pet stores)
- Mounting brackets (usually included in the kit)
- Screws (check kit for specifics)
- Measuring tape
- Drill with bits for your screws
- Level
- Pencil
- Safety goggles
Step-by-Step Instructions:
1. Measure Your Space: First things first—grab your measuring tape and find out where you want to install your pet barrier. Make sure to account for any furniture or other objects that might get in the way.
Precision is key here; you don’t want to end up with a wonky installation.
2. Mark the Mounting Points: Once you’ve got measurement and placement squared away, take your pencil and mark where the mounting brackets will go. A level is handy for confirming everything’s straight.
Trust me, there’s nothing worse than an off-kilter pet barrier reminding you of your questionable DIY skills every day.
3. Drill the Holes: Put on those safety goggles—it’s drill time! Use your drill to create holes where you marked for the brackets.
Make sure to follow the instructions on your barrier kit for the appropriate size of the drill bit. This isn’t an opportunity to showcase your impressive drilling skills; just stick to the plan.
4. Attach the Mounting Brackets: Here’s where it gets exciting. Secure the mounting brackets to the wall using the screws provided.
You want them steady, so your pup doesn’t think it’s an Olympic event trying to jump over.
5. Install the Barrier: Now for the fun part. Slide the fabric portion into the installed brackets.
If everything is in place, it should retract smoothly. Give it a test run — pull it out, let it soothe your dog’s urge to wander, and then retract it back. This is a fabulous time to check that your dog doesn’t see it as a fun new tug-of-war toy.
6. Final Adjustments: Make any needed adjustments to verify the barrier functions properly.
Sometimes a little tweak here or there can make a world of difference.
Optional Add-ons/Variations:
Feel free to get creative. You can choose a retractable fabric in your dog’s favorite color or pattern to jazz up your living space.
You might even want to customize the length of the barrier to fit a unique space or create multiple sections, giving your pet a designated “hangout” zone without compromising their comfort.
Pro Tip:
If you’re feeling ambitious, consider reinforcing the top edge of the barrier with a wooden trim for added durability.
It’s a simple touch that can also elevate its appearance, making your DIY project even more stylish and sturdy. And, of course, always double-check that everything is secure—nobody wants unexpected “daring escapes” during your next Zoom call.
4. Metal Wire Dog Gate
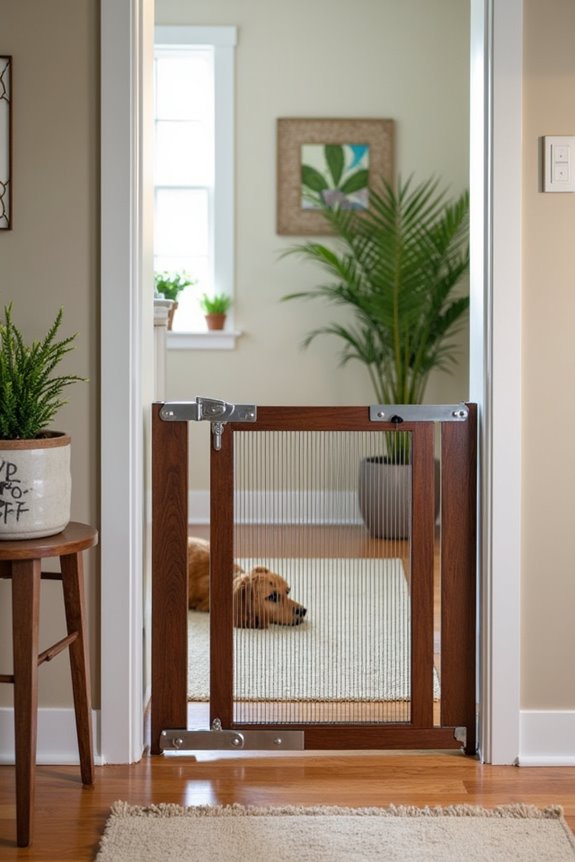
Every dog owner knows that sometimes, keeping our furry friends safe and contained can feel like a full-time job. That’s where a metal wire dog gate comes in handy. Not only does it act as a sturdy barrier that keeps your pup from sneaking into (and maybe raiding) the kitchen, but it also has a sleek, modern design that complements your home decor.
Plus, making this DIY project saves you money compared to pricey pre-made gates while giving you a satisfying feeling of accomplishment. Let’s explore the details. Premium dog supplies can enhance your pup’s life, making projects like these even more rewarding.
Materials Needed:
- Metal wire fencing (roll of welded wire or similar)
- Wooden posts (2×4 or your preferred size)
- Hinges (2-3, depending on size)
- Latch or lock mechanism
- Outdoor-friendly wood finish or paint (optional)
- Saw (for cutting the posts)
- Drill with bits
- Measuring tape
- Level
- Safety goggles
- Work gloves
Step-by-Step Instructions:
1. Measure the Area: Take a moment to measure the width of the doorway or space where you want to install the gate. Jot the measurements down because trust me, scratching your head later won’t help anyone.
2. Cut the Wooden Posts: Using your saw, Cut the Wooden Posts to the right height—typically around 30 inches should do the trick, but you know your pup best. Make sure to wear gloves while cutting; it’s not fun to earn an accidental battle scar.
3. Construct the Frame: Position the posts in a rectangle (or square, depending on your space) and attach them securely to form the frame of the gate. Use your drill to put some screws through the posts right into each corner. If it feels good and solid, you’re on the right track!
4. Attach the Wire Fencing: Now for the part that keeps your pup in check. Cut a piece of metal wire fencing to fit the frame you just built, allowing a little extra for wrapping around the edges.
Use staples, staples, and more staples—this isn’t the time for shoddy construction. Make sure the wire is taut and secure; we can’t have any daring escape artists on our hands.
5. Install the Hinges: Attach hinges to one side of the gate and to the door frame, verifying they’re level and aligned. The last thing we need is a wobbly gate that looks like it’s been on a journey through the Bermuda Triangle.
6. Add the Latch: Now, let’s keep those little tail wags from pushing the gate open. Install the latch mechanism across from the hinges, and double-check that it works smoothly—no one wants to do the dance of frustration when trying to get through.
7. Finishing Touches: If you want your gate to match your style, consider painting or finishing the wood. Let it dry, and voilà! You’ve got a stylish obstacle that tells your pup to stay put.
Optional Add-ons/Variations:
- Color and Style: Get creative with paint or stain for the wood. Choose colors that match your home or even add a fun pattern to the wire for a more whimsical touch.
- Decorative Elements: Attach some decorative accents, like a little sign that says “Paws Off” or even a small planter on top for some added flair.
Pro Tip:
To save on materials, consider re-purposing leftover wood or finding secondhand supplies at a local thrift store. You can create a custom look on a budget while also reducing waste.
And don’t forget, regularly checking the hinges and latch will maintain it in tip-top shape. A little maintenance goes a long way in prolonging your handcrafted masterpiece.
Now you’re ready to build a gate that not only keeps your pup in check but adds a touch of personality to your home! Happy DIY-ing!
5. Decorative Folding Screen Gate
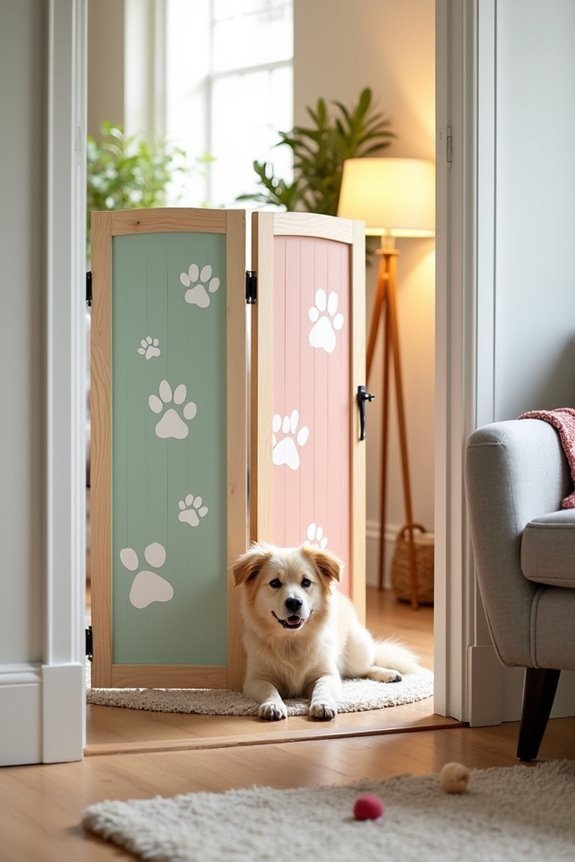
If you’re looking for a stylish yet functional barrier to keep your furry friend contained, a decorative folding screen gate is a fantastic DIY project. Not only does it serve as a decorative piece in your home, but it also provides a gentle way to restrict access to certain areas for your pup. The best part? You get to personalize it to match your decor, all while saving some bucks compared to those fancy pre-made gates.
Materials Needed:
- Wooden boards (pine, plywood, or your choice)
- Hinges (4-6 depending on size)
- Latch or hook-and-eye closure
- Sandpaper
- Paint or wood stain (optional)
- Measuring tape
- Saw (for cutting the boards)
- Drill with bits
- Safety goggles
- Work gloves
Step-by-Step Instructions:
- Measure Your Space: First, determine where you want to place your gate. Measure the width and height you want, typically around 30-36 inches tall and wide enough to fit comfortably in your doorway.
- Cut the Boards: Grab your saw and carefully cut your wooden boards to the desired lengths. If you choose to make a folding screen, remember to cut additional shorter boards for the folding mechanism.
- Sand the Edges: Nobody wants splinters, right? So, take your sandpaper and smooth out any rough edges on your cut pieces. It’s like giving your gate a mini spa day, making it safe for your pup and your fingers.
- Assemble the Panels: Depending on how many panels you’d like (usually 2-4 works nicely), lay them out side by side and attach them together using your hinges. Position the hinges to allow them to fold in and out—sort of like opening a book. Make sure everything aligns, so it’s easy to open and close.
- Attach the Latch: Install the latch mechanism on the side opposite your hinges so that it can easily keep your pup from pushing through. Give it a test run—let’s make sure it keeps things secure without any sneaky escapes.
- Finish It Up: If you want to add a personal touch, now’s the time. Paint or stain your gate to match your style. This is where you can really let your creativity shine. Just remember to let everything dry properly before introducing it to your excited pooch.
Optional Add-ons/Variations:
- Paint Patterns: Try stenciling some cute patterns or quotes related to dogs to make it more personal.
- Add Fabric Panels: For a softer look, you might want to attach fabric or mesh between the boards. It not only adds character but can also help to keep curious noses safely in check while allowing a view.
Pro Tip:
Always confirm your gate swings smoothly and securely.
If you live in a display case of a home, watch where you place it so it doesn’t become an obstacle, and consider adding rubber bumpers to prevent marks on your walls.
After all, a little comfort for both you and your dog goes a long way. Plus, it can save your wall a lot of headache—or scratches—when the playful pup gets excited.
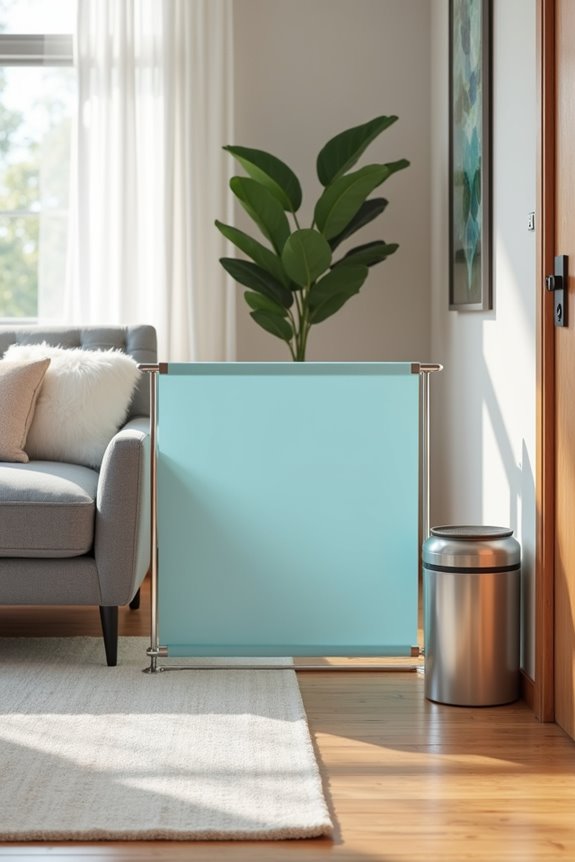
6. Colorful Acrylic Pet Gate
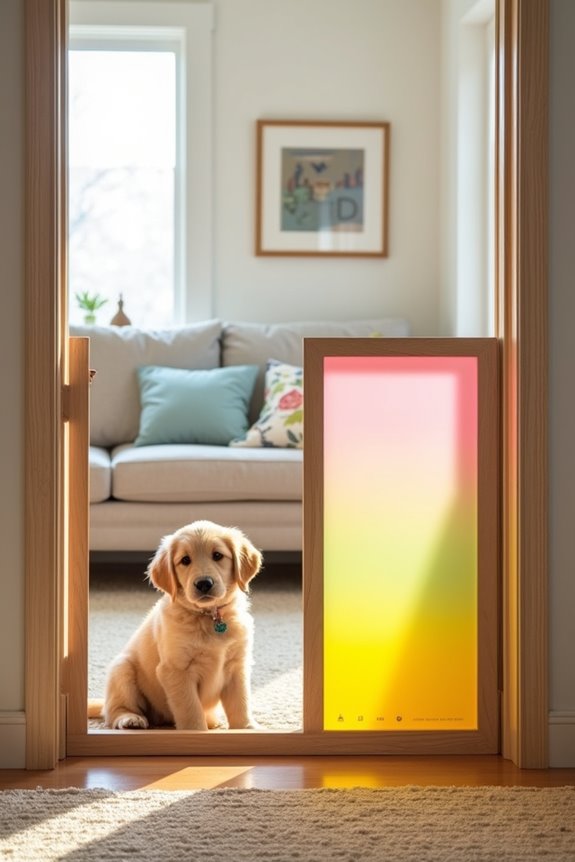
If you’re in need of a chic yet functional way to keep your canine companion where they belong, a colorful acrylic pet gate might just be your new best friend. This DIY project not only adds a splash of color to your home, but it also saves you money compared to high-end gates, giving you peace of mind while also elevating your decor. Plus, it’s a great way to show off your personal style. Additionally, you might want to consider investing in dog agility equipment professional, which can also provide a fun and safe environment for your pup to play and exercise. Ready to plunge into it?
Materials Needed:
- Acrylic sheets (available in various colors)
- Wooden frame materials (like 1×3 lumber)
- Hinge sets (2-3)
- Gate latch or magnetic closure
- Measuring tape
- Saw (for cutting wood)
- Drill with bits
- Safety goggles
- Work gloves
- Sandpaper
- Painter’s tape (for neat edges)
Step-by-Step Instructions:
- Measure Your Space: Start by measuring the width and height where your gate will be installed. Ideal dimensions often range from 30-36 inches tall, depending on your dog. Don’t forget to factor in the thickness of the frame.
- Cut the Frame: Using your saw, cut the wooden lumber into pieces that will make up the frame to hold your acrylic. You’ll need four pieces—two for the top and bottom, and two for the sides. Keep it even and straight for that polished look.
- Sand It Down: No one wants splinters, including your pup. Gently sand down any rough edges on the wood pieces, smoothing them out for safety and aesthetics.
- Assemble the Frame: With your wooden pieces ready, use your drill to join the frame together. It should be a rectangle deep enough to hold the acrylic securely. Remember, the smarter the joinery, the sturdier the gate!
- Attach the Acrylic Panels: Cut your acrylic sheets to size, leaving just a bit of edge space for the frame. Use a little painter’s tape to hold them in place while you secure them with screws through the frame—this way, you’ll avoid scratching your beautiful acrylic.
- Install Hinges and Latch: Attach the hinges to the side of the frame, making sure they’re evenly spaced for easy swinging. Connect the latch on the opposite side to keep your dog contained without worry.
- Final Touches: Step back and admire your handiwork. If you’d like, you can add decorative elements like wall decals to the acrylic or paint the frame for additional flair. This is where your personality can really shine.
Optional Add-ons/Variations:
- Color Wraps: Use different colored acrylics for a rainbow effect, or choose calming colors depending on your home design.
- Custom Designs: If you’re feeling crafty, try your hand at etching patterns or your dog’s name into the acrylic for a personable touch.
Pro Tip:
Secure your acrylic sheets firmly to the wooden frame to prevent any wobbly moments. If you’re using a translucent color, consider adding a non-slip base along the bottom to keep it steady—safety first, right?
Plus, it’ll help minimize any distracting wobble that could catch your pup’s curious eye.
There you have it! With a little time and creativity, you can make a lovely acrylic gate that not only serves a serious purpose but also looks great while doing it. Happy crafting!
7. Pet Safety Playpen Gate
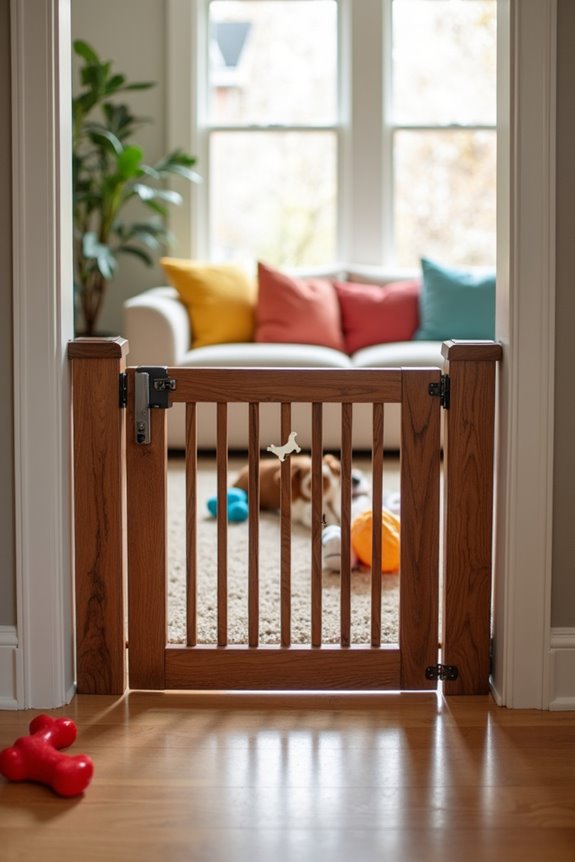
If you’re a dog owner, you know how important it’s to keep your furry friend safe while giving them the freedom to roam within a designated area. A DIY pet safety playpen gate is the perfect solution, providing a secure space for your pet to play without the worry of them wandering off.
Plus, it’s cost-effective and adds a bit of charm to your home, making it a win-win for you and your pup.
Materials Needed:
- Wooden boards (2x4s or 1x4s, depending on desired sturdiness)
- PVC pipes (optional, for a lighter option)
- Hinges (2-4, depending on gate size)
- Latch or locking mechanism
- Measuring tape
- Saw (a miter saw or hand saw will do)
- Drill with bits
- Sandpaper
- Wood stain or paint (for finishing)
- Safety goggles
- Work gloves
Step-by-Step Instructions:
1. Measure Your Area: First, decide where you want the playpen gate to go. Measure the opening’s width and height—typically around 30 inches tall works for most dogs but adjust depending on your breed’s jumping skills.
2. Cut Your Wood: Using your saw, cut your wooden boards to size. If you’re making a rectangular gate, you’ll need two vertical pieces and two horizontal pieces to form your frame.
Oh, and remember to keep your cuts as straight as your aim when tossing treats.
3. Sand Down the Edges: Nobody wants splinters, including your pup. Gently sand any rough edges to make everything smooth. Trust me, scrapes can ruin a perfect day of play.
4. Assemble the Frame: Join your wooden pieces together to form a rectangle. You can use screws for a strong hold or wood glue if you want to show off your DIY skills without the fancy equipment.
Whichever way you choose, just make sure it’s sturdy enough to withstand some enthusiastic bouncing.
5. Attach the Hinges: With your frame ready, it’s time to secure the hinges to one side. Make sure they’re level so your gate swings smoothly.
No one wants a gate that operates like an old-timey saloon door—creaky and unpredictable.
6. Add the Latch: Attach your latch on the opposite side of the hinges. This will keep your playful pup safely inside their area, while you enjoy a few quiet moments of peace (or at least what you can grab before the next bark calls your name).
7. Finish It Up: Now the fun part—finish it however you like! Stain the wood or paint it a funky color to complement your home decor.
Want to throw in some decals? Go for it. This is your chance to make it truly “pawsome.”
Optional Add-ons/Variations:
- Color and Material Swaps: Choose bright acrylic panels if you fancy something a bit more modern, or try using reclaimed wood for that rustic charm. Each option will give your gate a unique twist.
- Decorative Elements: How about adding some fun vinyl graphics? You can personalize it with your dog’s name or a playful quote. Bring your inner artist to life!
Pro Tip:
Remember to check that the latch is secure but easy enough for you to operate with one hand.
Trust me, trying to juggle a leash, treats, and a gate latch is a home improvement dilemma no one wants to face.
And don’t forget to regularly check the hardware to make sure everything stays tightly in place—after all, safety first!
Extra Tips & Ideas
While building your dog gate can feel a bit intimidating, there are plenty of creative ways to make it not only functional but stylish too.
You could repurpose old furniture or use reclaimed wood for a rustic vibe. Got paint lying around? A fresh coat can transform your gate into a showpiece.
Why not add some cute decorative accents? Think stenciled paws or fun fabric curtains.
If you’re unsure about dog-proofing, test it out with a small treat. Will they jump over it? Sneak under? It’s all part of the adventure.
And hey, if it doesn’t turn out perfect, it’s just a dog gate, right? Your pup won’t judge. They’re just grateful you didn’t turn it into an elaborate fort.
Frequently Asked Questions
What Materials Are Safest for DIY Dog Gates?
When building DIY dog gates, safest materials include sturdy wood, metal, or PVC. Avoid toxic finishes and guarantee no sharp edges. Using non-toxic paint or sealants keeps your dog safe and healthy in your home.
How Can I Measure My Space for a Dog Gate?
To measure your space for a dog gate, use a tape measure to determine the width and height of the opening. Make sure to account for any baseboards and choose a height suitable for your dog.
Are There Any Budget-Friendly DIY Options?
If you’re looking to stretch your dollar, consider repurposing wood pallets or using PVC pipes. Both options are budget-friendly and can transform into functional gates that keep your furry friend safe while looking great!
What Styles Suit Modern Home Interiors Best?
You’ll want sleek designs like minimalist panels or barn doors, focusing on clean lines and neutral colors. Mixing wood with metal can add a contemporary touch, ensuring your gate complements your modern home’s aesthetic beautifully.
Can I Customize Gate Designs for Larger Breeds?
Absolutely, you can customize gate designs for larger breeds. Think of a superhero protecting their city; with sturdy materials and adjustable heights, you’ll create a gate that keeps your big buddy safe and secure.
Conclusion
So, whether you’re going for that cozy barn vibe, a quirky folding screen, or a fancy acrylic gate, you’re bound to find a style that fits your space (and your pup’s personality). It’s funny how a simple dog gate can bring such flair to your home, right? You just might end up loving it more than your dog does. Go ahead, grab your tools, and get creative. You never know what masterpiece—both functional and stylish—you might end up with.