Got a pup that could use a little flair? You’re in for a treat with these DIY dog costumes that can turn any pooch into the life of the party. From superheroes to pirates, there’s something for every dog personality. Don’t worry if sewing isn’t your strong suit; these are simple enough, even for those of us who once glued our fingers together in art class. Stick around, and let’s get crafting those tail-wagging outfits.
Costumes for Every Breed
When it comes to dressing up your furry friend, picking the right costume for your dog’s breed is a big deal. For small breeds, think about something adorable yet comfy—a homemade pumpkin outfit for Halloween could be a hit.
Larger dogs? Maybe a DIY superhero cape would suit their style—you know, something that’ll make them feel powerful.
Get creative with household items; an old T-shirt turned into a flapper dress can be quite the charmer for a pup looking to strut.
Just remember, your dog’s comfort is key, or they’ll give you that “Seriously?” look.
Our Collection
You’ve got to check out our collection of dog costumes, because there’s something for every pup.
Whether you want to transform your furry friend into a superhero, a dashing pirate, or even a swashbuckling dinosaur, you’ll find plenty of options.
And let’s not forget the enchanting fairy and mermaid costumes—perfect for those moments when your dog channels their inner magical creature.
1. Superhero Dog Costume
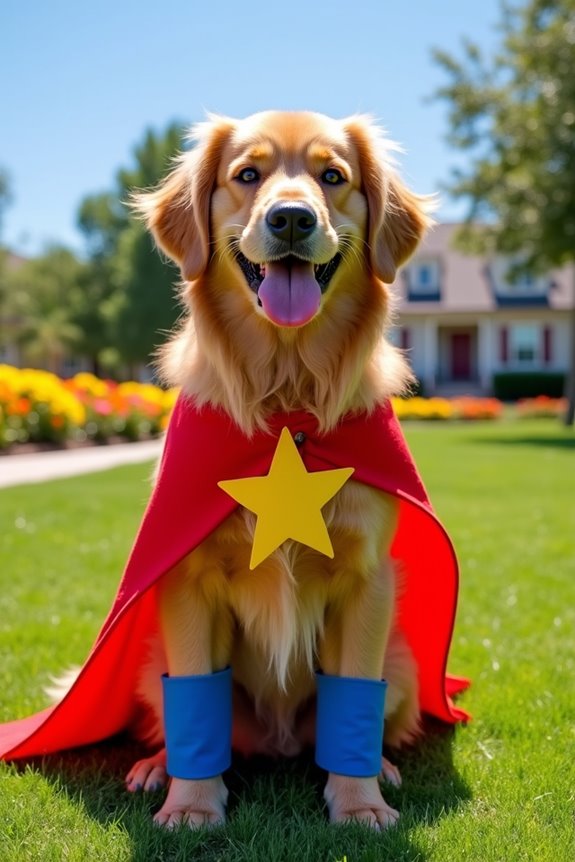
Ever dreamt of turning your pup into the superhero they were meant to be? This DIY Superhero Dog Costume is perfect for bringing out your dog’s inner hero without breaking the bank. Not only will it save you some cash compared to store-bought options, but it also guarantees a comfy fit for your furry best friend. Plus, you’ll be the coolest dog owner on the block! If you’re looking to elevate your pup’s happiness and health, considering a premium dog food subscription can also help keep them energized for all their superhero adventures!
Materials Needed:
- Brightly colored felt or fabric (red, blue, green, etc.)
- Scissors
- Fabric glue or a hot glue gun
- Dog harness or collar
- Ribbon or elastic band (for the cape)
- Marker or fabric chalk
- Optional: star stickers or other embellishments for added flair
Step-by-Step Instructions:
- Choose Your Colors: Decide on your superhero’s colors. Classic options like red and blue are always a hit, but feel free to get creative!
- Cut the Cape: Measure from your dog’s neck to just above their tail. Cut a rectangle of your chosen fabric or felt to that size. This will be the cape.
- Add the Neck Fastener: Cut a strip of fabric about 2 inches wide and long enough to tie around your dog’s neck comfortably. Attach this strip to the top corners of your rectangle cape with fabric glue or hot glue, making sure it can easily secure around your dog’s collar or harness.
- Make a Super Emblem: Using a contrasting color felt, cut out a simple shape for the emblem (like a star or a shield). Glue this to the center of the cape. You can also sprinkle star stickers or similar embellishments for an extra pop!
- Get Creative with Accessories: If you’re feeling extra crafty, make little wrist bands by cutting small strips of fabric and wrapping them around your pup’s legs (just above the paws for playful flair).
- Test It Out: Carefully put the costume on your dog. Make sure it’s snug but not too tight—after all, they need to save the day in comfort!
- Go for a Test Run: Take your superhero for a short walk or a photo shoot. Capture the moment as your pup struts their new look while you hold back your laughter at their fierce posing.
Optional Add-ons/Variations:
- Change up the cape with different fabrics like sparkly sequins or animal prints for a unique twist.
- Add a matching bandana—just cut a triangle from a piece of fabric, and voila! Instant superhero chic.
Pro Tip:
Make sure to choose lightweight materials to guarantee your pup can move freely and stay comfortable. If you’re unsure about the fit, always leave extra room—it’s better to be safe than stiff. You don’t want your dog to feel like they’re going into battle wearing a suit of armor when all they want is a cozy nap.
2. Dinosaur Dog Costume
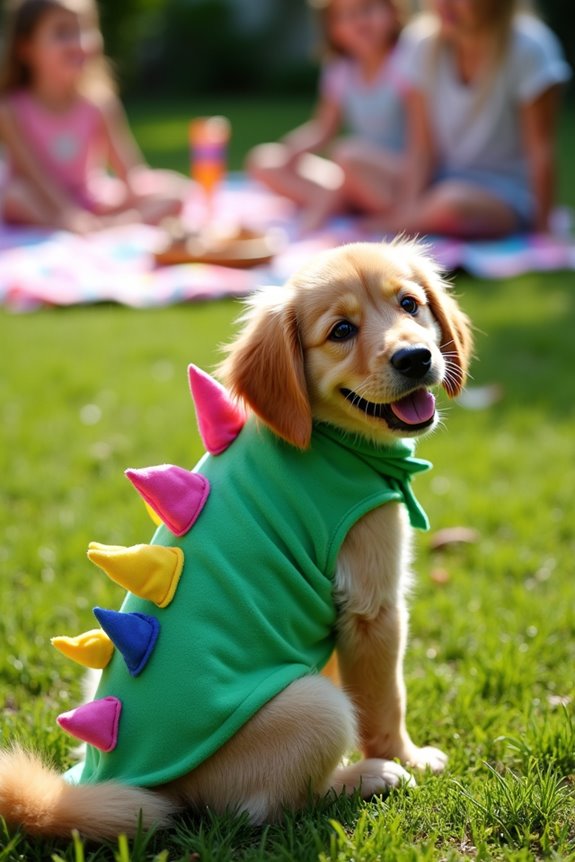
Imagine your furry friend roaring down the street, turning heads as the cutest dino in town. This DIY Dinosaur Dog Costume isn’t only an adorable way to transform your pup but also a fun project that you can whip up using simple materials at home. It’s budget-friendly, and your dog will appreciate the comfy fit that those store-bought costumes often lack. Plus, your pup can enjoy a special treat while wearing their costume, such as odor-free bully sticks, which are a great way to keep them happy during festivities.
Materials Needed:
- Green fleece or felt fabric (to mimic dinosaur skin)
- Scissors
- Fabric glue or a hot glue gun
- Adjustable dog harness or collar
- Cardstock or felt in contrasting colors (for the spikes)
- Marker or fabric chalk
- Optional: googly eyes or a dino tail for extra fun
Step-by-Step Instructions:
- Measure and Cut the Body Suit: Start by measuring your dog’s back from neck to tail. Cut a rectangle from your green fabric that matches this length and is wide enough to wrap around their body comfortably.
- Create the Spikes: Cut small triangles out of your cardstock or felt. You’ll need several of these for the dino spikes. The size can vary, but about 3 to 5 inches tall works well. Make as many as you like, depending on how spiky you want your dino to be.
- Attach the Spikes to the Body Suit: Lay the spikes along the top of the green rectangle, starting at the neck and going all the way down to the tail area. Use fabric glue or a hot glue gun to attach them securely. If you want, mix and match colors for a vibrant dino look.
- Add a Neck Fastener: Take a strip of fabric about 2 inches wide and long enough to tie around your dog’s neck comfortably. Attach this strip to the corners of the rectangle, ensuring it passes over the harness or collar to keep everything in place.
- Dino Details: For more character, you can glue on googly eyes to the top of your pup’s head and attach a small fabric tail at the back, if you’re feeling adventurous.
- Fit Check: Gently put the costume on your pup. Adjust the straps to make sure it’s snug yet allows for movement. You don’t want your doggie feeling constricted as they prance around.
- Show Off the Style: Take your newly-crowned dino for a walk. Get ready for the compliments and giggles as darling dino grabs the attention of everyone around.
Optional Add-ons/Variations:
- Choose different colors for your spikes, or even alternate with polka dots or stripes for extra fun.
- If your dog likes being pampered, consider adding a matching dino bandana—you just cut a triangle from a green fabric piece and tie it around their neck for an adorable finish.
Pro Tip:
Always make sure the costume doesn’t interfere with your dog’s ability to walk or play—choose lightweight materials for comfort.
And hey, if you notice they seem a bit stressed, it’s perfectly okay to ditch the costume and enjoy them just as they are. After all, they’re the cutest no matter what!
3. Pirate Dog Costume
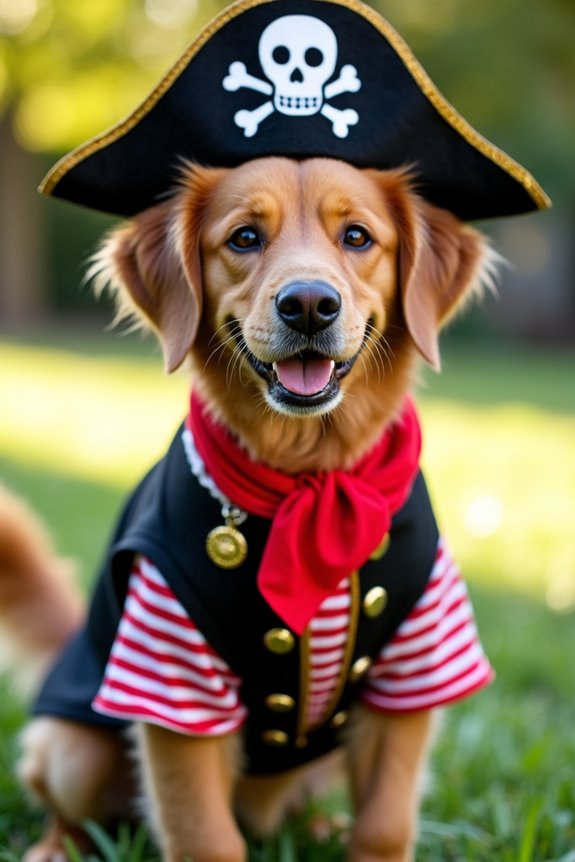
Transform your pup into a swashbuckling sailor with this DIY Pirate Dog Costume. Perfect for dog owners looking to save a few bucks, this costume isn’t only easy to make but also designed for comfort. Plus, it can be even more stylish when paired with some designer dog clothes from our collection.
Say goodbye to itchy store-bought costumes, and hello to a cozy pirate look that’ll have your dog sailing through the streets with style.
Materials Needed:
- Black felt or fabric (for the vest)
- Red and white striped fabric (for a pirate shirt)
- Scissors
- Fabric glue or a hot glue gun
- A bandana (preferably red or black)
- Cardboard (for a pirate hat template)
- Marker or fabric chalk
- Optional: faux gold coins or plastic jewels (for extra bling)
Step-by-Step Instructions:
- Measure and Cut the Vest: First, measure your dog’s back from neck to tail. Cut a rectangle from the black felt that’s the same length with a width to comfortably fit around their body. Cut armholes where necessary, like a comfy vest.
- Create the Pirate Shirt: Using the red and white striped fabric, cut out a rectangle that matches the length of the vest but is wider. You want this to billow a tiny bit, like a true pirate’s attire.
- Add Pirate Flair: Layer the striped fabric behind the black vest. Use fabric glue to attach it at the sides, allowing the stripes to pop out like a swashbuckling shirt.
- Craft the Pirate Hat: Draw a pirate hat outline on the cardboard, making it big enough to fit snugly on your pup’s head. Cut it out, then cover it with black felt. You can add a white skull and crossbones detail with leftover fabric to make it authentic.
- Accessorize with a Bandana: Take the bandana and tie it around your pup’s neck, leaving enough length for a neat bow. This simple addition completes the pirate look and keeps it comfy.
- Decorate with Treasure: If you’re feeling creative, glue on faux gold coins or plastic jewels to the vest, making your dog a treasure-seeking pirate. Remember, more is more when it comes to pirate gear!
- Fit Check: Once you’ve assembled the whole ensemble, gently put it on your furry friend and adjust everything to verify they’ve room to move around freely. Comfort is key, even for fierce pirates.
Optional Add-ons/Variations:
- Use different fabrics for the vest, like a deep navy blue for a sailor’s vibe.
- Add a long faux leather strip as a belt around the vest for a dashing look.
Pro Tip:
Before you set sail on your pirate adventure, confirm all fabric edges are properly secured with fabric glue to prevent any pesky fraying, and double-check that nothing is pinching or binding your dog’s skin.
4. Fairy Dog Costume
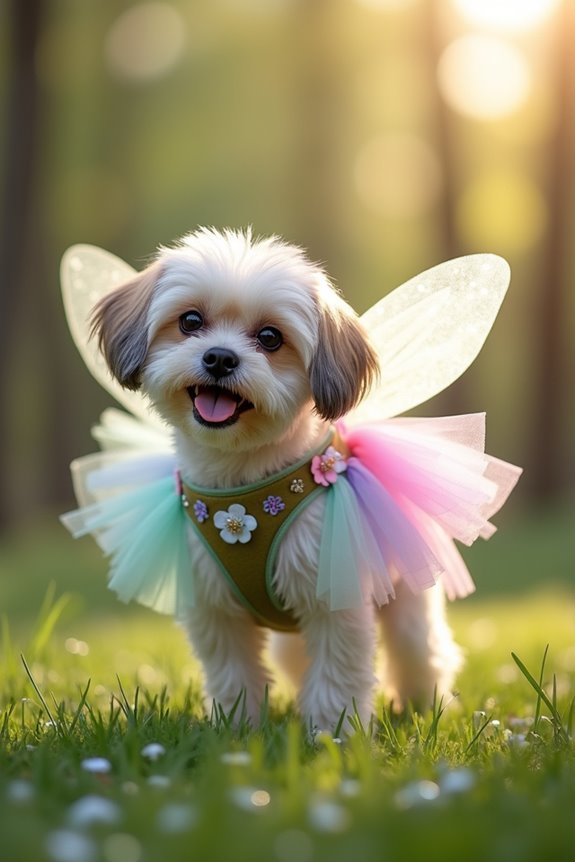
If you want to sprinkle a little magic into your dog’s wardrobe, then this DIY Fairy Dog Costume is just the project for you. Not only is it super cute, but it also saves you money and guarantees your dog is dressed comfortably in something you’ve crafted with love.
Plus, who wouldn’t want to turn their furry friend into a whimsical fairy? Additionally, while crafting this adorable costume, remember that premium dog food options for Shih Tzus can help keep your pup healthy and happy.
Materials Needed:
- Tulle fabric (in several pastel colors)
- Elastic band or ribbon (for the harness)
- Scissors
- Fabric glue or sewing kit
- Small flower embellishments (felt flowers or faux flowers)
- Glitter (optional, for extra sparkle)
- Dog harness (to attach the wings)
Step-by-Step Instructions:
1. Measure Your Dog: Start by measuring your dog’s girth (the widest part of their chest) to create a harness that fits comfortably. Make sure to give it some wiggle room.
2. Create the Wings: Cut two large rectangles from the tulle fabric, each approximately 12 inches wide by 14 inches tall. You can mix and match colors for a dazzling effect.
3. Layer the Tulle: Take one rectangle and fold it in half to create a wing shape. Do the same with the other rectangle. You want them to look fluffy and full, like a fairy would wear.
If you have a fabric that frays, consider folding in the edges or simply using a bolder hue for a neat finish.
4. Attach the Wings: On the upper part of the harness, use fabric glue or sew the center of your tulle wings down securely. Make sure the wings stand upright and are positioned so your dog can move freely.
5. Add Floral Accents: Glue or sew small flower embellishments onto the tulle wings and across the harness for that extra magical touch. You can even add a bit of glitter to the flowers or fabric for a fairy dust effect.
6. Final Fit: Slip the harness onto your dog and make any necessary adjustments for comfort’s sake. You want them to be a gliding fairy, not a grumpy pup.
Optional Add-ons/Variations:
- Consider using sparkly or metallic tulle in place of traditional colors for an even more enchanting look.
- You could also attach a small bell or charm to the harness, so every time your dog moves, they jingle like fairy magic!
Pro Tip:
Before you start gluing, lay everything out first to visualize how it’ll look. This way, you can play around with designs, and you’ll avoid that awkward moment trying to change things once it’s stuck!
And remember, keep an eye on your pup while they wear their costume — those wings might get a bit cumbersome if they get caught on the ground.
5. Mermaid Dog Costume
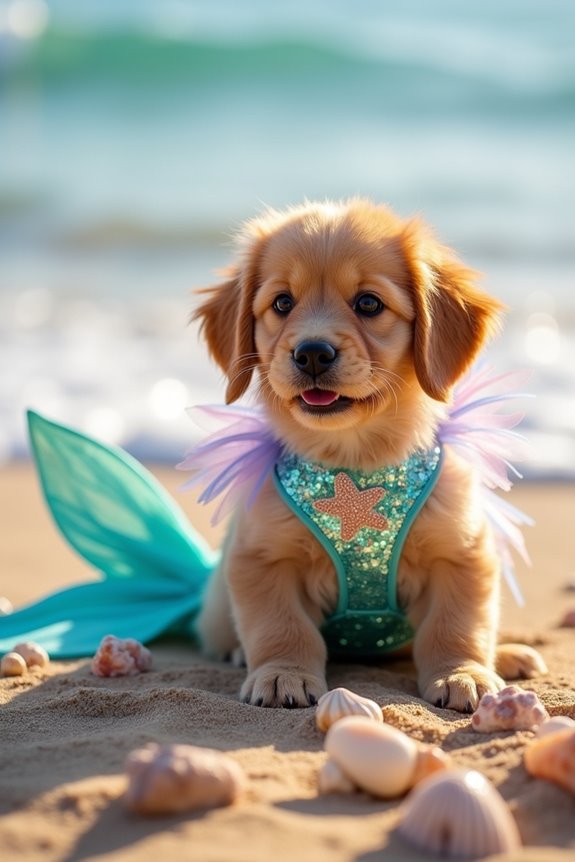
If you’re dreaming of the ocean and want to turn your pup into a dazzling sea creature, this DIY Mermaid Dog Costume is the perfect solution. It’s a fun and creative way to transform your furry friend while allowing them to move comfortably. Plus, it saves you money on store-bought outfits and makes for some seriously adorable photo ops! Also, consider the benefits of a luxury automatic pet door for easy access to the outside, especially for adventures in the backyard.
Materials Needed:
- Shimmery fabric (like sequined or metallic in your chosen color)
- Tulle or mesh (for the fins)
- Scissors
- Measuring tape
- Needle and thread (or fabric glue for a no-sew option)
- Elastic band (for the tail)
- Dog harness
- Optional: seashell and starfish embellishments
Step-by-Step Instructions:
- Measure Your Dog: Start by measuring your dog’s body from neck to tail to determine how long the mermaid tail should be. It should be comfortable and not too restrictive, so they can frolic without feeling like a pressure cooker.
- Cut the Tail Shape: From your shimmery fabric, cut a large rectangle that’s about twice the length of your dog’s measurement. You’ll fold this rectangle in half to create the tail, so don’t worry, the extra fabric is for flair.
- Sew or Glue the Sides: Fold the fabric in half lengthwise and secure the sides together with your needle and thread, or fabric glue. Leave the top open for your dog’s harness to fit through. If you’re using glue, let it dry completely before continuing.
- Create Fins with Tulle: Cut two fin shapes out of the tulle or mesh fabric. You can get creative here! Try making a wavy fin or a flared shape to mimic a mermaid’s tail. Attach the fins by sewing or gluing them to the bottom of the shimmery tail.
- Attach the Tail to the Harness: Slip your dog’s harness through the open top of the tail. Make sure it’s secure and comfortable so your pup doesn’t feel like a fish out of water when wearing it.
- Add Embellishments: Enhance the look by gluing or stitching on some seashells or starfish onto the tail or harness. It’s like their own ocean fashion statement.
- Final Slip-On: Once everything is dry and secure, let your pup try on their new mermaid tail. Adjust as needed so that they feel fabulous and free to chase those imaginary waves.
Optional Add-ons/Variations:
- Want to mix it up? Use different colored fabrics for the tail and fins, like a dazzling rainbow or a classic blue-and-green ocean theme.
- You can also consider adding a matching headpiece made from fabric scraps or flowers to resemble a sea crown. Setting the under-the-sea mood is all about the little touches!
Pro Tip:
Always watch out for any loose threads or small pieces that could come loose during your dog’s adventures. A quick check before they prance out can guarantee safety and comfort, because the last thing you want is a locking mechanism of the tail not working mid-fetch.
And hey, make sure to keep a camera handy – seeing your pup in a mermaid costume will definitely make a splash!
6. Pumpkin Spice Dog Costume
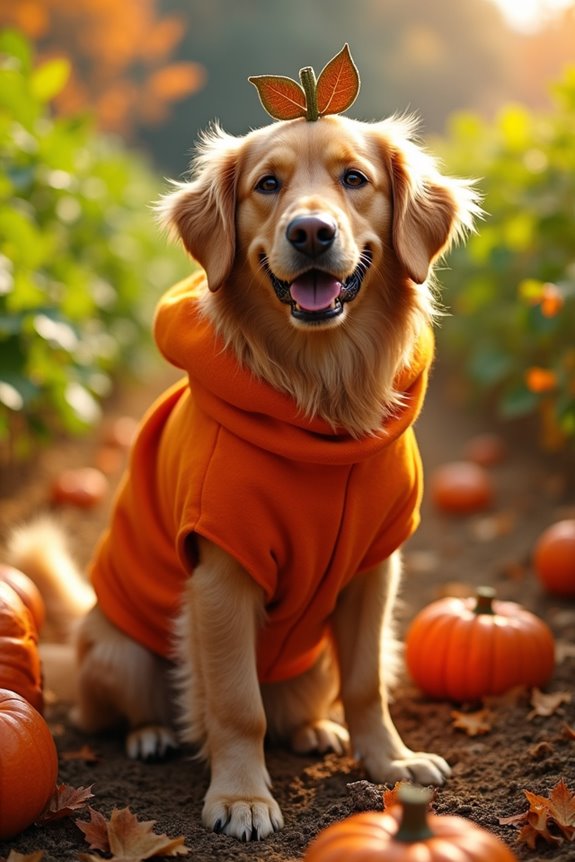
As the leaves change and the air turns crisp, why not spice up your pup’s wardrobe with a cozy and charming Pumpkin Spice Dog Costume? This DIY project not only saves you money compared to store-bought outfits but also adds that warm, fuzzy, autumnal vibe to your home.
Plus, your dog will look absolutely adorable, and you’ll have the perfect outfit for those fall photo ops—you know the ones featuring a pumpkin patch backdrop. Let’s explore this fun and easy project together.
Materials Needed:
- Orange felt fabric (1 or 2 yards)
- Brown felt fabric (small piece for the stem)
- Green felt fabric (small piece for the leaves)
- Scissors
- Measuring tape
- Needle and thread (or fabric glue for a no-sew option)
- Dog harness or vest
- Optional: decorative buttons or ribbons
Step-by-Step Instructions:
1. Measure Your Dog: Start by measuring your dog’s chest and length from neck to tail. This will help you determine how big your pumpkin costume should be. Remember, comfort is key—no one wants a grumpy pup.
2. Cut Out the Pumpkin Shape: From the orange felt, cut out a large oval shape. Make sure it’s roomy enough for your dog to wear comfortably. A little extra fabric never hurts; think of it as a pumpkin sweater.
3. Sew or Glue the Sides: If you’re using a harness, you can keep the center open for easier wear. Fold over the edges and secure them with a needle and thread or apply fabric glue, making sure it’s durable enough for your pup’s playful antics.
4. Create the Stem and Leaves: Cut a small rectangle from the brown felt for the stem and some leaf shapes from the green felt. Attach the stem to the top of the pumpkin with glue or stitches, then affix the leaves artfully around it.
Hey, every pumpkin needs a little greenery for flair!
5. Attach the Costume to the Harness: Slip your dog’s harness or vest through the opening you created earlier. Adjust as necessary to make sure your pup can still run, jump, and show off their new look without any restrictions.
6. Add Decorations: Ready to jazz things up? Attach decorative buttons or ribbons to the costume for some extra personality. It mightn’t turn your dog into the star of the pumpkin patch, but it definitely won’t hurt!
7. Final Fitting: Let your pup try on their new pumpkin outfit. Make any last-minute adjustments to confirm they’re feeling comfy and cute. A happy dog is a fashionable dog, after all.
Optional Add-ons/Variations:
– Want to take it a step further? Consider using a patterned fabric or adding a little sparkle with glitter felt to make your pumpkin costume unique.
Maybe even go for a cute little witch hat to complete the fall vibe!
– You could also mix and match colors, like a classic spooky black for a Halloween twist.
Pro Tip:
When making your costume, always remember to check for any small parts or loose edges that your dog might nibble on.
We love our DIY projects, but safety comes first—nobody wants a trip to the vet after a fun day at the pumpkin patch. Keep it safe, stylish, and fun.
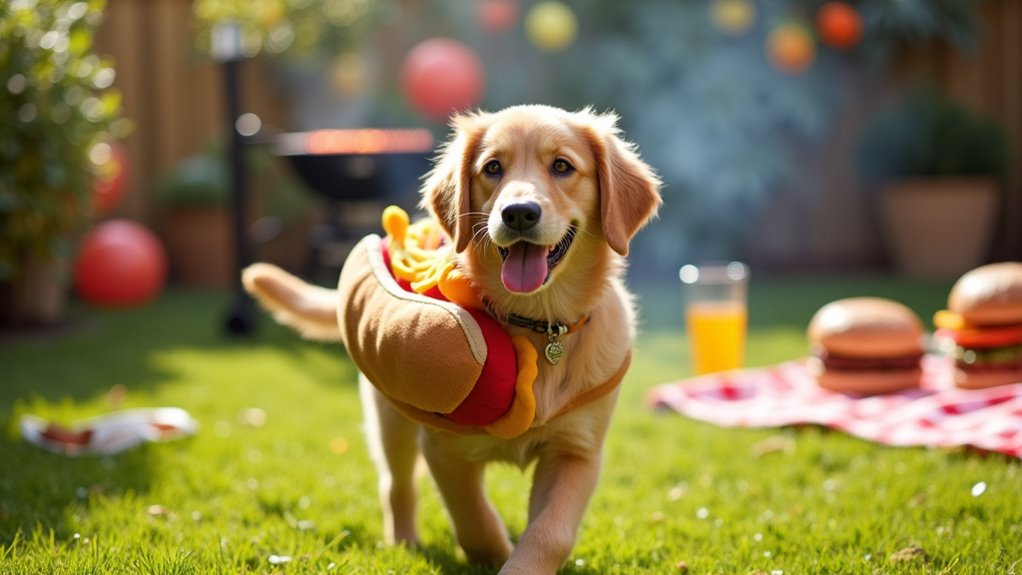
7. Hotdog Dog Costume

As the weather warms up and you fire up the grill for those summer barbecues, it’s the perfect time for your furry friend to join in on the fun—dressing up in a delightful Hotdog Dog Costume! This DIY costume isn’t only cute and quirky, but it’s also budget-friendly, allowing you to spend more on those tasty hotdogs for yourself instead of overpriced pet costumes.
Plus, your pup will be the life of the party, attracting attention and chuckles wherever you go. Let’s get sizzling with this fun project!
Materials Needed:
- Brown felt fabric (for the hotdog bun; 1 yard)
- Cream or beige felt fabric (for the hotdog; 1 yard)
- Red felt fabric (for ketchup; small piece)
- Yellow felt fabric (for mustard; small piece)
- Scissors
- Measuring tape
- Needle and thread (or fabric glue for the easy no-sew option)
- Dog harness or vest
- Optional: small Velcro strips or safety pins
Step-by-Step Instructions:
1. Measure Your Pup: Your first task is to measure your dog’s chest and length from neck to tail. This helps you know how big to cut your fabrics. Trust me, no one wants to wrestle a wiggly dog into something too tight.
2. Cut Out the Bun Shape: From the brown felt, cut out an oval shape that’s wide enough to wrap around your dog’s body. This is going to be your hotdog bun. Think of it as a cozy little wrap, so keeping it roomy is vital for comfort.
3. Cut Out the Hotdog Shape: Next, grab the cream or beige felt and cut out a long oval shape—this will represent the hotdog inside the bun. Make sure it’s a little smaller than the bun shape so it can nestle snugly inside.
4. Add the Toppings: Now, it’s time for the fun part. Cut thin strips from the red and yellow felt for your ketchup and mustard.
Attach these strips to the top of the hotdog shape using fabric glue or by sewing them on. Channel your inner chef—it’s like plate decorating, but for your pup!
5. Assemble the Costume: Take the bun piece and open it up (think taco style) to gently place the hotdog inside. You can sew or glue the edges of the bun closed, confirming there’s an open end for your harness.
This way, your pup can slip in and out easily.
6. Attach to the Harness: Slip your dog’s harness or vest through the opening in the bun. Make any adjustments necessary to confirm the costume sits comfortably without restricting their movements.
Your canine should be ready to trot around in style, not feel like they’re trapped in a fabric burrito!
7. Final Fitting: All dressed up? Let your pooch try on their tasty hotdog costume. Check for comfort and make any necessary adjustments—because a grumpy dog can ruin the fun, right?
Optional Add-ons/Variations:
Feeling creative? You can customize the colors by using patterned fabrics that showcase a fun picnic vibe.
Maybe a gingham or polka dot pattern for your bun? You can also make a giant pickle using green felt to add to the ensemble—how cute would that be?
Pro Tip:
To keep your pup comfortable during wear, consider adding a small piece of soft fabric around the edges of the bun for added cushioning.
It’s a simple way to prevent irritation, especially during those long summer strolls. And don’t forget to take lots of pictures before they decide that the costume isn’t “hot” enough for their taste.
Extra Tips & Ideas
What’s more fun than dressing up your pup for a special occasion?
To take your DIY dog costumes to the next level, think outside the box. Ever considered using old clothes? A tiny t-shirt can transform into a superhero cape. And don’t forget about accessories—like colorful bandanas or funky hats—they can jazz up any costume.
Want to make it even more memorable? Snap some pictures during your pup’s “fashion show,” then create a little scrapbook.
Also, keep safety in mind; avoid small, chewable parts that could cause trouble.
And hey, if you trip over your dog while they strut their stuff, just laugh it off—at least your pup’s the star of the show, and you can always blame the costume.
Frequently Asked Questions
What Materials Are Safest for Dog Costumes?
For dog costumes, use soft, breathable fabrics like cotton or fleece. Avoid small parts that could be swallowed, and steer clear of anything with strong chemicals. Ensuring comfort and safety keeps your pup happy during wear.
How Can I Measure My Dog for a Costume?
Measuring your dog’s like capturing a fleeting moment. Start with a flexible tape measure, noting the neck, chest, and length from neck to tail. That’ll help guarantee a snug fit for their costume!
Are There Any Dog Costume Patterns Available?
Yes, you can find numerous dog costume patterns online or in craft stores. Look for resources like sewing blogs, Pinterest, or specialty pattern websites to inspire your creativity and create the perfect costume for your pup.
Can I Dress My Dog for Hot Weather?
Just like you wouldn’t wear a heavy coat on a sunny day, your dog shouldn’t wear thick costumes in hot weather. Opt for lightweight, breathable materials to keep them cool and comfortable while still looking adorable.
How Should I Introduce My Dog to Wearing a Costume?
Start by letting your dog sniff the costume gently, then reward them for curiosity. Gradually put it on for short periods, using treats and praise to create positive associations, ensuring they feel comfortable and secure.
Conclusion
So, why not transform your pup into a star of the show? Whether they’re bouncing around in a superhero cape or strutting their stuff as a pirate, these DIY costumes are sure to bring smiles. Just imagine the compliments as you walk through the park, with your dog in a pumpkin spice costume, turning heads and wagging tails left and right. It’s all about having fun and letting your dog’s personality shine, one adorable stitch at a time.