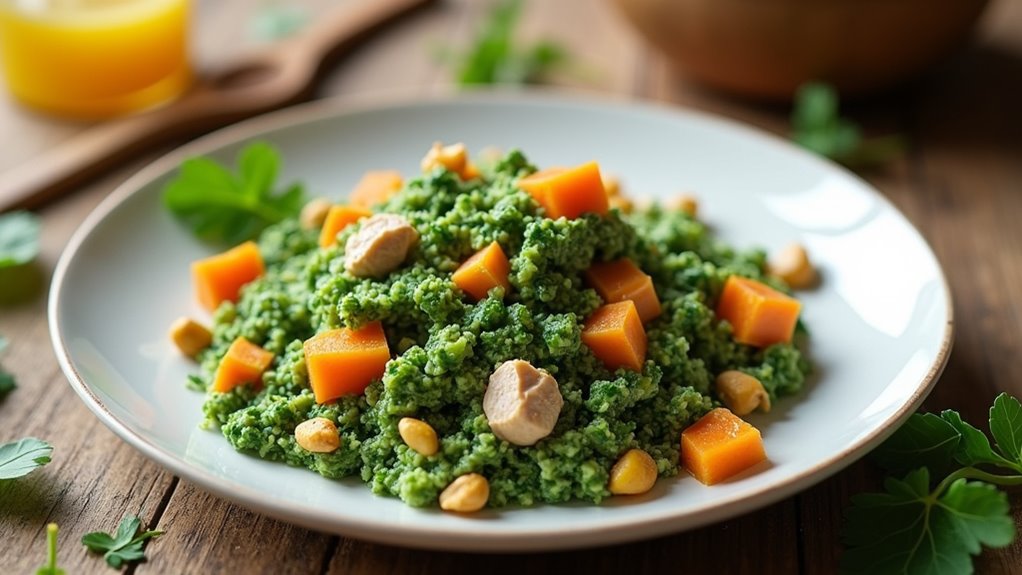
If your pup’s scratching like they’re auditioning for a role in a doggy talent show, it might be time to explore some homemade dog food options. It’s all about the ingredients, right? You’ve got the power to whip up meals that not only taste great but could also soothe that itchy skin. Let’s talk about some delectable ideas—each dish can be a game changer for your furry friend. So, what’s cooking in your kitchen?
Why Homemade?
Sure! Here is your revised content following the specified instructions:
—
When it comes to feeding your furry friend, have you ever wondered why homemade dog food is often the best choice?
Wondering why homemade dog food is the way to go? It’s all about knowing what goes into your pup’s bowl!
Let’s face it—commercial dog foods can be full of mystery ingredients that mightn’t love your pup’s sensitive skin. By whipping up homemade dog food for itchy skin, you gain control over what goes into their bowl. You know exactly what they’re eating—and you can skip the fillers that often trigger allergies. Additionally, homemade food allows you to avoid harmful additives that are commonly found in commercial brands.
Plus, cooking for your dog can be a fun bonding experience. Just think of it; your kitchen becomes a doggy chem lab. You can mix in anti-inflammatory ingredients like sweet potatoes, carrots, or lean meats, while avoiding grains that might annoy that delicate tummy. In addition, many dogs benefit from nourishing homemade dog food specifically formulated for skin allergies. Some ingredients, such as omega-3 fatty acids, are also known to promote skin health. Moreover, preparing nutritious homemade dog food can help regulate your dog’s blood sugar levels, which is crucial for diabetic pups.
Sure, you might accidentally drop a carrot or two on the floor (who hasn’t?), but isn’t your pup’s joy worth a little kitchen chaos? You’re crafting meals made with love and care, and that’s what counts.
—
Let me know if there’s anything else you need!
Meal Ideas for Dogs
When it comes to making meals for your furry friend, you’ve got some tasty options that not only delight their taste buds but can help soothe itchy skin too.
Think about whipping up a Chicken and Sweet Potato Mix or a Savory Salmon and Quinoa Bowl—isn’t it amazing how good food can be so beneficial? Making nutritious homemade dog food is essential for your Boxer’s overall health. By ensuring your dog receives well-balanced ingredients, you can aid in improving their skin condition. Nutritional benefits can also enhance your Cavapoo’s coat quality, making those meals even more rewarding.
With combinations like Beef and Pumpkin Medley and Turkey and Spinach Delight, your dog might just start giving you those ‘chef’s kiss’ looks. Additionally, it’s crucial to explore homemade dog food for chicken allergies to ensure that their meals are safe and nutritious.
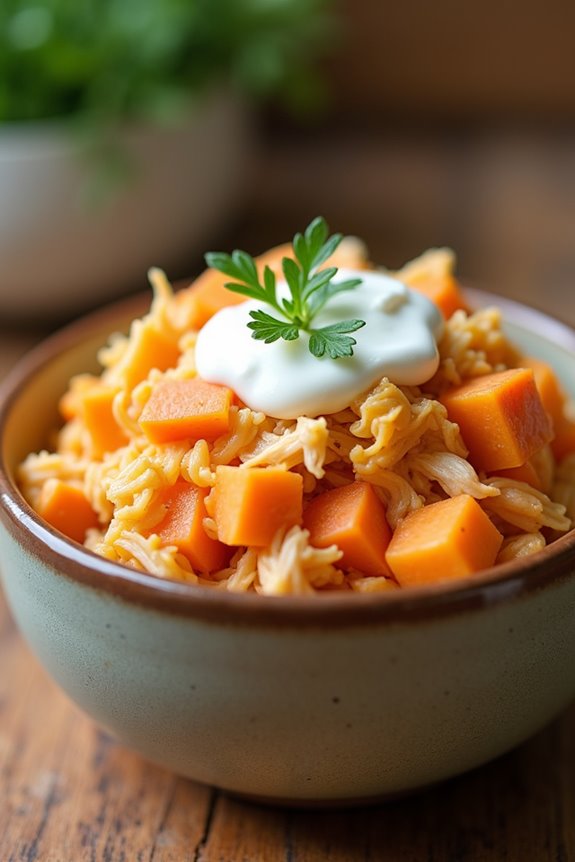
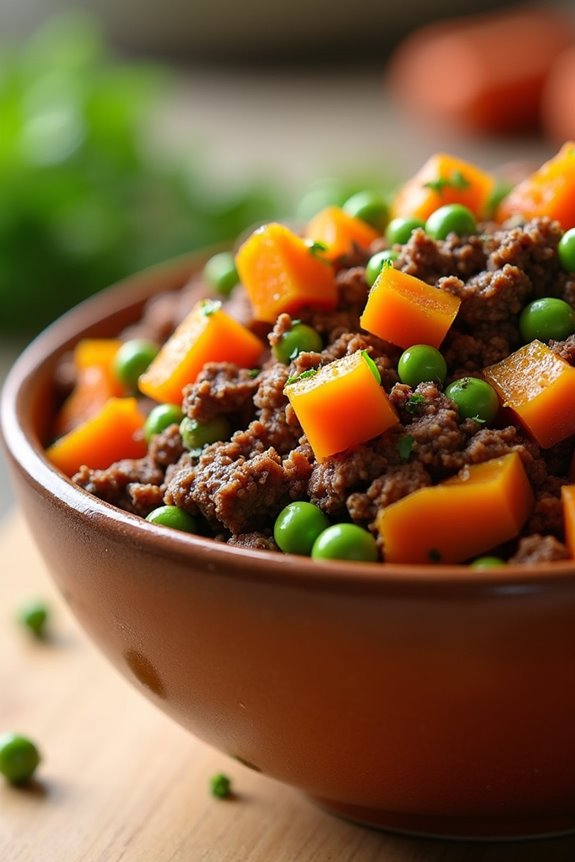
1. Chicken and Sweet Potato Mix
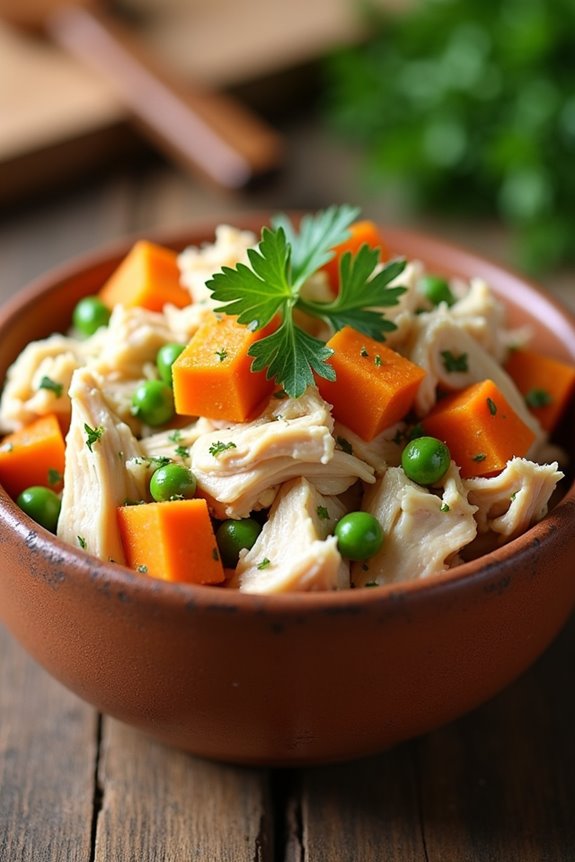
Ready to whip up something special for your pup? The Chicken and Sweet Potato Mix not only sounds tasty, but it’s also packed with nutrients that can help soothe that itchy skin. This recipe is specially designed to combat yeast issues which many dogs face. Let’s talk ingredients, easy step-by-step instructions, and maybe even a few fun add-ons to really make this meal shine for your furry friend. Additionally, this recipe is great for wholesome homemade dog food options that can be beneficial for bully breeds.
Ingredients
Making homemade dog food can be such a rewarding experience, especially knowing you’re crafting meals that are good for your pup and tailored to their needs.
Now, if your furry friend is dealing with itchy skin, a chicken and sweet potato mix is a fantastic choice. It’s nutritious, tasty, and, let’s be honest, who wouldn’t want to devour a delicious combination of chicken and sweet potatoes?
Here’s what you’ll need for this simple recipe.
- 2 cups of cooked, shredded chicken (skinless, boneless)
- 1 cup of cooked, mashed sweet potatoes (no skins)
- ½ cup of peas (frozen or fresh will work just fine)
- ½ cup of carrots, diced (cooked or raw, your choice)
- ¼ cup of chicken broth (low-sodium)
- 1 tablespoon of olive oil (to add some healthy fats)
This mix isn’t only easy to throw together, but it smells so good you might be tempted to join your dog in sharing a bowl—though I wouldn’t recommend it (trust me, I learned that lesson the hard way when I tasted my dog’s food once, and let’s just say, it’s not my ideal dinner).
Step by Step Instructions
- Start by gathering all your ingredients: chicken breast, sweet potatoes, carrots, and any additional toppings your pup enjoys.
- Preheat your oven to 400°F (200°C) while you get everything ready.
- Wash and peel the sweet potatoes and carrots. Cut them into small cubes for even cooking.
- Place the sweet potato cubes in a pot of boiling water. Cook for about 15–20 minutes, or until they’re tender enough to poke with a fork.
- While the sweet potatoes are cooking, place the chicken breast in a large frying pan over medium heat. Cook for about 7–10 minutes per side, or until the chicken is fully cooked (you’re aiming for no longer pink in the center).
- Once the chicken is cooked, remove it from the pan and let it cool. Shred the chicken into small, bite-sized pieces.
- Drain the sweet potatoes and toss them in a mixing bowl. Mash them slightly with a fork, but leave some chunks for texture.
- Add the shredded chicken and diced carrots into the bowl with the sweet potatoes. Mix everything together until combined.
- If you want, top with a splash of chicken broth or a dollop of plain yogurt for extra flavor!
- Transfer the mixture into your dog’s bowl or a storage container.
- Cool completely before serving to your dog. (You don’t want to burn their tongue – trust me, they’re not as patient as we are.)
Happy feeding!
Optional Add-ons
If you’re looking to spice up your dog’s chicken and sweet potato mix, you’ve come to the right place.
Try adding some green beans for crunch, or maybe a dollop of plain yogurt for creaminess.
Even a sprinkle of turmeric can bring anti-inflammatory benefits.
Your pup deserves variety, right?
Just remember: moderation is key—too many add-ons can lead to a rumbly tummy.
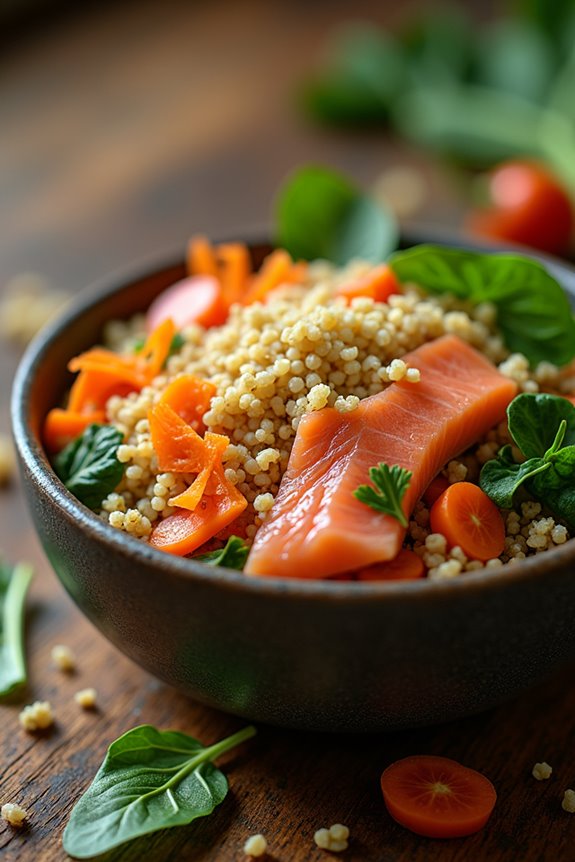
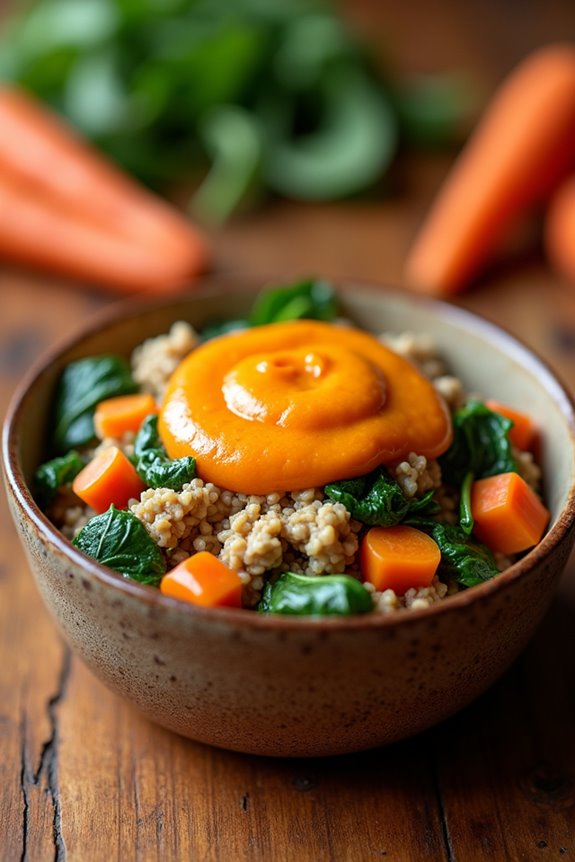
2. Savory Salmon and Quinoa Bowl
When it comes to your furry friend’s meals, the Savory Salmon and Quinoa Bowl is a game changer. You’ll love how simple it is, with just a handful of ingredients, and your pup will be wagging their tail in delight. Let’s get into the step-by-step instructions, plus some tasty optional add-ons to make it even more special.
Ingredients
If your pup is dealing with itchy skin, a homemade meal is a great way to help soothe their discomfort while giving them a nutritious boost. This Savory Salmon and Quinoa Bowl isn’t only tasty but full of wholesome ingredients that can help ease that irritation.
So, let’s gather what we need to whip up this delightful dish for your furry friend.
- 1 cup of cooked quinoa
- 1 cup of shredded, cooked salmon (make sure it’s boneless and skinless)
- ½ cup of steamed green beans, chopped into bite-sized pieces
- ½ cup of carrots, finely grated or diced
- 1 tablespoon of olive oil
- ½ teaspoon of turmeric (known for its anti-inflammatory properties)
- Optional: a sprinkle of parsley for added flavor and freshness
And there you have it, a simple list of pup-approved ingredients that won’t break the bank—or your best friend’s diet.
It’s like creating a gourmet meal for your dog, but without the need for a Michelin-starred chef. Trust me, if I can manage to make this without accidentally mistaking dog food for my lunch, you can definitely do it too.
Step by Step Instructions
- Start by gathering all your ingredients: 1 cup of quinoa, 2 cups of water, 1 can of wild-caught salmon (drained), ½ cup of shredded carrots, and ¼ cup of chopped spinach. Make sure you have a pot and a mixing bowl ready too.
- Rinse the quinoa in cold water under a fine-mesh strainer. This helps remove the natural coating called saponin, which can taste bitter.
- In a medium pot, bring 2 cups of water to a boil. Once boiling, add the rinsed quinoa, reduce heat to low, cover, and let it simmer for about 15 minutes. The quinoa should be fluffy and the water absorbed when it’s ready.
- While the quinoa is cooking, open the can of salmon and drain the excess liquid. Flake the salmon into a mixing bowl, breaking it into bite-sized pieces with a fork.
- After the quinoa is done, remove it from heat and let it sit for 5 minutes, covered. Then, fluff it with a fork until light and airy.
- Add the fluffed quinoa to the bowl with the salmon. Mix in the shredded carrots and chopped spinach, stirring everything together until well combined.
- If you want to make it a bit more exciting, you can even add a splash of fish oil or a sprinkle of turmeric for extra benefits; just mix those in thoroughly.
- Once everything is mixed well, serve it up in your dog’s favorite bowl.
- Cool completely before serving to your dog, because nobody likes a hot dinner—certainly not your furry friend.
And there you have it, a savory salmon and quinoa bowl ready to help soothe that itchy skin. Enjoy the tail wags and happy dances that follow!
Optional Add-ons
There’s nothing like a little creativity to jazz up your dog’s meals, especially when you’ve got that savory salmon and quinoa bowl hanging out in the fridge.
Think about tossing in some sweet potatoes for a boost in vitamins or sprinkle in fresh parsley for that extra flair. Your dog won’t just think it’s delicious—they might just sit up and beg for more.
Who doesn’t want a culinary superstar pooch?
3. Beef and Pumpkin Medley
Let’s talk about the Beef and Pumpkin Medley, a savory treat your pup’s gonna love. You’ll need just a few simple ingredients, and I promise, it’s way easier than it sounds—no chef hat required. Plus, we’ll go through step-by-step instructions and even sprinkle in some fun optional add-ons to really make it special for your furry friend.
Ingredients
Making homemade dog food can be a fun and rewarding experience, especially when it’s all about giving our furry friends some much-needed relief from itchy skin.
Plus, it’s an opportunity to bond with your pup while you whip up something tasty and nutritious.
Let’s dive right into the ingredients you’ll need for this hearty Beef and Pumpkin Medley.
- 1 pound ground beef (lean works best for our adventurous furry companions)
- 1 cup canned pumpkin (not the spiced pie filling, just pure pumpkin; it’s a superstar for digestion)
- 1 cup cooked brown rice (you know, the stuff that gives you all the feels when paired with beef)
- 1/2 cup green peas, frozen or fresh (little green gems that add fiber and flavor)
- 1/4 cup carrots, finely chopped (because dogs love a little crunch)
- 1 tablespoon olive oil (for that shiny coat and extra love)
- 1/4 cup water or low-sodium broth (to keep things moist and flavorful)
That’s it!
Seem simple enough, right?
Get ready to see your dog wagging their tail in delight as you whip this up in your kitchen.
Cooking for your pup can be a bit messy sometimes, but it’s worth every spill and splatter for that sweet, happy face looking up at you.
Happy cooking!
Step by Step Instructions
Start your journey to a healthier dog with this delicious Beef and Pumpkin Medley! Not only is it packed with nutrients, but it’s also great for relieving itchy skin. Let’s explore the simple steps to whip this up.
- Gather your ingredients: 1 pound of ground beef, 1 cup of pumpkin puree (not pie filling), 1 cup of carrots (diced), 1 cup of peas (fresh or frozen), 1 tablespoon of olive oil, and ½ cup of beef broth.
- Heat a large skillet over medium heat.
- Add the olive oil and let it warm up for about 30 seconds. (You don’t want it to smoke, just a little shimmer is perfect.)
- Toss in the ground beef. Cook until browned, stirring occasionally, about 5–7 minutes. (Make sure there’s no pink left, but hey, no need to get all gourmet about it!)
- Drain any excess grease from the beef. (It’s okay to leave a little for flavor. We aren’t going overboard here.)
- Add the diced carrots and peas to the skillet. Stir everything together and cook for an additional 3–5 minutes until the veggies start to soften.
- Pour in the pumpkin puree and beef broth. Mix well. (Nothing quite says “my dog will love this” like a rich, colorful medley.)
- Bring the mixture to a gentle simmer. Let it simmer for about 10 minutes, stirring occasionally. It should look deliciously thick and hearty.
- Once done, remove from heat and allow it to cool slightly.
- Serve in your dog’s bowl but be sure to cool completely before offering it to your furry friend. (Trust me, burnt tongues are no fun for anyone!)
And there you have it! A wholesome, homemade meal that packs a punch against itchy skin. Enjoy the happy tail wags!
Optional Add-ons
While it’s tempting to stick to the Beef and Pumpkin Medley as a go-to meal, why not spice things up?
Toss in some cooked carrots or peas for a pop of color and nutrients. A sprinkle of fish oil can give your pup’s coat a shiny boost.
4. Turkey and Spinach Delight
Ready to whip up a tasty Turkey and Spinach Delight for your pup? You’ll need just a few simple ingredients and some straightforward steps to create a meal that could make even your dog’s tail wag with excitement. And if you’re feeling adventurous, I’ve got a few optional add-ons that’ll take this dish from good to drool-worthy.
Ingredients
When your furry friend is dealing with itchy skin, it’s essential to give them the right nutrition to help soothe their discomfort. This Turkey and Spinach Delight isn’t only packed with goodness, but it’s super easy to make. Your pup will love it, and you’ll feel great knowing you’re making something healthy and tasty.
So, let’s get started with the ingredients!
- 1 pound ground turkey
- 2 cups fresh spinach, chopped
- 1 cup carrots, shredded
- ½ cup peas, frozen or fresh
- ¼ cup pumpkin puree (not the spiced pie filling)
- 2 tablespoons olive oil
- 1 teaspoon fish oil (optional, for added omega-3s)
These straightforward ingredients are all dog-safe and designed to help give your pup some much-needed relief while keeping their tail wagging with joy.
You can easily find them at your local grocery store. And trust me, cooking this up will make your kitchen smell fantastic, making you wonder why you even bother with takeout.
Make sure to prep a big batch; your dog will be begging for more!
Step by Step Instructions
1. Start by gathering all your ingredients: ground turkey, fresh spinach, carrots, pumpkin puree, quinoa, and a splash of olive oil.
Take a deep breath—you’re on your way to making a delicious meal for your pup.
2. Preheat your oven to 350°F (175°C) so it’s nice and hot when you’re ready to bake.
(Cooking is all about timing, right?)
3. In a large pot, bring about 2 cups of water to a boil. Once it’s bubbling, add 1 cup of quinoa.
Stir it gently and lower the heat to simmer. Cook for about 15 minutes or until the water is absorbed and the quinoa is fluffy.
(If it starts to look like a tiny, beautiful cloud, you’re spot on.)
4. While the quinoa cooks, heat a large skillet over medium heat and add a splash of olive oil.
Let it get warm, then toss in 1 pound of ground turkey. Cook it until it’s not pink anymore, about 5–7 minutes.
(Nose twitching yet? It’s the turkey magic.)
5. Once the turkey is fully cooked, add in 1 cup of chopped fresh spinach and 1 cup of diced carrots.
Stir it all together until the spinach wilts and the carrots soften a bit, around 3–4 minutes.
(It’ll look vibrant and colorful—so inviting, even you might want to jump in!)
6. Remove the skillet from the heat and mix in 1 can of pumpkin puree and the cooked quinoa.
Stir until everything is combined beautifully.
(You’re creating a masterpiece here, even if it does just look like dog food.)
7. Transfer the mixture into a baking dish, spreading it evenly.
Pop it into the preheated oven and bake for 25–30 minutes, or until it’s heated through and the edges start to turn a bit golden brown.
(Can you smell it yet?)
8. Take the dish out of the oven and let it cool completely on a countertop.
Your patience will pay off—don’t be in a hurry to serve it.
9. Serve it up in your dog’s bowl.
(Tip: Your pup will appreciate the warm, hearty meal—just make sure to cool it down first if it’s too hot.)
There you go, your homemade turkey and spinach delight. Happy cooking!
Optional Add-ons
Adding some optional ingredients to your dog’s Turkey and Spinach Delight can really elevate the meal, making it even more nutritious and tasty.
Consider tossing in some sweet potatoes for added fiber, or a splash of fish oil for a shiny coat. Your pup’s tail will wag with delight.
Let’s be honest, who wouldn’t want their dog to enjoy a gourmet meal?
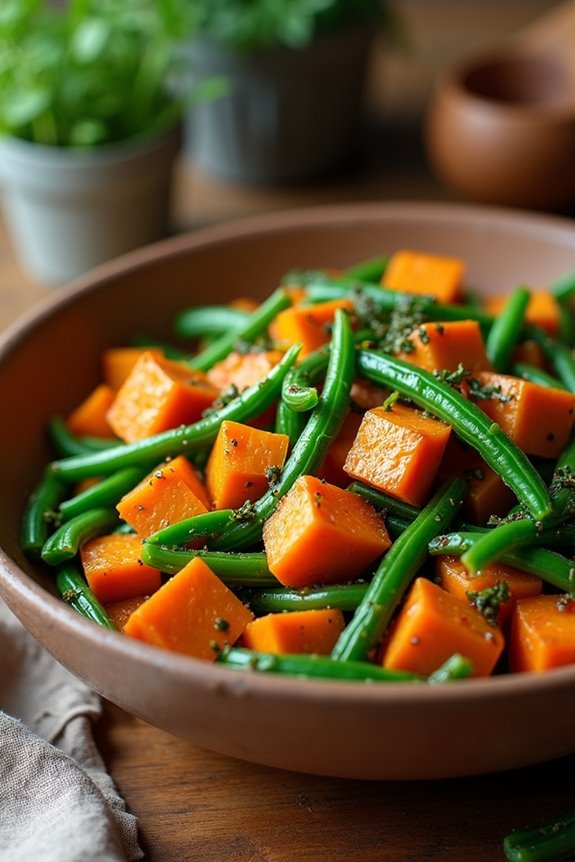
5. Sweet Potato and Green Beans
Let’s chat about a tasty combo: sweet potatoes and green beans.
These ingredients aren’t just healthy; they’re packed with nutrients that can soothe your dog’s itchy skin.
I’ll walk you through the easy steps to whip this up, plus some fun add-ons to make it extra special for your pup.
Ingredients
If your pup has itchy skin, you might be looking for something wholesome and soothing to help. Sweet potatoes and green beans aren’t just nutritious; they’re also tasty, and dogs seem to love them. Here’s a straightforward list of ingredients you’ll need to whip up a delicious meal that’ll have your furry friend feeling better in no time.
- 2 cups of sweet potatoes, peeled and diced
- 1 cup of fresh green beans, trimmed and chopped
- 1 pound of lean ground turkey or chicken, cooked and drained
- 1 tablespoon of olive oil
- 2 cups of water or low-sodium chicken broth
- 1/4 cup of plain pumpkin puree (make sure it’s not the spiced pie filling)
Honestly, putting this together is easier than pie—especially since there’s no crust to deal with. You just boil, mix, and serve. Plus, the excitement on your dog’s face when they smell the sweet potatoes bubbling away is downright priceless. Trust me, they’ll gobble this up like it’s the best thing since tennis balls. So, gather those ingredients, and let’s make mealtime a treat!
Step by Step Instructions
- Start by gathering all your ingredients: sweet potatoes and green beans. You’ll want two medium sweet potatoes and about a cup of fresh green beans.
- Preheat your oven to 400°F (200°C). It’s like getting the space cozy for what’s about to happen.
- Wash the sweet potatoes thoroughly under running water to remove any dirt. No one likes a crunchy bit of soil, right?
- Cut the sweet potatoes into small, bite-sized cubes. Aim for around 1-inch pieces. The smaller, the better — your dog will appreciate it.
- Next, bring a medium pot of water to a boil. This is where your green beans get cozy.
- Once the water’s boiling, add the green beans and cook them for about 5 minutes. You want them tender but still bright green, not mushy. (Trust your eyes. They should look vibrant, not sad.)
- After the time is up, drain the green beans and rinse them under cold water to stop the cooking process. We don’t want them turning into mushy puddles.
- Now, let’s get back to sweet potatoes. Place the cubed sweet potatoes on a baking sheet. Drizzle a little olive oil over them and toss to coat. Just enough to lightly cover them — it shouldn’t be a swimming pool.
- Spread the sweet potatoes evenly on the baking sheet. Bake them in your preheated oven for about 25–30 minutes, or until they’re fork-tender and starting to brown slightly. Keep an eye on them; you don’t want them to disappear on you.
- When the sweet potatoes and green beans are ready, let them cool for a bit. Mixing hot food with doggy enthusiasm can lead to some very surprised pups.
- Finally, combine the sweet potatoes and green beans in a bowl. Mix them gently until they’re evenly incorporated.
Cool completely before serving to your dog. Watching them enjoy your homemade creation is the best part, isn’t it?
Optional Add-ons
Who doesn’t want to jazz up their dog’s meal now and then?
Adding sweet potatoes and green beans is a perfect way to do it. Just steam or bake those sweet potatoes until they’re soft, then mash ’em up. Toss in some steamed green beans, and voilà!
You’ve got a nutritious, yummy side dish even your picky pup will love. It’s tail-wagging good.
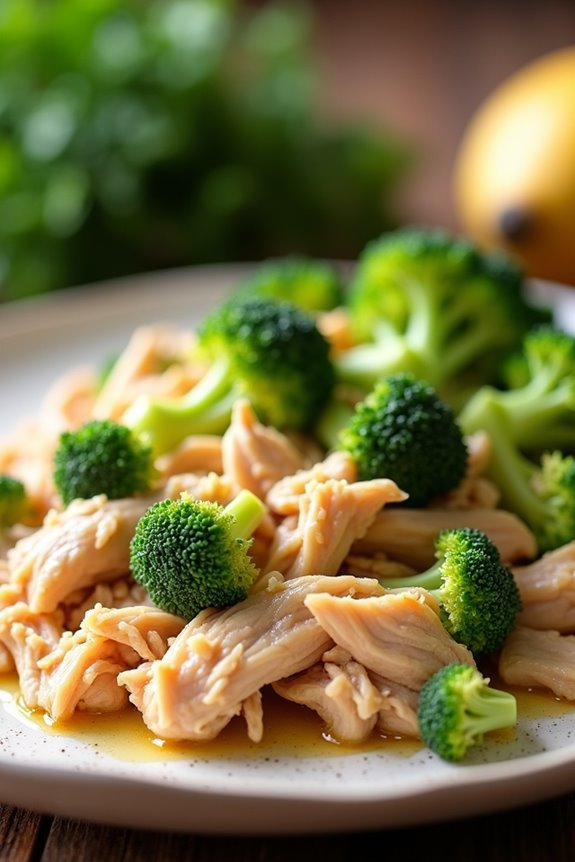
6. Oven-Baked Chicken With Broccoli
Ready to whip up something tasty for your furry friend? Oven-baked chicken with broccoli isn’t just easy; it’s a great option that’ll help soothe that itchy skin. Let’s break down the ingredients you’ll need, step-by-step instructions to follow, and some optional add-ons to jazz it up a bit.
Ingredients
When it comes to whipping up a tasty homemade meal for your furry friend, this oven-baked chicken with broccoli is a winner, especially for those pups with itchy skin.
Not only is it nutritious, but it’s also pretty simple to make. Plus, your pooch will love the aroma wafting through the kitchen. Who can resist a wholesome, home-cooked meal? Let’s gather those ingredients!
- 2 cups of boneless, skinless chicken breast, chopped into bite-sized pieces
- 1 cup of fresh broccoli florets, washed and cut into small pieces
- 1 cup of brown rice, rinsed
- 2 ½ cups of water (or low-sodium chicken broth for more flavor)
- 1 tablespoon of olive oil (helps with skin health)
- ½ cup of carrots, diced
- A sprinkle of turmeric (optional, but great for that anti-inflammatory boost)
These ingredients are all safe for your dog and should be easy to find at your local grocery store.
Just imagine your pup’s tail wagging with joy when they see you in the kitchen. It’s like their very own cooking show, and if they could, they’d totally be the star!
Step by Step Instructions
1. Preheat your oven to 375°F (190°C) to get things warmed up. Nobody likes a cold start, right?
2. Grab your chicken breasts and place them in a pot. Add enough water to cover the chicken completely, then bring it to a boil. You want to see those bubbles working their magic.
3. Once boiling, reduce the heat to medium and let the chicken simmer for about 15-20 minutes, until it’s fully cooked.
(Pro tip: Cut it open to check—no one wants to serve raw chicken.)
4. While the chicken is cooking, wash and chop the broccoli into bite-sized pieces. The smaller, the better.
You don’t want your doggos struggling—this isn’t an obstacle course.
5. In a large mixing bowl, shred the cooked chicken using two forks.
(You can pretend you’re a food critic if you want; it can make it feel fancy.)
6. Steam the chopped broccoli for about 5 minutes until it turns bright green and is slightly tender.
Keep an eye on it; nobody likes mushy broccoli, right?
7. Once the chicken is shredded and the broccoli is steamed, fold the broccoli into the chicken in the mixing bowl gently.
Don’t be too rough; treat that broccoli like it’s a delicate flower.
8. Spread the chicken and broccoli mixture evenly on a baking sheet lined with parchment paper.
You want it laid out nicely, not piled like a canine version of a food avalanche.
9. Bake in the preheated oven for about 20 minutes, until everything is heated through and slightly golden on the edges.
(The smell will be glorious; expect some tail wagging from the other room.)
10. Remove from the oven and let it cool completely before serving to your dog.
They mightn’t understand patience, but their taste buds will thank you.
Optional Add-ons
If you want to take your homemade dog food to the next level, why not spice things up with some optional add-ons?
Try oven-baked chicken with broccoli. Just cube the chicken, season lightly, and bake until golden.
Steam some broccoli on the side. Your pup will get a tasty, nutritious boost. Plus, who doesn’t love a meal that makes tails wag?
7. Coconut Oil and Spinach Blend
Let’s whip up a Coconut Oil and Spinach Blend that your pup is sure to love. You’ll need just a few simple ingredients to get started, and the steps are easy—trust me, if I can manage it without accidentally burning something, so can you. Plus, there are plenty of optional add-ons to customize this meal, turning it from a basic doggy dish into a gourmet treat!
Ingredients
Making your pup feel better with homemade food is truly rewarding. With just a few simple ingredients, you can whip up a delightful Coconut Oil and Spinach Blend that’s not only tasty but good for relieving itchy skin. Trust me, your dog will be wagging their tail in gratitude.
So, let’s plunge into what you need to gather.
- 1 cup of fresh spinach, washed and chopped
- 1/2 cup of cooked brown rice (because you know, who doesn’t love a little grain?)
- 1/4 cup of coconut oil, melted (for that perfect buttery goodness)
- 1/2 cup of cooked chicken, shredded (or turkey if you’re feeling fancy)
- 1 tablespoon of pumpkin puree (not the spiced pie filling, though)
Gather these ingredients, hit that kitchen, and prepare for some tail-wagging excitement.
When making dog food, keeping it simple is key. Each of these ingredients brings something special to the table, not to mention they’re all safe for your furry friend.
It’s like a little health party on their plate—just don’t invite the onions or chocolate, alright?
Step by Step Instructions
- Start by gathering all your ingredients: coconut oil, fresh spinach, and any other dog-safe add-ins you’d like.
- Preheat your oven to 350°F (175°C) to get things nice and cozy.
- In a large saucepan, bring 2 cups of water to a boil. You want it bubbling—it’s the key to well-cooked spinach.
- Rinse your spinach thoroughly under cold water, then chop it roughly. You want it small enough for your pup to munch on but not so tiny that it disappears.
- Once the water is boiling, add the chopped spinach and let it cook for about 2-3 minutes. It’s ready when the leaves are wilted and bright green.
- Drain the spinach and give it a good squeeze to remove any excess water. (Nothing soggy about this meal, right?)
- In a large mixing bowl, combine the cooked spinach and 1/4 cup of melted coconut oil.
- Stir well until the spinach is fully coated in the coconut oil. (Think of this like mixing up a little green magic potion for your furry friend.)
- If you’re adding any other ingredients, like boiled chicken or sweet potatoes, fold them in now. Just be gentle; it’s all about that perfect blend.
- Transfer the mixture to a greased baking dish, spreading it out evenly.
- Pop the dish into the oven and bake for about 20-25 minutes. You’ll know it’s done when the edges start to slightly brown and the top is set.
- Let it cool for a few minutes, then slice into portions that are suitable for your dog’s size.
- Cool completely before serving to your dog, and get ready for some tail-wagging gratitude.
Optional Add-ons
After whipping up that tasty coconut oil and spinach blend, you might wonder what else you can throw into the mix to really jazz things up for your pup.
How about adding some shredded carrots for crunch or sweet potatoes for a flavor boost? These add-ons not only make the meal exciting but also pack in extra nutrients—because who doesn’t love a little variety, right?
Use Fresh Ingredients Only
Fresh ingredients make all the difference when cooking for your furry friend, especially if you’re trying to ease that itchy skin. You wouldn’t want to eat old, wilted veggies, right? So why serve them to your pup?
Fresh fruits and vegetables are packed with vitamins and nutrients that support skin health. Think carrots, sweet potatoes, and blueberries—yum for them!
When you use fresh ingredients, you can avoid unnecessary fillers or preservatives that may irritate your dog’s skin further. Just imagine the satisfaction of knowing you’re whipping up a colorful bowl of nourishing goodness.
And yes, your kitchen might look like a mini farmer’s market when you’re done.
Plus, you’ll notice that your dog’s coat shines brighter, and their itchy skin might finally get some relief. So, next time, skip the can and grab that fresh produce; your pup will thank you with happy tail wags.
Frequently Asked Questions
Can Homemade Dog Food Cure Skin Allergies?
Homemade dog food can help manage skin allergies, but it won’t necessarily cure them. It’s vital to identify your dog’s specific allergens and consult a veterinarian to determine the best dietary approach for their needs.
How Long Does Homemade Food Stay Fresh?
Homemade dog food typically stays fresh in the refrigerator for about three to four days. If you freeze it, it can last up to three months. Always check for spoilage before serving your pup.
What Supplements Can I Add for Skin Health?
You can add omega-3 fatty acids, probiotics, and vitamin E to support skin health. These supplements help reduce inflammation, promote a shiny coat, and enhance overall skin wellness for your furry friend. Always consult your vet first.
Can I Mix Homemade and Store-Bought Food?
Yes, you can mix homemade and store-bought food. Just guarantee the combination meets your dog’s nutritional needs, and introduce it gradually. Monitor their reaction to avoid any digestive issues or allergies.
How Often Should I Change My Dog’s Diet?
You shouldn’t change your dog’s diet too frequently; ideally, do it every few months. Gradually introduce new foods to prevent digestive upset and monitor your dog’s reactions to make certain they’re adjusting well.