Your golden retriever just tracked mud across your white rug again.
And somehow he’s already back on the couch, looking at you like he didn’t just destroy your whole Pinterest aesthetic.
Girl, I feel this in my soul. My dog Koda did the same thing last winter — I spent an entire Saturday deep-cleaning my sofa cushions while he watched me, zero remorse.
Here’s the thing: he’s not going anywhere. And honestly? You don’t want him to.
What you do want is a dedicated spot that keeps him cozy, your furniture clean, and your home still looking like something out of a decor board.
That’s exactly why I put together these 7 DIY dog couch ideas — each one actually cute enough to leave out in your living room without hiding it when company comes over.
#1: DIY Sectional Dog Couch — Give Your Pup Their Own Spot on the Sofa (Without the Fur Everywhere)
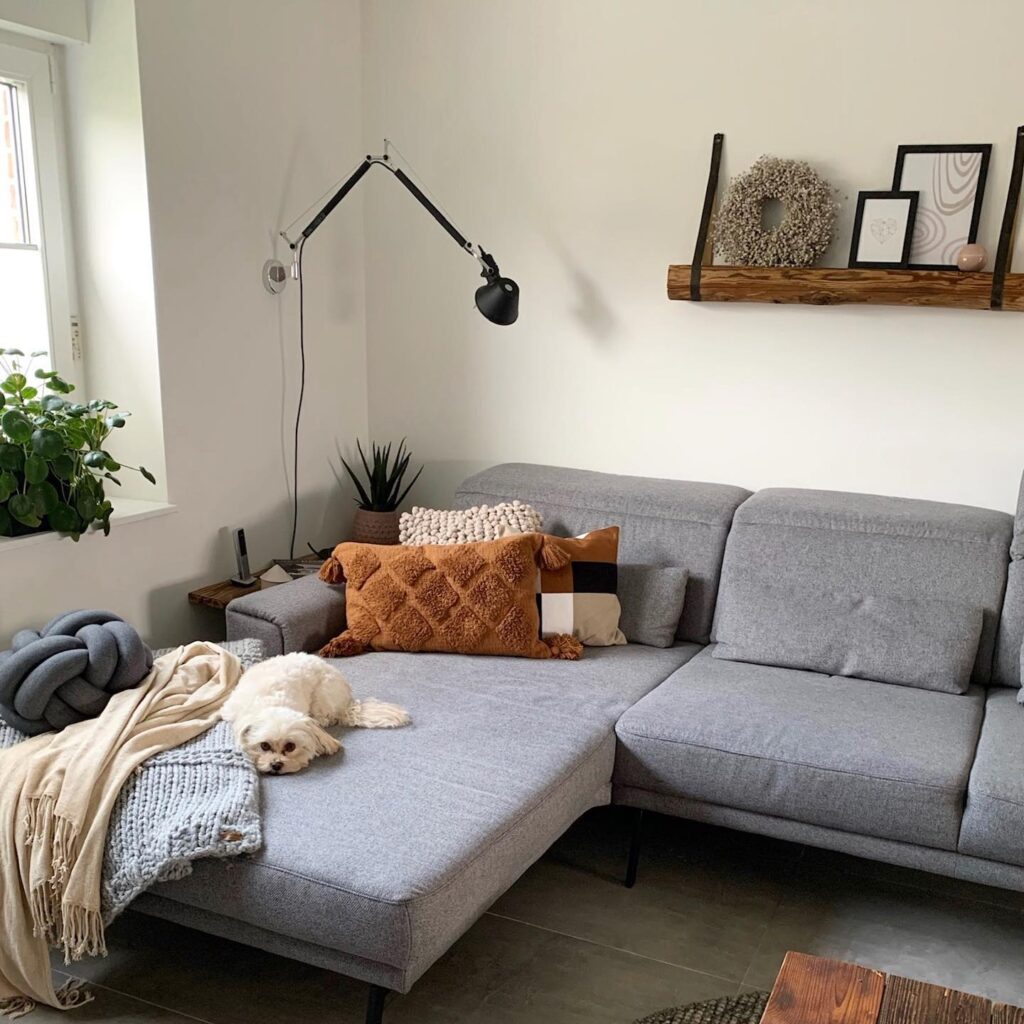
You know that moment when you walk into your living room and your golden is already spread across the entire chaise, looking at you like you’re the one in the wrong spot? Yeah. Been there. My cousin’s lab does the same thing — she basically claimed the whole left side of their sectional and nobody said a word.
The good news? This DIY dog couch section is literally built into the sofa setup, so your pup gets her own corner and you stop fighting over cushion space.
Materials & Tools
– Gray linen-blend fabric (at least 2 yards)
– High-density foam, 4 inches thick
– Plywood board, cut to 24″ x 48″
– Black metal hairpin legs (set of 4, 6 inches tall)
– Staple gun + ½ inch staples
– Electric drill
– Sandpaper (120-grit)
– Washable fabric spray (for sealing)
Instructions
Sand your plywood until the edges feel smooth — splinters are a real issue if your dog shifts around a lot while napping. Attach the four hairpin legs using your drill, one at each corner, making sure they feel firm before flipping the board upright.
Cut your foam to match the plywood surface exactly. Lay the gray fabric face-down on the floor, place the foam on top, then set the board over both. Pull the fabric tight on each side and staple every 3 inches around the perimeter — this keeps the cover taut so it doesn’t bunch under your dog’s weight.
Flip it right-side up and press it flush against your existing sectional’s chaise end. The plywood base locks into place against the sofa frame, so it doesn’t slide when she jumps on and off. That stability means less wear on your actual sofa — which is the whole payoff here.
Spray the fabric with washable sealant and let it cure for 24 hours before your dog uses it.
Tuck a chunky knit blanket over her corner like you see in the photo — it doubles as a washable barrier and looks like you planned it that way the whole time. Which you did.
Keep the dog’s section slightly lower than the main sofa seat height. It signals “this is your spot” without any training drama, and most dogs naturally gravitate toward it.
Prep Time: 30 min | Active Project Time: 2 hours | Difficulty Level: Beginner
📸 Photo credit: Instagram @cookies_zuhause
#2: DIY Wooden Dog Bed Frame With Blue Cushion (The One That Actually Looks Good in Your Living Room)
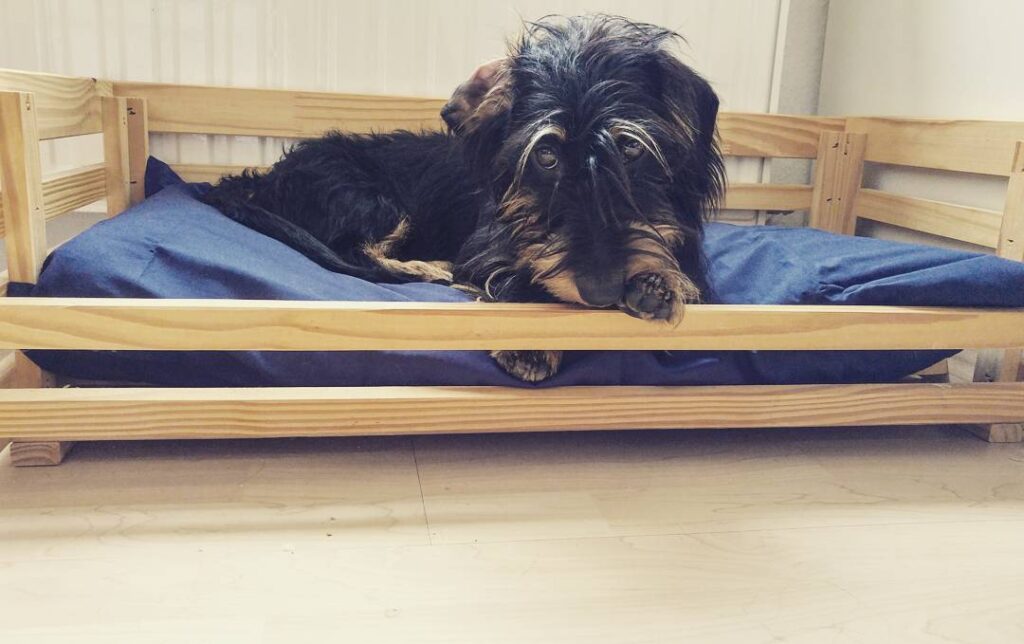
You know that moment when your golden retriever jumps off the couch and you spot that damp, fur-covered indent right where your throw pillow used to be? Yeah. This build fixes that.
Prep Time: 30 min | Active Project Time: 2–3 hours | Difficulty Level: Beginner-Friendly
Materials & Tools You’ll Need:
– 4 pine wood planks (natural/light finish) — 2 at 100cm and 2 at 60cm for the frame
– 2 horizontal front slat rails in raw pine
– 4 short square legs (8cm each)
– 1 blue denim-style rectangular cushion (waterproof cover preferred)
– Wood screws, sandpaper (120-grit), wood glue, drill, measuring tape
Instructions
Sand every plank before touching the drill. Rough edges catch fur like velcro, and your dog’s paws deserve better than splinters.
Attach the four legs to the base corners using wood glue first, then drive two screws per leg for real stability. This frame needs to hold a wiggling, dreaming dog — don’t skip the double-fastening.
Build the back and side rails by standing the planks upright and screwing them into the base frame. The back rail sits higher than the sides, which gives your dog that cozy “leaning against something” feeling — the kind that makes them actually stay on their own bed.
Add the two front horizontal slats low on the frame. They keep the cushion tucked in place, so your dog’s paw doesn’t shove it off the edge at 2am.
Drop the blue cushion inside. Real talk: a waterproof cover here is everything — mud, drool, wet paws after rain walks all wipe clean instead of soaking through.
The raised pine frame keeps airflow under the cushion, which means no trapped heat and no mildew smell — your dog sleeps cooler, and your nose thanks you.
If you love projects like this, 13 Genius DIY Dog Stuff Every Pet Parent Needs to Try Today! has more builds worth your weekend.
Seal the pine with a clear matte wood finish to protect against scratches. One coat is enough — it keeps that warm, natural look without making it feel like furniture from a waiting room.
📸 Photo credit: Instagram @freddy_frechdachs
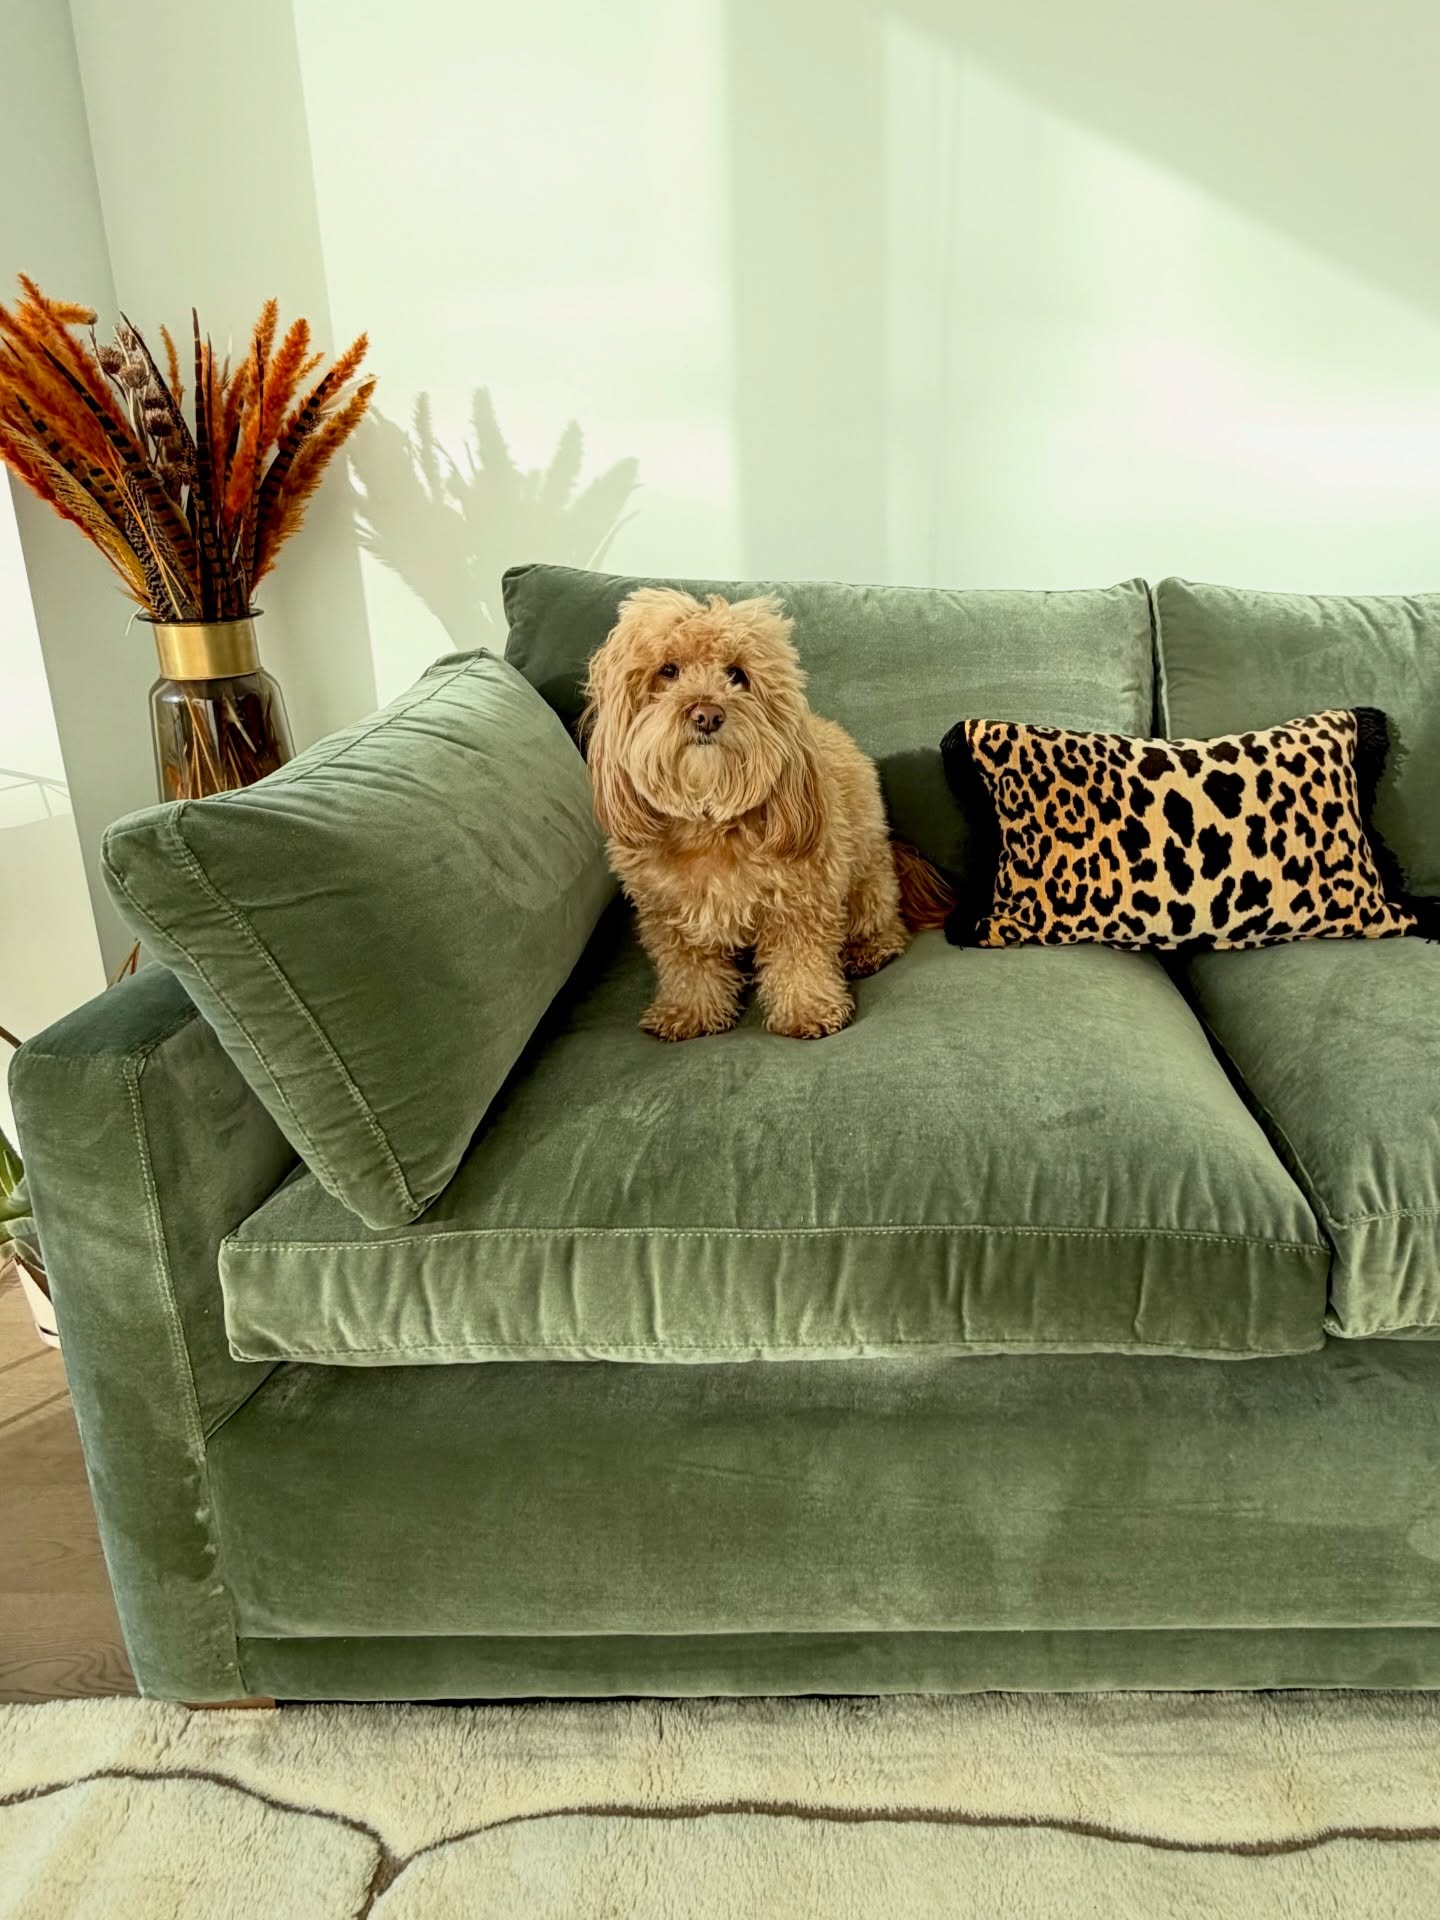
#3: The “My Dog Owns the Couch Now” DIY Pet Sectional Makeover
You know that moment when you walk into your living room and your golden retriever is completely sprawled across your brand-new sofa — paws hanging off the edge, zero shame on their face? Yeah. Mine does the same thing, and honestly I stopped fighting it years ago.
So instead of constantly shooing them off, I leaned in. I built a dedicated dog-friendly couch setup that looks so good, guests think it’s intentional. Because it is now.
Materials & Tools You’ll Need:
– Light gray linen-blend fabric (minimum 2 yards for cushion covers)
– High-density foam, 4 inches thick (cut to 24″ x 24″ squares)
– Pampas grass stems (dried, natural tone) in a ceramic amphora vase
– Patchwork velvet cushion cover in earthy tones (tan, olive, charcoal)
– Chunky fringe throw blanket in warm beige
– Low-profile dark metal coffee table
– Sewing machine, fabric scissors, measuring tape, hot glue gun
Instructions
Start by measuring your sofa’s seat depth — most standard sofas run 24 to 28 inches deep, which gives your dog room to stretch without crowding the cushions.
Cut your high-density foam into two equal squares and wrap each piece in your linen-blend fabric, pulling it taut before sewing the seams closed. Tight seams mean the cover holds its shape even when your pup kneads it obsessively every single night.
Layer the patchwork cushion flat on the sofa arm — this gives your dog a defined “head spot” and keeps drool off your actual cushion fabric. Drape the chunky fringe throw over the lower armrest so it catches the shedding and shakes clean in seconds.
Place the amphora vase at a safe distance from the sofa — pampas grass is gorgeous but you don’t want a wagging tail sending it across the room. Ask me how I learned that one.
The foam-core cushion construction supports your dog’s joints during long naps, which means fewer stiff mornings and more of that happy, loose-limbed sprawl you saw in this photo.
If you love this kind of intentional pet-friendly setup, 14 Creative DIY Elevated Dog Bed Ideas You’ll Love has some seriously gorgeous builds that pair well with this aesthetic.
Swap cushion covers every few weeks instead of washing them while attached — foam dries slow and mildew is not the vibe.
Prep Time: 30 minutes | Active Project Time: 2–3 hours | Difficulty Level: Beginner-Friendly
📸 Photo credit: Instagram @casa.koppenburg
#4: The Tufted White Velvet Dog Loveseat With Cowhide Cushion
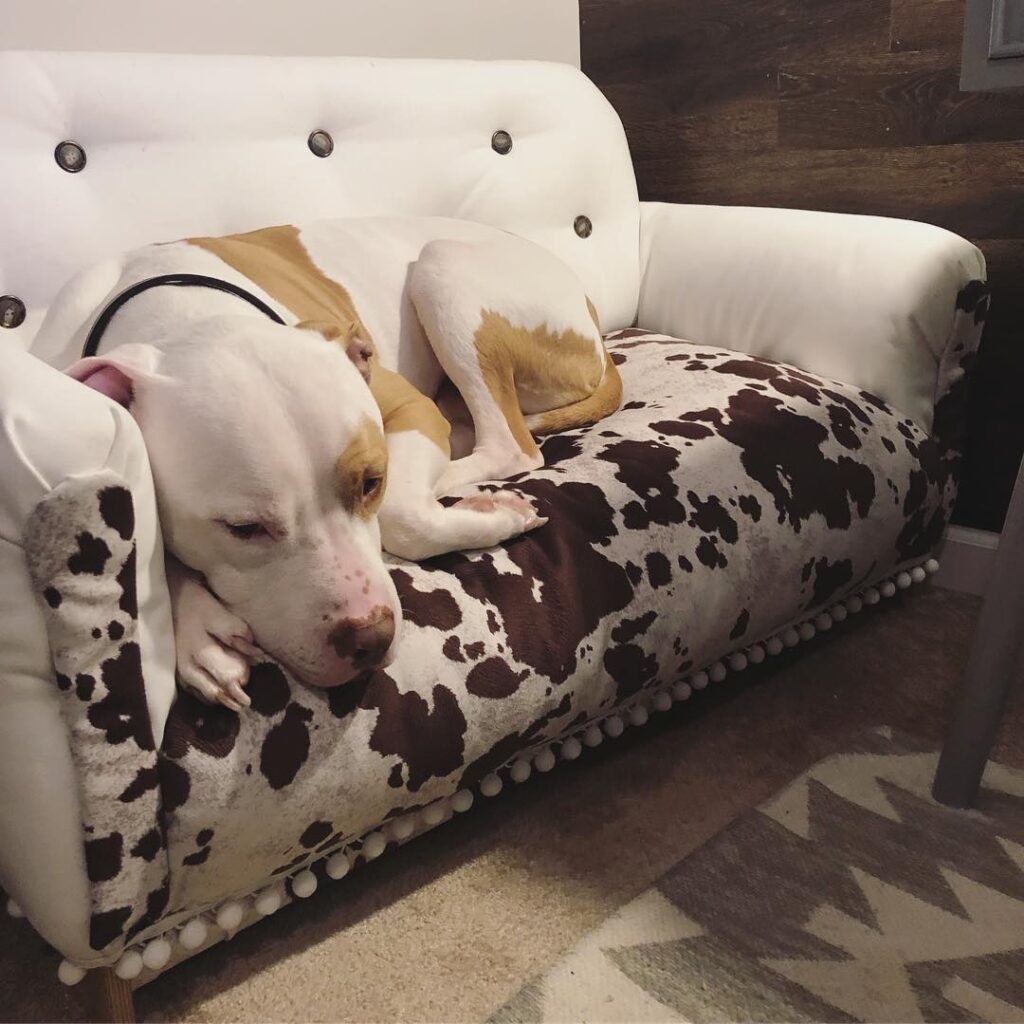
Your golden retriever does that thing — you know the one. She circles the couch three times, does a dramatic flop, and somehow takes up the entire seat cushion. And you love her, but girl, the drool situation on your Pinterest-worthy sofa? Not it.
This DIY fixes exactly that.
Materials & Tools:
– White faux leather or vinyl fabric (for the back and arms)
– Brown and white cowhide-print fabric (for the seat cushion)
– High-density foam, at least 4 inches thick
– Tufting buttons in antique brass or gunmetal finish
– White pom-pom trim (roughly 1.5 inches wide)
– Wood frame (pine or MDF), cut to 36″ wide x 20″ deep x 28″ tall
– Staple gun, upholstery needle, heavy-duty thread, fabric glue, sandpaper
Prep Time: 45 minutes | Active Project Time: 6–8 hours | Difficulty Level: Intermediate
—
### Instructions
Build your wood frame first — cut the back panel taller than the seat base so it mirrors that classic loveseat silhouette you see in the photo. Sand every edge smooth because splinters and paw pads are a terrible combo.
Cut your foam to match the seat base dimensions, then wrap it in a layer of quilt batting before pulling the cowhide fabric taut over it. Staple from the center outward on each side — this prevents bunching and keeps those gorgeous brown spots centered.
For the back and arms, use your white faux leather and pull it tight before stapling. The tufting is what makes this look expensive. Push your upholstery needle through the fabric and foam, loop through a button, and pull back. The tension creates those beautiful indentations. Space buttons about 6 inches apart in a grid pattern.
And here’s the part that ties it all together — hot glue your white pom-pom trim along the bottom edge of the seat cushion. It’s the detail that makes people ask “wait, where did you buy that?”
The raised seat — about 10 inches off the ground — takes pressure off your dog’s joints over time, which matters a lot as she gets older. Firm foam supports her spine, the cowhide fabric wipes clean in seconds, and you stop wincing every time she hops up.
Attach four tapered wood legs at the base corners using corner brackets. Stain them walnut or leave them natural — both look stunning against the white frame.
For the tufting buttons, cover them yourself with matching white faux leather scraps. Store-bought buttons look flat. Covered ones catch the light and look intentional.
📸 Photo credit: Instagram @morgan__skye
#5: DIY Wooden Crate Dog Bed (The Cozy Napper)
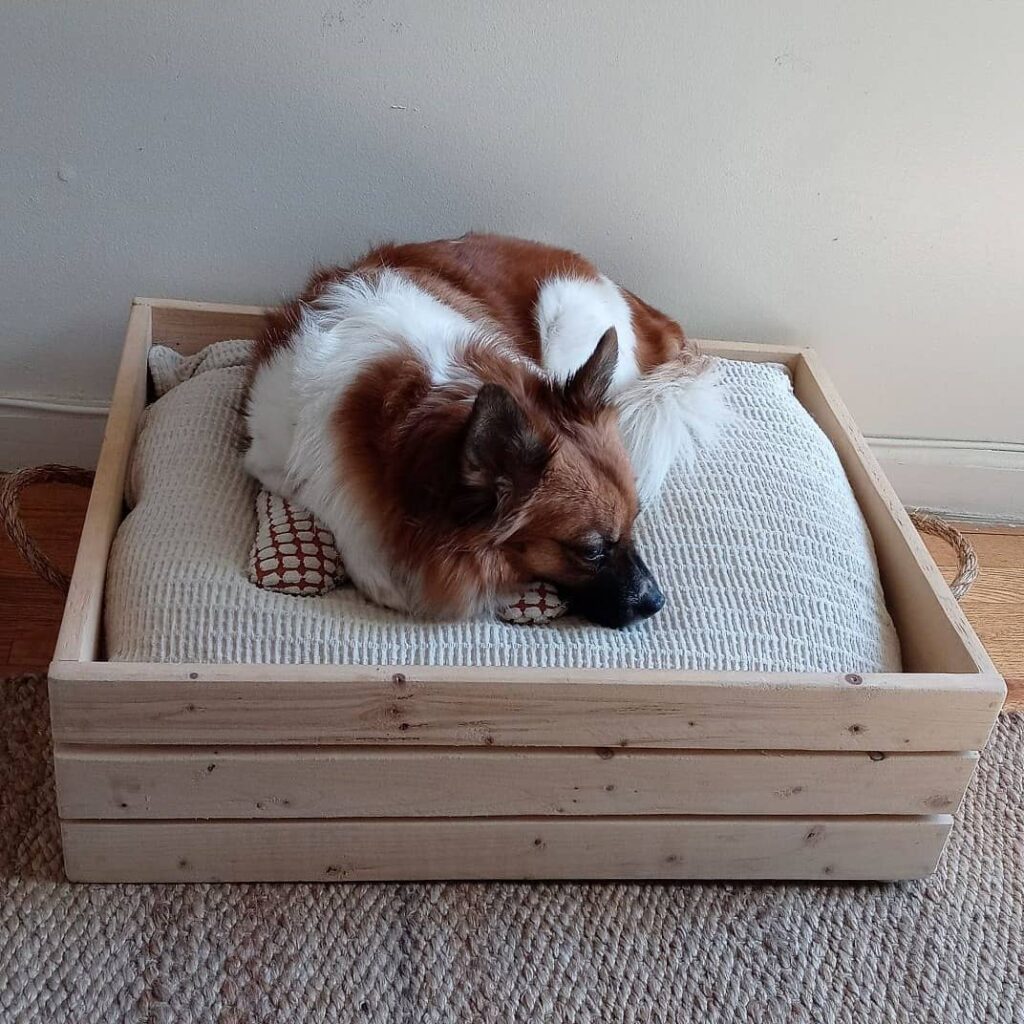
Okay, you know that moment when your golden has finally worn herself out and she’s just flopping anywhere — the couch, your clean laundry pile, the one rug you actually love? Yeah. My cousin’s dog did that for months until she built this, and honestly I’ve been thinking about it ever since.
Prep Time: 30 min | Active Project Time: 2–3 hours | Difficulty Level: Beginner-Friendly
What You Need:
– 4 cedar pine boards (2 × 24″ long sides, 2 × 18″ short sides)
– 1 flat base board (24″ × 18″, ½” thick plywood)
– Wood nails or screws (1.5″)
– Natural rope (for side handles)
– Sandpaper (120-grit)
– White waffle-weave cushion or folded blanket
– Drill + hammer
Instructions
Sand every board edge first — splinters and dog paws are not a good combo. Attach the two long side boards to the base using screws, keeping edges flush. Then secure the short ends to close the rectangular frame. The low 3″ side walls keep the cushion contained, which means your dog gets that “den” feeling without feeling trapped.
Thread natural rope through two drilled holes on each short end and knot tightly on the inside — this gives the bed a Pinterest-worthy look and makes it easy to slide around your floors.
Drop your waffle-weave cushion inside. And honestly, that’s it.
The unfinished cedar is the real move here — it’s naturally resistant to moisture, so muddy paw days don’t ruin the wood, and your bed stays looking clean longer.
Seal the wood with beeswax instead of varnish if your dog is a chewer. It’s non-toxic and still protects the grain beautifully.
📸 Photo credit: Instagram @tiya.darahshay
#6: Build a Modern Outdoor Dog Sofa (That Looks Like It Came From a Designer Catalog)
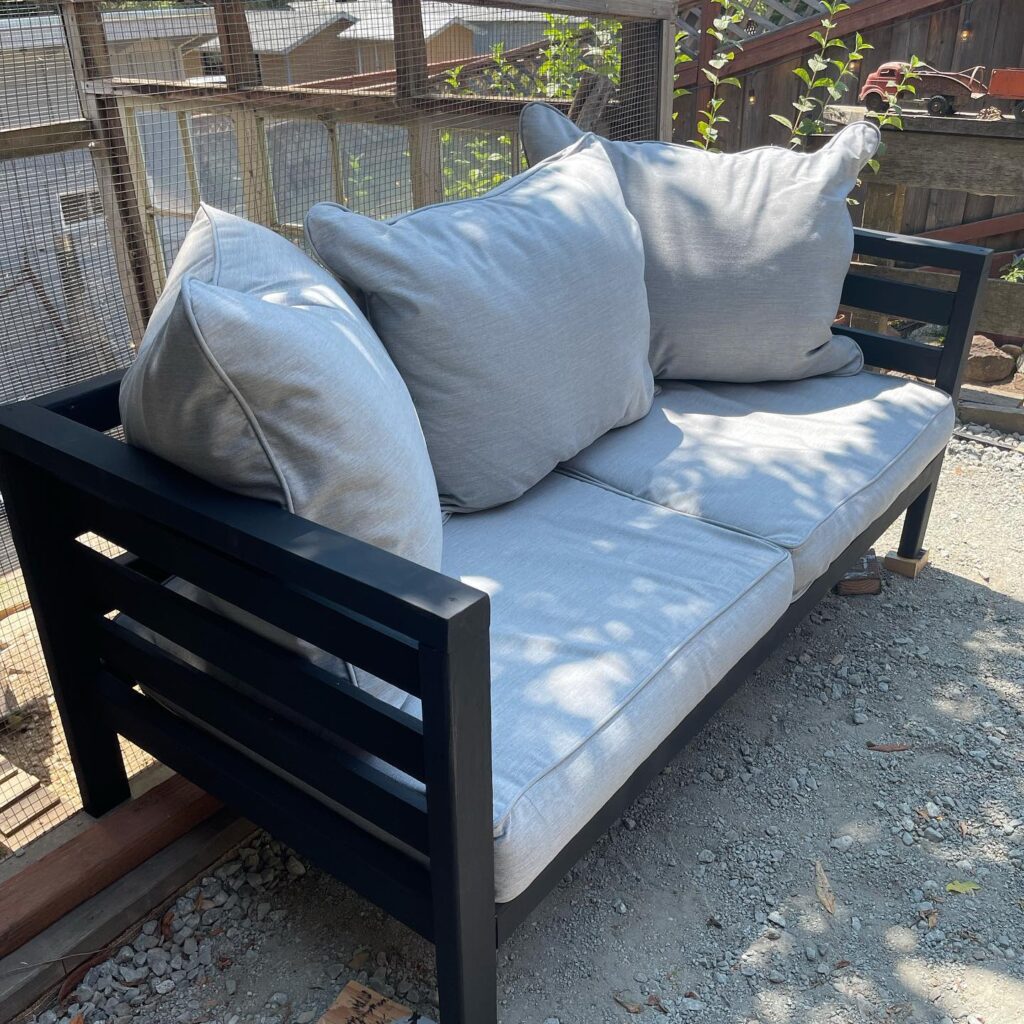
Okay, so picture this — your golden is sprawled across your patio furniture again, her muddy paws sinking into your cushions while you’re trying to enjoy your morning coffee. I’ve been there. My cousin’s lab destroyed two outdoor sofas in one summer. Two.
That’s exactly why this DIY hit different for me.
Materials & Tools:
– Black powder-coated aluminum square tubing (1.5″ x 1.5″)
– Metal cutting saw + angle grinder
– Gray outdoor performance fabric (water-resistant, 54″ wide)
– 3″ thick foam cushion inserts (cut to size)
– Upholstery staple gun + staples
– Metal primer + matte black spray paint
– Weld or heavy-duty metal screws
– Measuring tape + safety gloves
Prep Time: 45 min | Active Project Time: 6–8 hours | Difficulty Level: Intermediate
Instructions
Start by cutting your aluminum tubing into the frame pieces. You’ll need two 72″ lengths for the base rails, four 18″ legs, two 28″ armrest uprights, and three back support slats per side.
Weld or bolt the base rectangle together first — this is your foundation, so take your time getting it square. Once that’s solid, attach the legs at each corner. And don’t skip the cross braces underneath; they carry your dog’s full weight.
Build the armrests next by welding the upright posts to the base corners, then add three horizontal slats evenly spaced on each arm panel. The open slat design — aluminum frame plus breathable spacing — keeps air moving under your dog on hot days, so she’s not overheating while lounging outside.
Sand every weld point smooth. A rough edge near a curious golden is a recipe for a vet visit.
Prime the whole frame, let it dry completely, then hit it with two coats of matte black spray paint. The contrast between dark metal and light cushions is exactly what makes this look so expensive.
For cushions, cut your 3″ foam to fit the seat (72″ x 24″) and cut two back panels. Wrap each piece in your gray performance fabric, pull it tight, and staple the underside. No slip covers, no fuss. The water-resistant fabric means drool and rain wipe right off — which honestly saved my sanity when I built a version of this for my own back porch.
Set the cushions in and fluff those oversized back pillows. Done.
The whole build costs around $180–$220 in materials, a fraction of what you’d pay retail for something this size. And if your golden is more of an indoor princess, 7 Cozy DIY Dog Beds for Large Dogs has some great indoor alternatives worth saving too.
Seal the frame annually with a clear metal protectant spray — it adds years to the finish without changing the color.
📸 Photo credit: Instagram @cwhite
#7: Turn Your Leather Couch Into a Dog-Approved Snuggle Zone With Mountain Pillow Layers
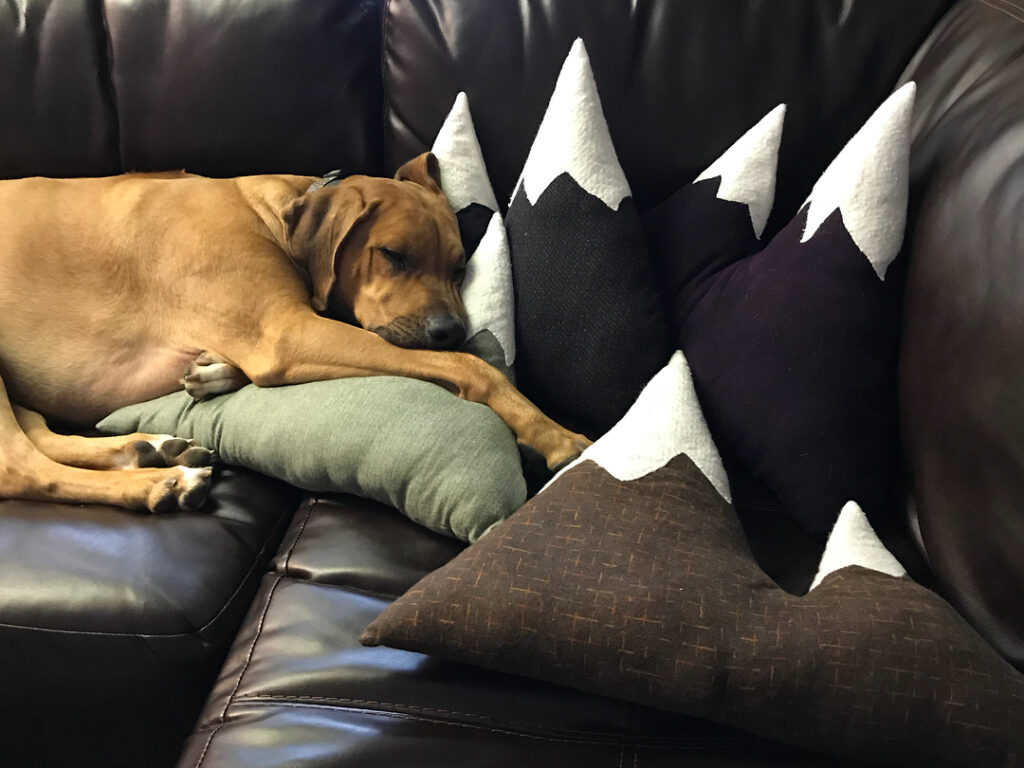
You know that moment when your golden just melts into the couch cushions like she owns the place? Yeah. Mine does the exact same thing, and honestly, I stopped fighting it.
This setup in the photo is genius — and your dog will thank you for it.
Materials & Tools:
– Dark charcoal black linen fabric (for mountain-print pillows)
– Deep plum/eggplant cotton fabric (second pillow)
– Dark brown tweed fabric (bottom accent pillow)
– Sage green linen fabric (dog’s main resting pillow)
– White felt sheets for mountain snow peaks
– Pillow stuffing/fiberfill
– Fabric scissors, sewing machine, pins, and fabric glue
Prep Time: 20 min | Active Project Time: 2–3 hours | Difficulty Level: Beginner-Intermediate
### Instructions
Start by cutting your black linen into a 18×18 inch square — this becomes your first mountain pillow. Cut the white felt into jagged triangle peaks and hand-stitch or fabric-glue them across the top third of the fabric panel. The felt locks in place without fraying, which means zero loose threads for your pup to chew on.
Sew three sides of your pillow cover, stuff it with fiberfill until it’s firm (not flat — dogs need the support), then stitch the final edge closed. Repeat this process for the plum cotton pillow using a slightly different mountain silhouette so each pillow has its own personality.
And here’s where it gets good. The sage green linen pillow is the hero piece — this is where your dog actually rests her head. Make it 20×20 inches, stuff it fuller than the others, and use a removable zipper closure so you can wash the cover weekly without losing your mind.
Keep this in mind: layering the pillows creates a tiered wall effect that gives your dog a cozy corner to nestle into, which reduces her anxious energy and keeps her off the armrests.
Arrange the mountain pillows vertically against the leather back cushions, tallest in the center. Place the brown tweed pillow flat on the seat as a base layer, then set the green pillow on top slightly forward. Your dog will naturally curl into that nest like she was always meant to be there.
I did a version of this for my cousin’s Rhodesian Ridgeback last winter, and the dog refused to leave the couch for three days straight. She looked like a tiny bear in a mountain painting. We both cried a little.
Wash your pillow covers on cold, gentle cycle — the felt peaks hold their shape better at lower temps. And if your golden is a drooler (same, sis), a quick spritz of fabric protector spray on the linen before first use buys you so much more time between washes.
📸 Photo credit: Instagram @eriksijgers
The One Mistake That’ll Ruin Your DIY Dog Couch (And How to Skip It)
Okay, real talk — most people build their dog couch first, then think about the fabric. That’s where everything falls apart.
Here’s the pro secret nobody tells you: always choose your upholstery fabric before you cut a single piece of wood. Why? Because the fabric thickness changes your measurements. I learned this the hard way when my whole slipcover came out looking like a lumpy potato sack. Not the Pinterest moment I was going for.
For a golden retriever specifically — that shedding, that drool, those muddy paws — you want a microfiber or canvas weave rated for heavy use. Avoid velvet or bouclé, no matter how cute they look. They trap fur like a magnet and you’ll be lint-rolling that thing every single morning.
One thing to remember: the foam density matters just as much as the frame. Go for 1.8 lb density or higher. Anything softer and your pup sinks straight through in two months.
Build the frame around your foam cut, not the other way around.
Your Dog’s Next Favorite Spot Is One Weekend Away
Pick one corner. Grab some supplies. Build something your golden will actually use — not just sniff once and ignore.
Seriously, even if you only do one of these ideas, your pup gets a spot that feels like hers. And your living room stops looking like a dog toy explosion happened.
If you want to keep the momentum going, DIY dog feeding station ideas are the perfect next project — same low effort, same big payoff.
So tell me — which idea are you starting with this weekend? Drop it in the comments, I genuinely want to know! 🐾