Is your living room a doggy disaster zone with toys everywhere? You’re not alone. It’s like dogs have a secret mission to spread chaos at home, isn’t it? But here’s the good news—you can create a pet-friendly space that’s both stylish and functional.
From chic storage baskets to custom cabinets, there are clever ways to keep things tidy without sacrificing your home’s charm. So, let’s explore how you can turn the clutter into clever solutions that bring joy to both you and your furry friend.
Stylish Dog Bed Storage
When deciding on stylish dog bed storage, you might wonder: how can I keep my space looking neat while catering to my pup’s comfort?
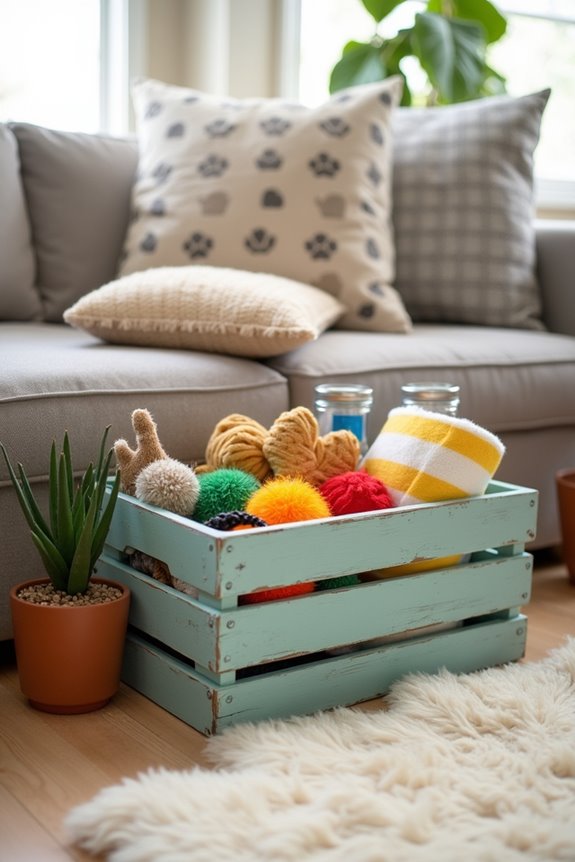
Fear not, you’ve got options! Consider using decorative baskets or stylish crates as dog storage ideas. Not only do they hold your dog’s bed, but they also add a cozy vibe.
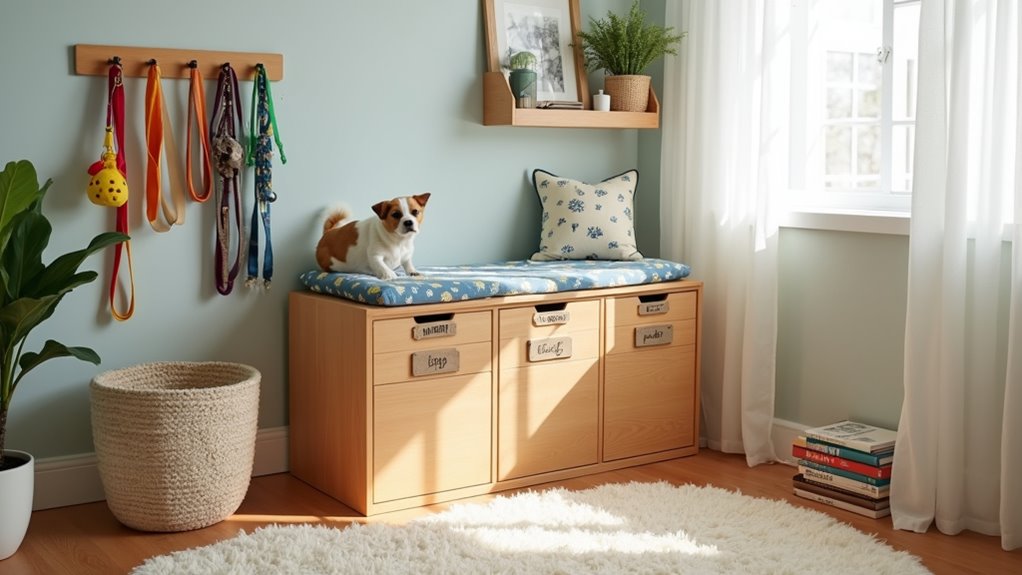
If you’ve got a corner to spare, custom benches with hidden compartments are perfect. You can even make it a DIY project—just be careful with those power tools.
Or try a chic ottoman that doubles as storage; who says practicality can’t be fashionable? Additionally, incorporating a dog food storage container large can help maintain organization and ensure your pet’s food stays fresh and accessible.
Our Collection
Let’s chat about our collection of dog storage solutions that’ll keep both you and your pup happy.
From a built-in cupboard for toys to pull-out drawers and wall-mounted baskets, there’s no shortage of clever ideas here.
Under-bed storage and pet furniture with hidden nooks mean you’ll finally reclaim that cluttered floor space—just think of all the carpet you can save from rogue squeaky toys. Our selections are designed to complement your space while providing easy access to professional dog grooming supplies for whenever your pup needs a stylish touch-up.
1. Built-In Cupboard for Toys
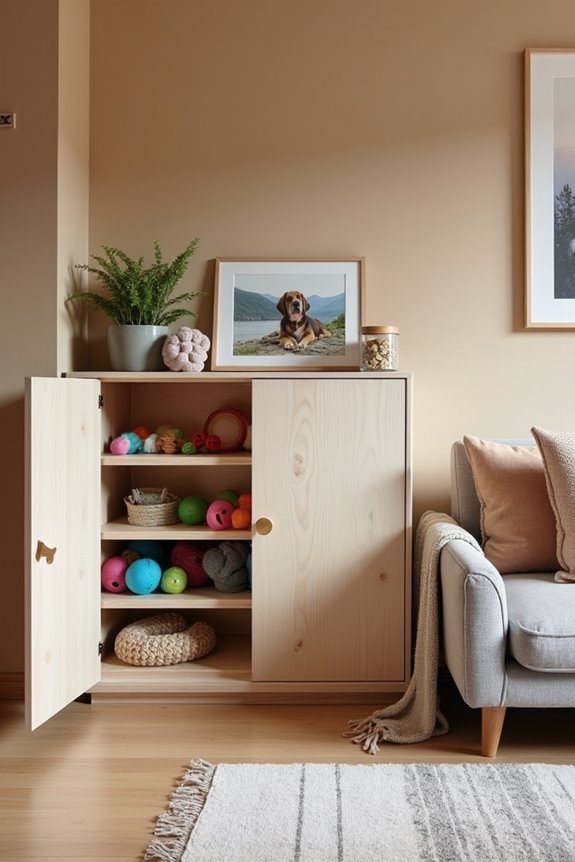
Have you ever tripped over a rogue squeaky toy while trying to navigate the living room? Yeah, me too. A built-in cupboard for your pup’s toys is the perfect solution for keeping your home tidy and showcasing your dog’s delightful collection. Plus, it helps you save money by channeling all those dog toys into one place, so you don’t end up buying duplicates (confession: I’ve done this more than once). To keep your adventures comfortable, consider incorporating premium hiking boots to gear up for outdoor excursions with your furry friend. Did you know that adding dachshund art to the space can also enhance your decor? Additionally, you can create a cozy spot for relaxation with luxury dog beds large that your pup will love.
Ready to create a stylish and efficient storage space? Let’s dig in!
Materials Needed
- Plywood or MDF boards (cut to the size you want)
- Wood screws
- Wood glue
- Sandpaper
- Paint or wood stain (in colors that match your decor)
- Paintbrush or roller
- Measuring tape
- Saw (hand saw or circular saw)
- Drill
- Level
- Hinges (optional, if you want doors on your cupboard)
- Handles (for easier opening)
Step-by-Step Instructions
1. Measure Your Space: Determine where you want your built-in cupboard to go. Make certain to measure the length, width, and height of your desired space. Don’t forget to imagine where your dog’s toys tend to spread out—especially if you’re incorporating some playtime into the design.
2. Cut the Wood: Once you’ve measured, cut the plywood or MDF to the dimensions needed for the top, sides, back, and bottom of your cupboard. If you’re feeling adventurous, aim for different heights for added flair.
(I once tried to be extra fancy and ended up with oddly shaped pieces rolling around my garage.)
3. Assemble the Structure: Start by attaching the back panel to the two side pieces using wood screws and glue—a simple ‘L’ shape will do the trick. Next, attach the bottom piece for stability. Use your level to verify everything is even.
If you want some flair, consider adding a little ledge on top for displaying dog treats or photos of your furry friend.
4. Sand and Paint: Smooth out any rough edges with sandpaper, then it’s time to make it look pretty. Apply your chosen paint or wood stain, letting it dry completely before moving on.
If you’re an indecisive soul like me, keep a few color swatches nearby to help with final selections.
5. Finishing Touches: If you opted for doors, now’s the time to attach them using hinges. Don’t forget the handles, which will make opening up for playtime much easier. That little bit of hardware can make a world of difference – I once had a cupboard without them, and let’s just say it turned into a mini workout every time.
6. Load It Up: Now the fun part! Organize your dog’s toys inside the cupboard. You can even separate them by type, size, or color for that Pinterest-worthy look.
Bonus points for displaying the toys with the squeakers facing out—adds an extra pop of personality.
7. Enjoy Your Space: Stand back and admire your handiwork. No more tripping and hiding toys under the couch. Your living area looks more tidy, and your pup’s toy collection is neatly stowed away.
Optional Add-ons/Variations
- Paint a Mural: If you’re feeling artsy, consider painting a fun mural on the side of the cupboard or using stickers that match your dog’s personality. Imagine a whimsical bone pattern or a playful paw print design.
- Change the Hardware: Switch out standard handles for cute dog-themed ones. There’s nothing like a little paw print knob to remind you of who’s really in charge around here.
Pro Tip
When using screws and wood glue, be sure not to skip any steps—this cupboard needs to withstand all the enthusiastic diggin’ a playful pup can muster.
Also, if you’re worried about durability, consider sealing your paint with a waterproof clear coat for added protection, and maybe even against potential slobber.
With this sturdy storage solution, your home will feel organized, your dog will love their dedicated space, and your gorgeous DIY project will impress all your friends.
2. Pull-Out Toy Drawer
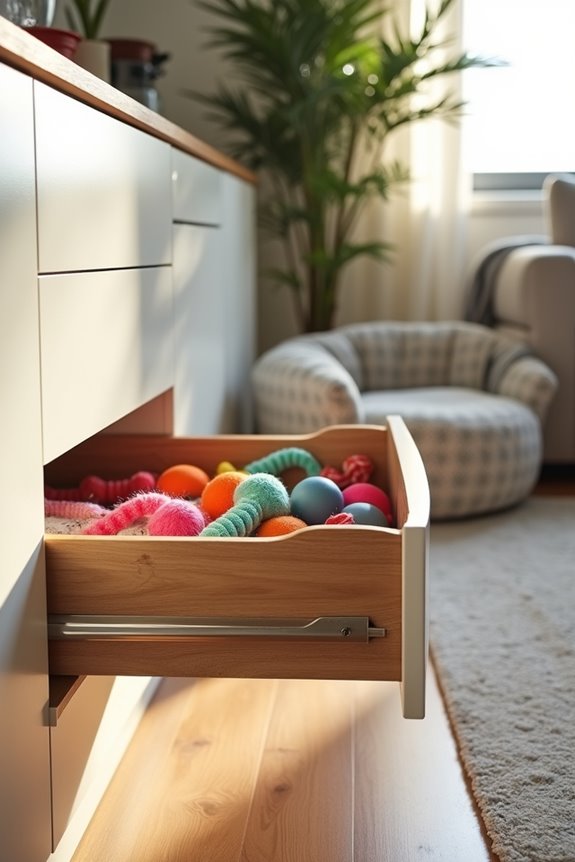
If your dog has a toy collection that rivals a small pet store, a pull-out toy drawer may be just the solution. It’s a fantastic way to keep your dog’s toys organized, easily accessible, and hidden away when playtime is over. Plus, it saves you from those “Where did that squeaky toy come from?” moments, allowing you to reclaim your living room from the chaos. Moreover, investing in a high-end outdoor dog kennel can provide your pet with a safe and comfortable space when they’re outside. Additionally, incorporating an outdoor dog washing station can make after-play cleanup much easier. Let’s get you equipped to build this pet-friendly storage solution.
Materials Needed
- Plywood or MDF boards (for the drawer and sides)
- Drawer slides (two sets, make sure they’re rated for weight)
- Wood screws
- Wood glue
- Sandpaper
- Paint or wood stain (color of your choice)
- Paintbrush or roller
- Measuring tape
- Saw (hand saw or circular saw)
- Drill
- Level
- Drawer handle (for easy pulling)
Step-by-Step Instructions
- Measure and Plan: Start by figuring out where you’ll install the pull-out drawer. Measure the height and width of the space, then determine how many toys you want to store. This helps you decide how big the drawer needs to be—because no one wants a toy drawer that’s too small, right?
- Cut the Wood: Use your measurements to cut the plywood or MDF into the pieces needed: two side panels, a front panel, a back panel, and a bottom panel. For a little extra flair, consider curving the front panel for a softer look. Just remember your neighbors might think you’re building a secret dog lair.
- Assemble the Drawer: Start by attaching the sides to the bottom panel using wood screws and glue. The back panel goes on next, and finally, attach the front panel. Make sure it’s square—no one likes wonky drawers.
- Attach Drawer Slides: Before you paint, you’ll want to add the drawer slides. Fix one part of the slide to the side of the drawer and the other part to the inside of the cabinet or the space where you’re pulling it out from. Trust me, measure twice to avoid any mishaps (like, say, having a drawer that can only be opened half an inch).
- Sand and Paint: Once your drawer is assembled, sand it down until it’s smooth. Time to glam it up with some paint or wood stain. I like to do a couple of coats but may have gone a little overboard once and turned my kitchen into a DIY studio.
- Finishing Touches: Once the paint’s dry, attach the drawer handle for easier pulling. Then, slide your new pull-out drawer into place. Voilà! You’re now the proud owner of a stylish storage solution that your dog can’t resist digging into (but luckily for you, it won’t be all over the floor).
Optional Add-ons/Variations
- Personalized Stenciling: You can easily customize your drawer by stenciling your dog’s name or fun paw prints on the front. It adds a personal touch and makes it heartwarming to see it every day.
- Patterned Fabric Lining: Consider lining the bottom of the drawer with a fun fabric for extra color and easy cleaning.
Pro Tip
To extend the life of your pull-out drawer, use some wood conditioner before staining or painting to help prevent wear and tear. Plus, don’t forget to check the weight limit on those drawer slides, especially if your dog thinks they need ten toys at once during playtime. Not to mention, using premium dog food can help keep your Goldendoodle healthy and energetic for all the playtime.
Now you have a stylish and functional pull-out toy drawer that keeps your home organized and brings joy to your furry friend!
3. Wall-Mounted Storage Baskets
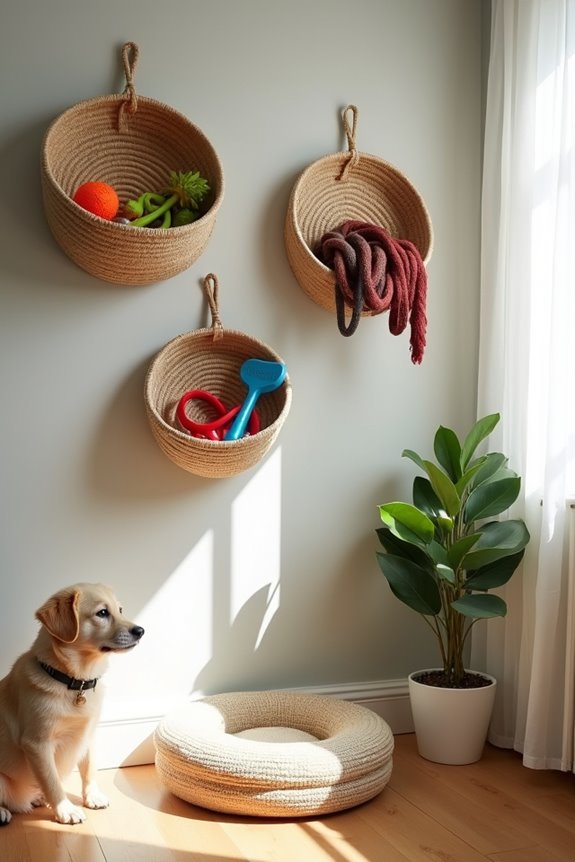
If you’re tired of dog accessories cluttering your home, wall-mounted storage baskets are a stylish and functional solution. This DIY project not only helps you keep your pup’s gear tidy and organized, but it also frees up valuable floor space. Plus, it adds a dash of charm to your home décor—who doesn’t love a little extra coziness mixed with practicality?
Materials Needed
- 3-4 Wall-mounted baskets (woven, wire, or fabric)
- Wall mounting brackets (if not included)
- Anchors and screws (appropriate for your wall type)
- Drill
- Level
- Tape measure
- Pencil
- Optional: decorative paint or fabric to customize the baskets
Step-by-Step Instructions
- Choose Your Location: Start by deciding where your wall-mounted storage baskets will go. Somewhere near your dog’s favorite play area is ideal. Measure the space to guarantee your baskets fit nicely.
- Mark Your Spots: Use a pencil to mark where each basket will hang on the wall. Make sure to space them evenly—consider the size of the baskets and how much gear you plan to store.
- Install the Wall Anchors: If you’re mounting on drywall, use a drill to create holes for wall anchors. These little guys are your best friend if you want your baskets to stay put, especially with full loads of dog toys.
- Attach the Baskets: Using the brackets that came with your baskets, attach them to the wall first. Keep your level handy to guarantee they hang straight; nothing worse than a crooked basket, right?
- Add Finishing Touches: Once your baskets are securely mounted, fill them with your dog’s toys, leashes, or blankets. The world is your oyster here, but don’t forget: you could even toss in a few treats if you’re really feeling generous.
- Personalize: If you want to make your storage baskets pop, consider painting them or covering them with a fun fabric. You could go with a bold color that matches your decor or use patterned fabric that matches your dog’s bed.
Optional Add-ons/Variations
- Color Change: Feel free to swap out baskets for different styles or colors. For a boho vibe, woven baskets can add texture, while sleek metal baskets can give a modern touch to your space.
- Label Them: Use chalkboard labels or cute little tags to label each basket. Want a laugh? You could label one “Squeaky Storm” just for kicks.
Pro Tip
Before you start drilling, verify you’re not hitting any electrical wires or plumbing. Use a stud finder for peace of mind. It’s a small step that will save you a heap of trouble down the line.
Plus, anchoring your baskets securely will keep them safe under the weight of all that dog gear, which, let’s be honest, can add up quickly.
4. Under-Bed Storage Solutions

Are you dreaming of a world where dog toys and gear don’t overtake your living space? Here’s a simple DIY project that transforms the often-neglected area under your bed into a treasure trove of organized dog gear. Not only does it save space, but it also keeps your home looking neat and tidy. Consider it the secret hideaway for all things pup-related—because let’s be honest, they’ve enough stuff to start their own shop. Additionally, using premium dog food brands can enhance your dog’s nutrition, making your pet even happier. Himalayan yak chews are also a great addition to your dog’s treat collection, providing both enjoyment and health benefits. Furthermore, top premium dog food makers focus on high-quality ingredients to support your pet’s overall well-being.
Materials Needed
- 2-3 plastic storage bins with wheels
- Measuring tape
- Permanent marker or tape
- Sandpaper (optional, if you need to smooth any edges)
- Optional: Fabric or contact paper for decorative lining
- Optional: Labels for bins
Step-by-Step Instructions
- Measure Your Space: Start by measuring the space under your bed. Make sure the height is enough to fit the bins you plan to use. You can also check the width to see how many you can squeeze in without creating a tight fit.
- Choose Your Bins: Select plastic bins with wheels for easy access. Getting bins that are transparent lets you see the contents at a glance, saving you from a mini scavenger hunt each time you’re looking for that elusive squeaky toy.
- Smooth the Edges: If you find certain areas on your bins that feel rough or sharp, lightly sand them down to prevent any snags—especially if your dog has a curious nose that likes to explore all these nooks and crannies.
- Organize Dog Gear: Fill the bins with your dog’s toys, grooming supplies, and any spare blankets. Use a mix of items, but try to keep similar things together for easy retrieval.
- Labeling for Clarity: If you want to take it up a notch, use labels to clearly mark what’s inside each bin. Something like “Toys,” “Grooming,” and “Extras” can save you time when it’s playtime—or grooming time—because nobody wants to dig through a pile of toys just to find a brush.
- Slide Into Place: Once your bins are packed and labeled, slide them under your bed. Easy-peasy! Just imagine the wonderful feeling of knowing where everything is stashed.
Optional Add-ons/Variations
- Color Pop: If you want to spice things up a bit, consider covering the bins with decorative fabric or fun contact paper. Choose something that complements your other decor, or go wild with a dog-themed pattern—it’s all about personalization.
- Extendable Options: If you’re feeling ambitious, you could create a pull-out shelf system using plywood and wheels to create more tailored storage solutions under your bed.
Pro Tip
For easy access, push your bins farther back under the bed—they should slide smoothly. Keep in mind the bins’ height and the space available, especially if you have a curious pup looking to sneak a peek at what goodies lie within.
5. Pet Furniture With Hidden Storage

Imagine a stylish piece of furniture that not only elevates your home decor but also hides away all your dog’s toys and gear. Sounds good, right? This DIY project is perfect for dog owners looking to blend functionality with aesthetics. It helps reduce clutter, saves you money on expensive dog storage solutions, and keeps your living space looking neat and polished. Plus, don’t forget about providing your furry friend with a nutritious diet through premium dog food packages that support their overall health.
Materials Needed
- 1 sturdy wooden bench or a large chest
- Sandpaper
- Wood stain or paint (in your chosen color)
- Sealing varnish or polyurethane
- Measuring tape
- Drill with screws (if assembling)
- Optional: Cushion for the top (if you want added comfort)
- Optional: Decorative pillows to enhance the look
- Optional: Fabric for lining the inside (to protect your dog’s toys)
Step-by-Step Instructions
- Select Your Furniture: Choose a sturdy wooden bench or chest that complements your home decor. Make sure it’s big enough to hold your dog’s toys, but still works well as a piece of furniture.
- Prep the Surface: Give your bench a good sanding to smooth out any rough edges that could snag your pup’s curious little paws. You don’t want them to get splinters while playing around.
- Add Some Color: Apply wood stain or paint in your favorite color. Go for a classic look with a warm stain, or have fun with vibrant paints. Let it dry completely, or you’ll be coating your floors too.
- Seal the Deal: Once the paint or stain is dry, top it off with a sealing varnish or polyurethane. This adds a durable finish and protects it from scratches and spills—because, let’s face it, nothing stays neat when a dog’s around.
- Create a Cozy Top: If you want to add a comfy spot for sitting, attach a cushion to the top. You can either buy a pre-made one or make your own using foam and fabric.
- Organize and Fill: Line the inside with fabric for a polished look, then fill it with your dog’s toys, blankets, or other gear. Create a little organizational system—maybe even some bins inside if you have smaller items.
- Decorate: Optional but highly recommended. Add some decorative pillows on top, or place it against a wall adorned with pet photos. Now you’ve created a multitasker: a stylish bench and a hidden storage solution.
Optional Add-ons/Variations
- Personal Touch: Consider painting paw prints or your dog’s name on the front using a stencil. It adds a fun, personalized flair.
- Different Material Options: If you’re feeling adventurous, you can use reclaimed wood for a rustic look or even chic metal for a modern touch. Whatever suits your style.
Pro Tip
Before starting, think about safety—make sure any finishes you use are non-toxic, especially if your pup is prone to chewing on furniture.
Also, if you want this furniture to last, consider adding a removable lining inside. This makes cleaning up any toy fluff or hair a breeze.
With your DIY pet furniture complete, you’ll not only gain extra storage but a piece that your friends will admire.
Just think, no more tripping over toys when you walk into a room. How blissful does that sound? Happy crafting!
6. Dog Crate With Storage Space

If you’re a dog owner juggling all those leashes, toys, and essentials, a dog crate with built-in storage could be your new best friend. This DIY project not only provides a cozy little den for your pup but also aids in consolidating all their gear in one stylish spot, allowing you to store large dog equipment alongside their play items. It saves you money by allowing you to repurpose furniture you already own and helps keep your space neat while giving your dog a designated area to feel safe and secure. Additionally, consider placing an exercise pen with panels nearby to create an inviting play area where your dog can thrive while also enjoying the comforts of a luxury outdoor dog house.
Materials Needed
- 1 wooden dog crate or a sturdy wooden box
- Sandpaper (medium and fine grit)
- Paint or wood stain (your choice)
- Sealing varnish or polyurethane
- Measuring tape
- L-brackets (optional, for extra stability)
- Drill and screws (if assembling)
- Optional: Cushion for the top or crate pad for added comfort
- Optional: Decorative accessories (like stickers or stencils for personalization)
Step-by-Step Instructions
- Choose Your Crate: Start by selecting a wooden dog crate or sturdy wooden box that will serve as the base. Verify it’s spacious enough for your furry friend to sit, stand, and lie down comfortably.
- Smooth It Out: Use the medium-grit sandpaper to sand down rough edges, followed by fine-grit paper for a smooth finish. This will help prevent any accidental ouchies when your pup is exploring.
- Paint the Town: Grab your paint or wood stain and get to work giving your crate a fresh look. Choose something that matches your home decor or is simply a color you love. Let it dry completely before moving on to the next step—trust me, cleaning up paint spills is no fun.
- Seal for Good Measure: Apply a sealing varnish or polyurethane over the painted crate. You want it to withstand scrapes and spills because, let’s be honest, dogs aren’t known for being tidy.
- Optional Cushion Delight: If you want to turn the top of the crate into a comfy resting spot, attach a cushion or crate pad. You might want to measure the surface to cut foam or fabric to fit perfectly—no one likes a lumpy seat.
- Organize Your Dog Gear: Use the bottom of the crate or side compartments (if you’ve added any) to store your dog’s essentials: leash, toys, treats, or even blankets. Create a mini organization system with baskets or bins—there’s no shame in the label maker game, my friend.
- Personal Touch: Add some character to your crate by incorporating decorative accessories like stickers, stencils, or even your dog’s name on the side. This makes the crate not only a storage solution but also a unique piece of decor.
Optional Add-ons/Variations
- Fabric Lining: Consider lining the inside with a patterned fabric to add a fun pop of color and protect the crate’s interior. Plus, it makes it feel extra cozy for your pup.
- Wood Treatment: If you want something a bit different, try using reclaimed wood for a rustic vibe. Just be sure it’s free of any splinters or sharp edges—safety first!
Pro Tip
Always make certain no harmful chemicals are used in the paint or treatments since our pup’s health is the priority.
When decorating, keep it simple and opt for non-toxic materials. And remember, the best part? You’ll have a stylish piece that looks great in your living space while keeping your dog’s items organized and accessible.
7. Overflowing Dog Accessories Bin
If your dog’s accessories are starting to take over your living room, it’s time for a DIY dog accessories bin that’ll rein in that chaos. This project isn’t just practical; it adds a lovely touch to your home while keeping everything tidy. Plus, you’ll save money by using materials you may already have lying around—win-win! Additionally, consider implementing stackable crate solutions to maximize your space and organization options. Remember, having a designated storage area can also help keep your dog’s items separate and manageable, contributing to a more organized life with premium dog herbal remedies. To keep your premium dog food fresh and safe, look into investing in a quality premium dog food storage cabinet.
Materials Needed
- 1 wooden or sturdy plastic bin (you can upcycle an old storage box)
- Sandpaper (medium and fine grit)
- Paint or wood stain (optional, choose your favorite color)
- Sealing varnish or polyurethane (optional for wood)
- Measuring tape
- Drill and screws (if assembly is needed)
- Fabric (optional, to cover bins or add cushions)
- Decorative labels or stickers for organization
Step-by-Step Instructions
- Select Your Bin: Start by selecting a big enough storage bin that can handle all your pup’s gear. If you’re using an old crate, make sure it’s sturdy and clean.
- Prep for Paint: If you’re using a wooden bin, grab that sandpaper and smooth out any rough edges. Trust me, you don’t want a splinter during toy retrieval. Sand it down until your hands feel safe.
- Get Artsy: Feel free to paint or stain your bin in a color that’ll brighten your space or matches other furniture. Remember, let it dry completely—that paint won’t clean itself.
- Seal It In: For wooden bins, finish it off with a coat of sealing varnish. Dogs can be messy. You want to make sure your masterpiece can handle a few slobbery toys.
- Organize and Fill: Now comes the fun part—organizing! Gather your dog’s leashes, toys, grooming supplies, and more. You can use baskets or even old jars to create mini storage systems within the bin. Please don’t forget the virtues of a label maker—we all love a tidy name tag!
- Optional Fabrics: If you want to add some charm, cover the bin with fabric or add cushions on top for your pooch to lounge on. Choose playful prints or soft colors that delight you and complement your space.
Optional Add-ons/Variations
- Color Combo: Why not go all out with a colorful paint job or add patterns? Think stripes or paw prints.
- Extra Decor: You can DIY little tags or name plaques for each item or even for your dog’s bin—“Rover’s Toys” has a nice ring to it, don’t you think?
Pro Tip
When planning your bin space, think about the weight distribution. Heavier items should go at the bottom so your bin won’t topple over when you reach in.
And make sure your dog can’t chew on any paint or finishes; always opt for pet-safe materials when possible.
You have the tools, the creativity, and now, a plan to tackle that overwhelming pile of pet gear. Happy crafting!
Extra Tips & Ideas
While you might think dog storage has to be all about practicality, it can also be a chance to showcase your personal style—after all, your furry friend deserves a charming space, too. Consider using decorative baskets for toys; they can match your home décor and make cleanup a breeze. You could even repurpose an old dresser—no more cluttered spaces. Additionally, integrating a luxury dog hiking backpack into your pet organization can provide extra storage for outdoor gear, ensuring adventures are always ready to go.
What about a wall-mounted leash holder? It’s functional and can add a flair with cute hooks. Don’t forget labels; a touch of whimsy never hurts. Additionally, a dog mud room organizer system can help keep all your pet supplies in one tidy area.
And hey, if you find yourself stepping on squeaky toys at 2 a.m., remember: you’re not alone—dog parents everywhere are in the same boat. A little organization makes a world of difference. Additionally, using hunting dog GPS collars can help keep track of your dog while you’re out enjoying organized outings.
Frequently Asked Questions
What Materials Are Best for Dog Storage Furniture?
Wood, metal, and durable plastic are great materials for dog storage furniture. They’re sturdy and easy to clean, ensuring your storage solution lasts while keeping your pet’s items organized and accessible. Choose what fits your style!
How Can I Incorporate Dog Storage Into My Existing Décor?
You can blend dog storage into your décor by choosing furniture that complements your style, like stylish bins or decorative boxes. Consider items that serve a dual purpose, adding both functionality and aesthetics seamlessly to your space.
Are There Eco-Friendly Options for Dog Storage Solutions?
You could channel your inner Thoreau and opt for eco-friendly dog storage solutions. Think bamboo bins, recycled materials, or upcycled furniture. Incorporating these choices not only helps the planet, but it enhances your home’s charm too.
How Do I Prevent Odors From Dog Storage Areas?
To prevent odors, regularly clean storage areas with pet-safe disinfectants, use odor-absorbing materials like baking soda, and guarantee proper ventilation. Store items in sealed containers and wash your dog’s belongings frequently. You’ll notice a difference!
Can I Customize Dog Storage to Fit My Dog’s Specific Needs?
You know what they say: “A happy dog makes for a happy home.” Yes, you can customize storage to fit your dog’s needs by considering size, accessibility, and specific supplies. Tailor it for their comfort and convenience!
Conclusion
Creating a pet-friendly paradise can be as easy as tossing a frisbee in the park. With these stylish storage ideas, you can keep your dog’s toys organized without sacrificing your home’s charm. Imagine building that perfect spot, where you and your furry friend can unwind. So, go ahead, mix in some whimsy and comfort, and turn your space into a fun haven for both of you. Trust me, your dog will love it, and so will you.