
Did you know that nearly 70% of dog owners consider packaging when buying treats? It’s true. You’re not alone if you’ve found yourself drawn to a colorful bag or a unique shape. After all, it’s not just about what’s inside, but how it looks on the shelf—or let’s be honest, on your kitchen counter. So, what makes a treat package truly stand out? Let’s explore some innovative designs that could change how you view your furry friend’s snacks.
Vibrant Colors to Attract Dogs
When you think about dog treat packaging, the first thing that pops into your mind might be the taste or the smell, right?
But what really grabs your pup’s attention? Vibrant colors can work wonders. Bright greens, rich reds, and sunny yellows aren’t just for decoration—they’re like a beacon for your dog. Imagine your furry friend’s tail wagging furiously, drawn to those lively hues.
It’s almost like they see a party in a bag, and they want in! Using bold colors in dog treat packaging not only stands out on the shelf but also sparks excitement. Peanut butter dog treats are often packaged in eye-catching designs that highlight their delicious flavors. Including a wide variety of treats in a luxury treat gift basket can make those colors even more enticing. Additionally, the right packaging can also incorporate dog health care systems which promote overall wellness through appealing visuals.
Just think about it: a colorful bag is way more fun than a plain brown one. So, go ahead, let those colors shine!
Our Collection
When it comes to our collection, you won’t want to miss out on the limited edition flavor packs that’ll have your pup drooling in anticipation.
Think organic grain-free options, treat puzzles that keep them mentally engaged, and packaging that’s as eco-friendly as it’s stylish. Our chews are not only delicious but also provide the added benefit of being rawhide-free to support your dog’s health and happiness. Additionally, our pig ears for dogs are a great alternative for pups that love chewy textures without compromising their dietary needs.
1. Limited Edition Flavor Packs

If your furry friend’s treat stash is looking a little lackluster, why not spice it up with some custom dog treat bags? Exciting flavors in our dog treat variety pack ensure your pup stays excited about snack time! For a cozy atmosphere that complements your adorable pet, consider investing in designer dog friendly couches.
These personalized bags not only keep your pup’s favorite snacks fresh and organized, but they also add a touch of fun and flair to your home. Plus, a neat packaging solution can save you money in the long run by using materials you probably already have tucked away. Investing in a luxury dog treat maker can elevate your homemade snacks to a whole new level, adding gourmet flair that your dog will adore.
Let’s explore this delightful DIY that will surely put a wag in your dog’s tail.
Materials Needed:
- Brown paper bags (you can also use cloth bags for a more eco-friendly option)
- Acrylic paints (non-toxic is a must)
- Paintbrushes (various sizes)
- Stickers or decals (optional for personalization)
- Twine or ribbon (to seal the bags)
- Scissors
- Templates or stencils (optional, for designs)
- Clear sealing tape (to reinforce closures)
Step-by-Step Instructions:
1. Choose Your Treat Size: Decide how many treats you want to store and select appropriately-sized bags. If treats are on the bigger side (hello, peanut butter biscuits), make sure they fit comfortably inside without cramping.
2. Lay Out Your Work Area: Get a flat, clean surface ready. Put down some old newspaper or a craft mat; trust me, you don’t want paint on your dining table.
I still remember the day I declared my dining room a “creative space” — my mom nearly had a heart attack.
3. Design Your Gamut: Grab your acrylic paints and brushes. Get creative! You can go with paw prints, hearts, or even a simple “Treats for My Best Friend” slogan.
If you’re unsure, use stencils or templates for a polished look.
4. Paint Away: Once you have a design idea, start painting on your bags. Don’t stress too much; a few extra brush strokes won’t hurt.
After all, Picasso didn’t worry about perfection either. Just let your personality shine through—and don’t forget to include your dog’s name.
5. Let it Dry: Give your painted bags some time to dry completely. This can take about 30-45 minutes, so maybe take this time to indulge in some dog treat tasting.
No, no… not the dog treats. Colorful sprinkles and chocolate marshmallows are more my style.
6. Seal it Up: Once your designs are dry, fill those bags with your dog’s favorite snacks.
Then, use twine or ribbon to wrap the bags up nicely. For extra security, use clear sealing tape on the top. This will keep those treats safe from sticky paws or curious noses.
7. Show Off Your Creation: Place the finished bags in a designated treat area or on a cute doggy shelf. Give yourself a pat on the back; you just turned simple packaging into a work of art.
Optional Add-ons/Variations:
- Different Colors: Feeling adventurous? Use a rainbow of paints for a cheerful look, or go monochrome for a chic touch.
- Fabric Bags: Swap the paper bags for fabric ones and embellish them with stitched designs or fabric markers for a more durable end product.
Pro Tip:
Keep your doggies safe by always ensuring that any materials you use (including paints and glues) are non-toxic.
Also, consider labeling each bag based on the treat flavor—this will save you time when it comes to snack time decision-making, and your pup won’t have to stare at you with that sad “What’s for dinner?” look.
With just a little creativity and elbow grease, you’ve now transformed your dog’s treat experience.
Who knew snack storage could be so much fun? Happy crafting!
2. Organic Grain-Free Options

If you’re looking for a way to keep your pup’s treats tidy and add a personal touch to your home, then why not try making your own custom dog treat bags? This DIY project isn’t only a fun way to showcase your dog’s personality but also saves you money on store-bought packaging. Plus, you can use supplies you likely have at home, making this project both budget-friendly and environmentally conscious. By crafting these bags, you’ll also have a chance to showcase your premium pitbull dog supplies, ensuring your treats are as special as your pup. Finding the right premium dog food allergies can make a significant difference in your dog’s overall health. Additionally, choosing grain-free options can provide your dog with delicious nourishment. Let’s plunge into it!
Materials Needed:
- Brown paper bags (or cloth bags for a greener option)
- Acrylic paints (make sure they’re non-toxic)
- Paintbrushes (different sizes)
- Stickers or decals (for that extra flair)
- Twine or ribbon (to seal your bags)
- Scissors
- Templates or stencils (optional for more intricate designs)
- Clear sealing tape (to keep everything secure)
Step-by-Step Instructions:
- Pick Your Size: Decide how many treats you want to store. Choose bags that fit them comfortably, ensuring they won’t feel squished like a sardine in a can.
- Prepare Your Work Space: Find a flat surface to work on. Lay down some old newspaper or a craft mat – trust me, your dining table will thank you later if you avoid paint splatters.
- Get Creative: Grab those paints and brushes and express your inner artist. You can paint paw prints, your dog’s name, or even fun quotes. If you need a hand, stencils can guide your artistic flair.
- Paint Your Bags: Immerse yourself in the fun part—painting! Make sure to let your imagination run wild and don’t worry about making it look perfect. It’s all about the love you put into it.
- Let Them Dry: After you’re done painting, set the bags aside to dry. This could take 30-45 minutes, perfect for treating yourself to a snack break (no dog treats, I promise).
- Fill and Seal: Once dry, fill those bags with your dog’s favorite treats. Use twine or ribbon to tie them up nicely. For added security and to keep those sneaky paws away, seal it up with some clear tape.
Optional Add-ons/Variations:
Want to jazz it up a bit? Consider using bright colors like turquoise or neon shades to really make your bags pop. You can even add some patterns like polka dots or stripes for a unique twist. Express yourself and don’t be afraid to mix and match.
Pro Tip:
When it comes to sealing your bags with twine or ribbon, double knot for extra safety. It’s just like how we secure our bags when we shop—a little extra effort goes a long way!
Now that you have your custom dog treat bags ready, your pup is going to feel so special. Not only will treats be protected, but you’ll also feel pretty darn good knowing you made something unique just for them. Happy crafting!
3. Interactive Treat Puzzles
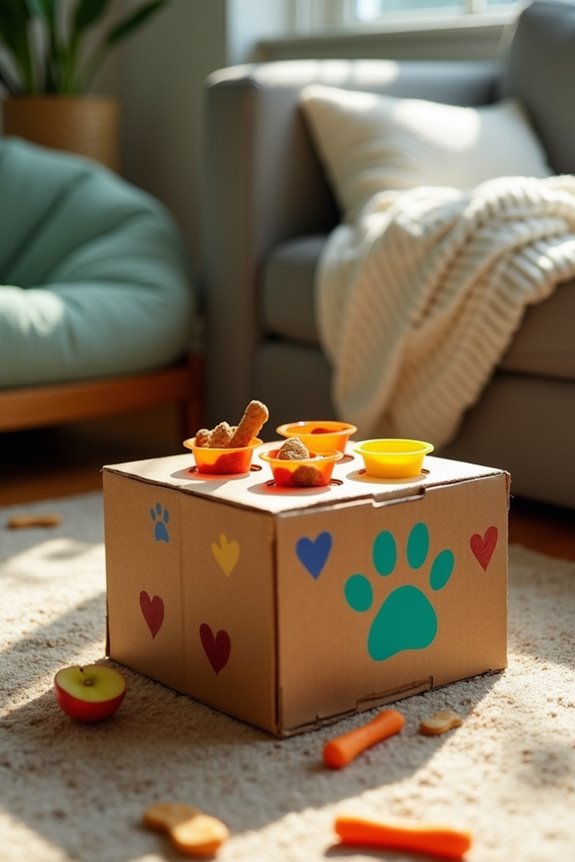
Have you ever wished you could keep your furry friend entertained while also treating them to some yummy snacks? Well, here’s a delightful DIY project just for you—an interactive treat puzzle! Not only will this keep your pup mentally stimulated, but it’s also a fantastic way to bond with your dog while saving money on pricey toys. In addition, premium dog enrichment toys can provide even more mental stimulation for your furry friend. Premium dog chew toys are also an excellent alternative to keep your dog engaged.
Plus, you can use materials you already have at home. Let’s explore!
Materials Needed:
- A cardboard box (any sturdy size will work)
- Scissors
- Small plastic cups or muffin tins
- Dog treats (the ones your pup loves best)
- Craft paint (non-toxic) or markers (optional for decoration)
- Old newspapers or a craft mat (to catch any mess)
Step-by-Step Instructions:
- Choose Your Box: Start by choosing a cardboard box that’s sturdy enough for your pup to nudge and paw at. It can be a shoe box or any small box you have lying around.
- Cut Holes: Using scissors, cut holes in the top of the box that are just big enough for the small plastic cups or muffin tins to fit through. You want them to be snug so they won’t slip out easily during playtime.
- Place the Cups: No need for perfection here! Place the cups or muffin tins inside the box, with the openings facing up. They should be spaced out enough to make it challenging but still reachable for your pup.
- Add Treats: Fill the cups with your dog’s favorite treats. You can also use smaller bits of treats, kibble, or even pieces of fruits and veggies (if your pup is adventurous).
- Optional Decoration: If you’re feeling crafty, now’s your chance to add a splash of color! Paint or draw on the outside of the box with non-toxic paint or markers. This will give it a fun, personalized look.
- Time to Play: Once everything is set, show your dog how to interact with the puzzle. You may need to give them a little nudge to get started, but once they figure it out, they’ll be hooked.
Keep an eye on them and offer praise as they solve the puzzle.
Optional Add-ons/Variations:
Want to level up your interactive treat puzzle? Try adding different sizes of cups to create varying difficulty levels. You can also modify the contents of the cups by mixing in some kibble, along with the treats, to keep things interesting.
Pro Tip:
Supervise your dog while they play with the puzzle. While it’s safe and fun, keep an eye out to guarantee they don’t try to chew or eat the cardboard.
And hey, if your pup is a bit of a rascal, you might want to reinforce the box with some tape to increase its durability.
This interactive treat puzzle won’t only keep your pup entertained for hours, but it will also give you peace of mind knowing you crafted something special just for them. Additionally, there are many premium dog enrichment toys that can further enhance your dog’s play experience. Happy puzzling!
4. Eco-Friendly Recyclable Packaging

Are you a dog owner who loves to keep things green while also treating your furry friend? Creating eco-friendly recyclable packaging for your dog treats is the perfect DIY project for you! Not only does this initiative help reduce waste, but it also adds a personal touch to how you store and present your pup’s favorite snacks.
Plus, it saves you money and makes your home feel a bit brighter and more organized. Let’s explore!
Materials Needed:
- Empty cardboard container or box (like a cereal box or small shipping box)
- Non-toxic craft paper or old newspapers
- Scissors
- Glue stick or double-sided tape
- Markers or stamps (for decorating)
- String or twine (optional for a rustic look)
Step-by-Step Instructions:
1. Choose Your Base: Start with a sturdy cardboard container—you can repurpose an empty cereal box or any small shipping box. Clean it out and make sure it’s dry.
2. Cut to Size: If your container is too tall, grab your scissors and trim it down to a height that’s nice and user-friendly. You want it to be easy to access those tasty treats.
3. Wrap It Up: Take your craft paper or old newspapers and cut them to size, covering the entire outside of your box. Use your glue stick or double-sided tape to secure the paper around the box.
Feel free to get creative—different colors and patterns can add real flair!
4. Seal it Up: If you want to keep the treats fresh, make sure your box can close or have a lid. You could cut out a small flap from the top or use a piece of craft paper to create a closing mechanism.
Just make sure it’s secure but easy to open when it’s treat time.
5. Personalize It: Here’s where the fun begins! Grab those markers or stamps and decorate your packaging with your dog’s name or cute paw prints.
Don’t worry about being a Picasso; the goofier, the better.
6. String It Up: For an added touch, you can tie a piece of string or twine around the box. It adds a lovely rustic charm and makes it feel even more gift-like.
7. Fill It with Love: Finally, fill your new eco-friendly packaging with your dog’s favorite treats.
Make them feel special and loved every time they see it.
Optional Add-ons/Variations:
Consider using fabric scraps instead of paper for a sturdier solution. This makes your packaging more durable and adds a cozy feel.
You could also decorate your box with unique dog-themed stickers or even some paw prints for an extra touch of personality—after all, your dog deserves the best!
Pro Tip:
Be sure to avoid using any toxic adhesives or decorations that might pose a risk to your dog. Always check the materials you’re using to keep everything safe and fun.
And if you use a string, make sure it’s secured well, so it doesn’t become a chew toy!
Now, you’ll have a charming, eco-friendly place to store your pup’s treats that’s not only attractive but responsible too. Happy crafting!
5. Customizable Packaging Designs
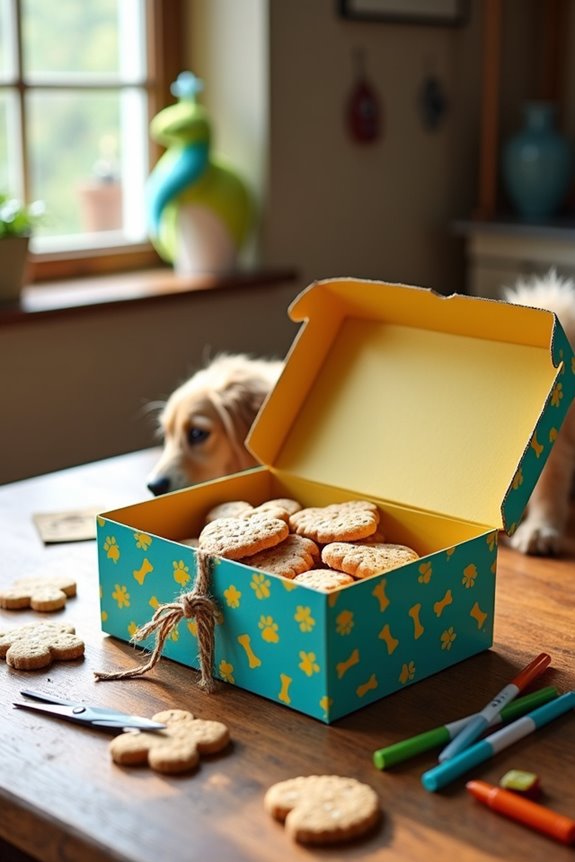
Looking to add a personal touch to your dog’s treat storage? This DIY project lets you create customizable packaging that suits your style and your pup’s personality. Not only does it make storing those tasty morsels a little more fun, but it also adds a splash of creativity to your home. Plus, you can impress your friends with how resourceful you are—who doesn’t love a crafty dog parent? Did you know that using premium dog food makers can help ensure your pup’s treats are nutritious and of high quality? With a homemade dog food machine, you can ensure fresh and healthy ingredients for your furry friend’s treats. Furthermore, incorporating dog treat baking equipment can enhance your baking experience and improve the quality of your homemade treats.
Materials Needed:
- Sturdy cardboard boxes (think cereal boxes or shoe boxes)
- Colorful craft paper or fabric scraps
- Scissors
- Glue or tape
- Markers, stickers, or stamps
- Ribbon or twine (for embellishment)
Step-by-Step Instructions:
- Pick Your Box: Start by selecting a cardboard box that’s strong enough to hold your dog treats. Clean it out and allow it to dry—nobody wants a soggy surprise.
- Trim for Function: If your box is too high, simply trim it down with scissors so that it’s the perfect height for easy access. You want your treats to be just a paw away.
- Cover and Create: Cut your craft paper or fabric scraps to fit around the box. Use glue or tape to secure it. Choose colors and patterns that reflect your dog’s personality—or go wild and mix them all together.
- Seal it Tight: Confirm the packaging can close. You can create a flap from your craft material or use another piece of paper to make a lid. Just make sure it’s secure enough to keep those snacks fresh.
- Decorate with Flair: Grab your markers, stickers, or stamps and customize your box. Write your pooch’s name or draw fun designs. Remember, there’s no such thing as too much creativity here.
- Add the Finishing Touch: Tie a piece of ribbon or twine around the box for that rustic feel. It’s like wrapping a gift for your furry friend, and they’ll appreciate the effort you put into it.
- Fill it Up: Once your packaging is ready, fill it with your dog’s favorite treats. Watch their excitement when they see the lovingly crafted box.
Optional Add-ons/Variations:
Feeling adventurous? You can use fabric scraps instead of paper to create a sturdier, more tactile packaging design. You could also try out different festive themes based on the season—after all, your pup deserves a decorated treat box for every occasion.
Pro Tip:
When using glue or tape, go for non-toxic options to keep our furry friends safe. And if you have little ones running around, make sure the packaging is durable enough to withstand a few playful knocks.
After all, treats should stay in the box, not on your floor.
6. Seasonal Holiday Packaging Themes

Why not give your dog’s treats a festive touch? This DIY project lets you create seasonal holiday packaging for your furry friend’s goodies. It’s not just about looking cute; it brings joy to you and your pup every time they see their special box filled with treats. Plus, you’ll save a few bucks by reusing supplies you already have at home. Using a professional sewing machine can help you create even more elaborate designs for your treat packaging. Let’s get those creative juices flowing!
Also, to keep your pup cool during the warmer months, consider pairing these treats with a stylish cooling bandana that adds comfort while looking trendy!
Materials Needed:
- Cardboard boxes (old shoe boxes or similar)
- Wrapping paper or craft paper (think holiday-themed)
- Scissors
- Glue or tape
- Decorations (stickers, ribbons, or stamps)
- Seasonal embellishments (like glitter or small ornaments)
Step-by-Step Instructions:
- Choose Your Box: Grab a sturdy cardboard box and give it a good cleaning. A shoe box is often perfect—it’s just the right size.
- Prepare for the Party: Trim the box, if needed, to make certain easy treat access. You want your pup to get to their goodies without any fuss.
- Wrap It Up: Cut your holiday wrapping paper to fit around the box. Make sure it wraps snugly and covers every side. Secure it with glue or tape.
- Seal It Festively: Create a flap on the box lid or take another piece of wrapping paper to fit the top. Make sure it closes tightly to keep those treats fresh—no canine snack attacks allowed.
- Get Creative: Decorate the outside with your chosen embellishments. Think snowflakes for winter, hearts for Valentine’s, or colorful leaves for fall. You can even add your pup’s name to make it extra special.
- Add Ribbon or Twine: Tie a lovely ribbon or twine around the box to give it that extra festive flair. Trust me, it looks charming and puts a smile on your face.
- Fill and Celebrate: Once your masterpiece is ready, fill it with your dog’s favorite treats. Watch their tail wag when they see the beautiful box. It’s a treat for their eyes and their tummy!
Optional Add-ons/Variations:
Feeling extra creative? Try using fabric instead of paper to wrap your box.
You could even create themed colors that match your own holiday decor—because who doesn’t love a little cohesive design? Or consider seasonal stencils to jazz up your box with holiday-specific images.
Pro Tip:
When decorating, make certain all materials are safe and non-toxic, just in case your curious pup decides to investigate.
A little extra attention to safety goes a long way in making this project worry-free—for both you and your beloved pet.
7. Flavorful Ingredients Highlighted

Are you ready to level up your dog’s treat game? Making homemade dog treats isn’t only budget-friendly, but it also allows you to customize flavors that your pup will love. Plus, you can guarantee they’re made with high-quality, nutritious ingredients. Trust me, your dog will thank you with all those tail wags!
Materials Needed:
- 1 cup whole wheat flour (or oat flour)
- 1/2 cup rolled oats
- 1/4 cup peanut butter (make sure it’s xylitol-free)
- 1/2 cup pumpkin puree (not the spiced pie filling)
- 1/4 cup chicken or beef broth (low sodium)
- Baking sheet
- Parchment paper (for easy cleanup)
- Mixing bowl
- Rolling pin or a clean surface to flatten the dough
- Cookie cutters (optional)
Step-by-Step Instructions:
- Preheat Your Oven: Start by preheating your oven to 350°F (175°C). This will guarantee your treats bake evenly and come out just right.
- Mix the Dry Ingredients: In a mixing bowl, combine the whole wheat flour and rolled oats. Give it a little stir to mix everything together. It’s best to do this first, trust me—it prevents the flour from flying everywhere later.
- Add the Wet Ingredients: Add peanut butter, pumpkin puree, and chicken broth to your mixing bowl. Now, this is where it gets messy; get ready to mix. Use a spoon or your hands (optimal pup love style) to combine everything into a dough. If it’s too dry, add a splash more broth.
- Roll it Out: Dust your rolling surface with a bit of flour to prevent sticking. Grab your dough and roll it out to about 1/4 inch thick. Remember, thinner treats will cook faster—no one wants a burnt offering.
- Cut the Treats: Now comes the fun part! Use cookie cutters to cut out shapes. If you don’t have cookie cutters, just use a knife to cut squares or strips. No doggy judge here.
- Prepare to Bake: Line your baking sheet with parchment paper and lay out your treats. Don’t worry too much about spacing; they’re dog treats, not fine cuisine.
- Bake and Cool: Bake in the oven for about 20-25 minutes or until they turn golden. Let them cool completely on a wire rack before handing them over to your enthusiastic taste tester.
Optional Add-ons/Variations:
Feeling adventurous? Try adding ingredients like mashed bananas, sweet potatoes, or even some shredded carrots to the mix for extra flavor and nutrition.
You could also explore different flours like coconut or almond for a gluten-free option!
Pro Tip:
Store these homemade treats in an airtight container in the fridge—if they last that long! To make them last longer, consider freezing them in batches. That way, your pup can have a fresh treat whenever they please, and you won’t feel overwhelmed by a sea of snacks.
Now, get ready for some major happy dances and puppy snuggles—those tails won’t stop wagging once they get a taste of your delicious homemade treats!
Extra Tips & Ideas
While you’re diving into dog treat packaging designs, don’t forget that a little creativity can go a long way.
Think about using vibrant colors or playful patterns that grab attention. Have you considered incorporating windows? They let pet owners peek at those delightful treats inside. Oh, and don’t underestimate the power of a quirky tagline—it can be the cherry on top. Additionally, using a premium pet treat maker can elevate the quality of your treats and enhance your brand image. A well-designed package for premium dog treat machine can further entice customers and highlight your craftsmanship.
You could also take inspiration from your own furry friend. What do they love? If they can’t resist peanut butter, showcase that mouth-watering flavor!
And hey, eco-friendly materials are all the rage; your planet-loving customers will appreciate the thought. Additionally, investing in dog treat making equipment can enhance your production process and help you create even better treats to showcase.
Frequently Asked Questions
What Materials Are Commonly Used for Dog Treat Packaging?
You’ll commonly find materials like plastic, biodegradable film, foil, and paper used for dog treat packaging. These options guarantee freshness and durability, while some eco-friendly choices appeal to environmentally conscious pet owners.
How Can I Choose Sustainable Packaging for Dog Treats?
You can choose sustainable packaging for dog treats by using compostable materials like PLA. For example, a brand could replace plastic bags with plant-based pouches, reducing waste and appealing to eco-conscious customers while keeping treats fresh.
Are There Specific Regulations for Dog Treat Packaging?
Yes, there are specific regulations for dog treat packaging. You’ll need to comply with guidelines from the FDA, ensuring proper labeling, ingredient disclosure, and safety standards. Always check your local regulations for additional requirements too.
How Does Packaging Influence Dog Treat Freshness?
Packaging plays an essential role in maintaining dog treat freshness. Quality seals and moisture-resistant materials protect treats from air, light, and humidity, which keeps them tasty and safe for your furry friend longer.
Where Can I Find Custom Packaging Designs for Dog Treats?
You can find custom packaging designs for dog treats on websites like Etsy, Packlane, or Custom Packaging. Designers there offer unique options that let you create something special tailored to your brand and pet’s needs.
Conclusion
So, there you have it—ten dog treat packaging designs that not only catch your eye but also keep those tails wagging. It’s amazing how something as simple as a package can spark joy, right? Next time you grab a bag at the store, think about the creativity that went into it. Your pup deserves the best, and these designs celebrate that bond. After all, when your dog’s happy, aren’t you just a little bit happier too?