Imagine your dog zooming through a colorful obstacle course, tail wagging in pure delight. Building a DIY dog agility course is not just a fun project; it’s a chance to bond with your pup while keeping them active. You don’t need fancy equipment or a huge backyard. With everyday materials, you can create jumping hurdles, weave poles, and more. So, what are some must-have obstacles that you should consider? Let’s explore the world of agility right in your backyard.
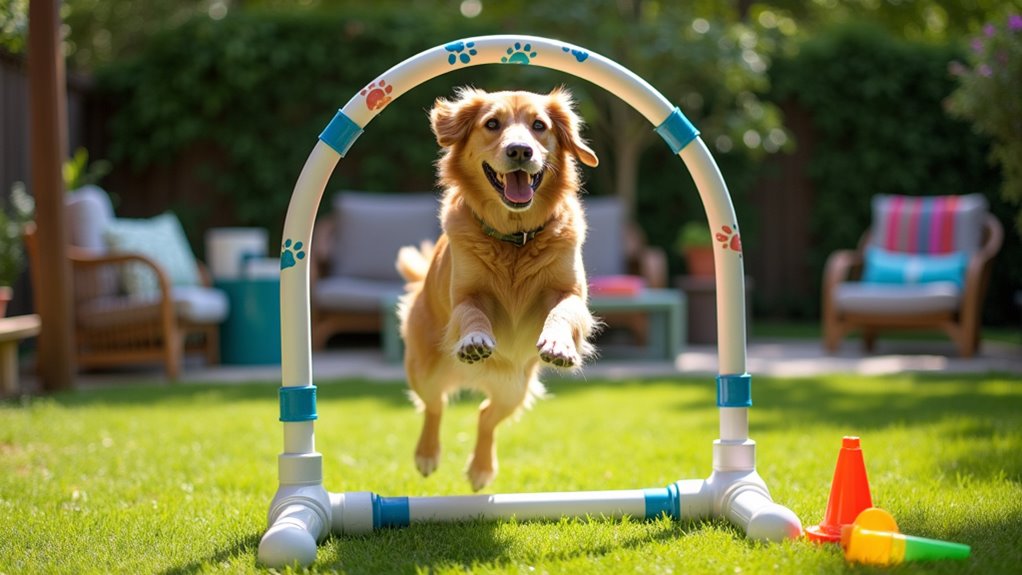
Jumping Hurdles and Weave Poles
Creating jumping hurdles and weave poles for your dog agility course can be a fun project that’ll have your pup leaping and zigzagging in no time.
First, think about hurdle placement; you’ll want them spaced out just right to keep your dog engaged. Too close together, and they could trip. A good rule of thumb? Aim for about two to three feet apart.
For weave poles, weave spacing is vital too. You might start with poles around 24 inches apart. Just imagine your pup weaving through like a pro.
And hey, if your first set-up looks like a game of Jenga, don’t worry—you’ll get better, trust me. Your pup won’t care if it’s perfect, just the laughter and fun they bring will make it all worth it.
Our Collection
Now that you’ve tackled those jumps and weaves, let’s talk about our collection of fun and challenging obstacles.
Imagine your pup zipping through tunnels, perfecting their balance on a teeter-totter, or conquering an A-frame like a champ.
These pieces not only keep things exciting but also ramp up the training, so are you ready to build some new skills together?
1. Tunnels for Added Fun
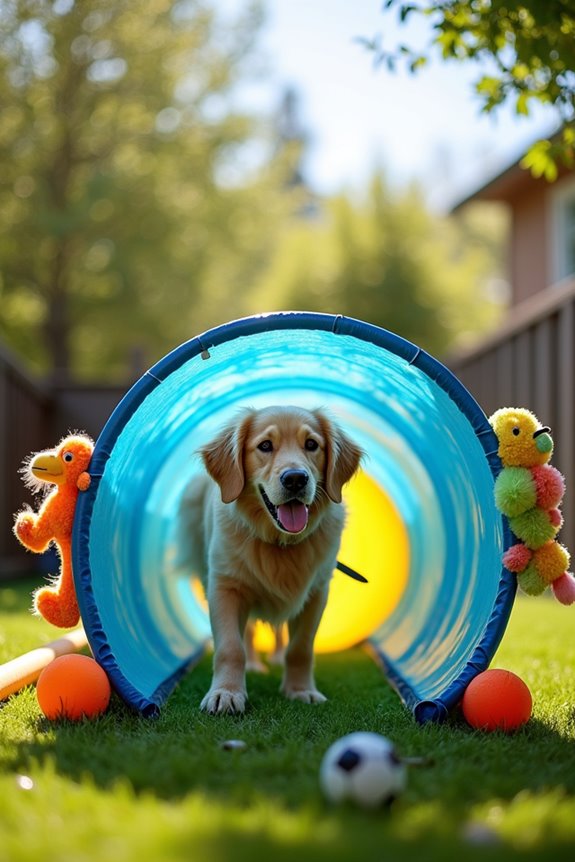
Have you ever watched your pup dart through a tunnel and thought, “Wow, that’s pure joy on four legs”? Building a DIY dog agility tunnel can add not just fun to your dog’s playtime but also a fantastic training incentive.
Plus, it’s budget-friendly and can be tailored to fit your space perfectly. So, if you want to see tails wagging and fur flying, let’s get to work.
Materials Needed:
- 10- to 12-foot flexible PVC pipe or garden mesh (like the stuff you use for fence repairs)
- Heavy-duty tarp or durable fabric (any lively color will do)
- Rope or bungee cord (to secure the ends)
- Scissors
- Tape measure
- Optional: Pool noodles (for extra structure and fun)
Step-by-Step Instructions:
1. Measure and Cut: Decide how long you want your tunnel. For most dogs, 10 to 12 feet is ideal. Measure and then cut your PVC pipe or mesh to that length.
Be sure to cut with scissors or a pipe cutter—unless you’re feeling adventurous and want to risk a trip to the emergency room.
2. Form the Tunnel Shape****: If you’re using flexible PVC, bend it into a curved shape, like a rainbow. If you’re using garden mesh, you should already have a nice roll.
No need for fancy gymnastics here; just make sure it’s wide enough for your dog to dash through without getting stuck.
3. Create the Fabric Cover: Measure out a piece of tarp or durable fabric that’s about two feet longer than your tunnel on each side (for overhang). Cut it out.
This will be your tunnel’s cozy cover—who doesn’t love a little flair?
4. Secure the Cover: Drape the fabric over your tunnel structure. Use rope or bungee cords to secure the fabric at both ends.
This gives your tunnel that nice, snug fit. Just like wrapping a burrito, but much more entertaining.
5. Add Extra Support (Optional): If you want to make your tunnel more structured, slide some pool noodles into the openings of your tunnel to give it shape.
It’s like giving your tunnel a backbone—neat, right?
6. Test and Adjust: Give it a shake. Make sure everything is secure.
Then step back and admire your handiwork. If it falls over like my self-esteem after a bake-off, adjust where necessary.
7. Introduce the Tunnel: Now it’s time for your dog to explore. Use treats to encourage your pup to enter from one side and come out the other.
Maybe do a little happy dance when he does—it’s like your personal performance of the “Tunnels of Joy!”
Optional Add-ons/Variations:
Want to get fancy? Consider painting your PVC pipe in different vibrant colors, or use patterned fabrics to match your home or your pup’s personality.
You could even add fun toys attached to the sides as distractions to make tunnel time even more exciting for your furry friend. After all, a little customization can go a long way.
Pro Tip:
Always supervise your dog when they’re exploring their new tunnel. Make sure it’s secured and safe—nobody wants their pup going on an unexpected wild ride.
And if your pup seems shy about entering, try lying down next to the tunnel and calling them in. Sometimes all they need is a little nudge—or a brave human in the tunnel with them.
2. Contact Zone Equipment
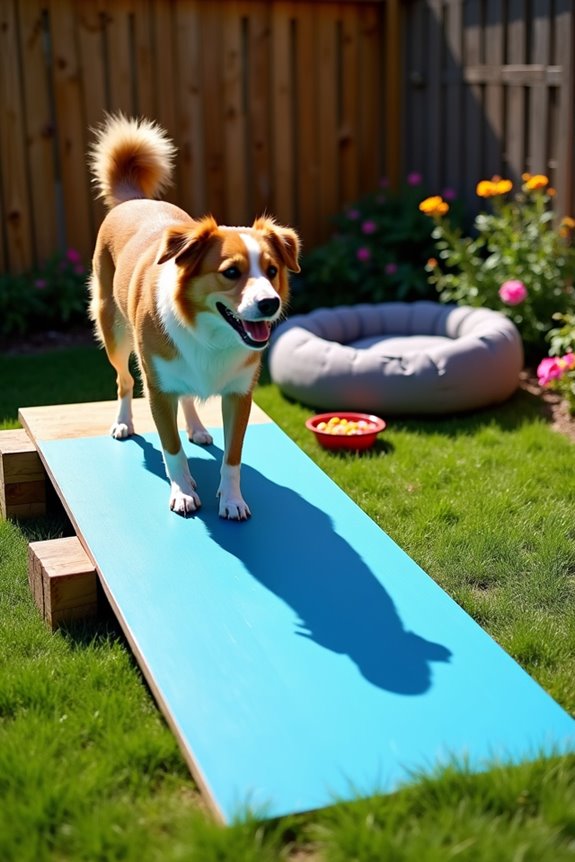
If you’ve ever watched your dog gracefully leap through an obstacle course, you might’ve thought, “Wow, could they possibly look any happier?”
Building a DIY contact zone is a fantastic way to enhance your dog’s agility skills while keeping their playtime engaging. Plus, it saves you money and gives your furry friend a cozy place to practice those climbing and balancing skills right in your own backyard. Investing in a quality luxury dog bed pillow can complement their training by providing a comfortable resting place after play.
Materials Needed:
- A sturdy piece of plywood (at least 4×8 feet)
- Sandpaper (medium and fine grit)
- Non-slip paint or coating
- Wooden blocks or bricks (these will act as supports)
- Measuring tape
- Saw (if you need to cut your plywood to size)
- Drill and screws (for securing the structure)
- Optional: Bright paint or fun decals (to add a pop of color)
Step-by-Step Instructions:
- Choose Your Size: Decide what dimensions will work best for your dog. You want it to be challenging but not too intimidating. A low ramp approximately 1 foot high is great for beginners.
- Cut the Plywood: If your plywood isn’t already the right size, use a saw to cut it into your desired dimensions. Think of it as creating your dog’s very own stage, where they can shine like the stars they are.
- Smooth the Edges: Sand down the edges and surfaces of the plywood using medium and then fine grit sandpaper. Trust me, splinters aren’t cool—neither for you nor for your dog. This step guarantees a safe and comfortable experience.
- Add Non-Slip Coating: Apply a coat of non-slip paint or coating to the top surface of the ramp. This creates traction for your pup, helping them feel secure and confident as they climb. Just imagine your dog strutting their stuff like a runway model.
- Create Support Structures: Use wooden blocks or bricks as sturdy supports underneath the ramp. This is super important for stability. You don’t want your DIY masterpiece to wobble like your knees do after leg day.
- Test for Stability: Once everything is in place, give your contact zone a good shake to verify it’s secure. If it’s wobbly, adjust your supports or add more until it feels solid. This is your chance to channel your inner contractor.
- Introduce the Equipment: Lead your dog to their new contact zone with treats. Encourage them to walk up and down, rewarding them with praise and snacks. Celebrating their successes is part of the fun—maybe even snap a video, so you have proof of their cuteness.
Optional Add-ons/Variations:
- Make your contact zone extra fun by painting it a vibrant color or adding decals of your dog’s favorite cartoon characters. Who said agility couldn’t be stylish?
- If you’re feeling particularly crafty, create a ramp with adjustable heights, using extra bricks or wooden supports to modify it as your dog gains confidence.
Pro Tip:
Always supervise your pup during practice sessions on the contact zone. It’s a thrill for them to explore, but safety is your top priority.
Also, consider starting with shorter heights before gradually increasing them so your furry friend can build trust in their skills.
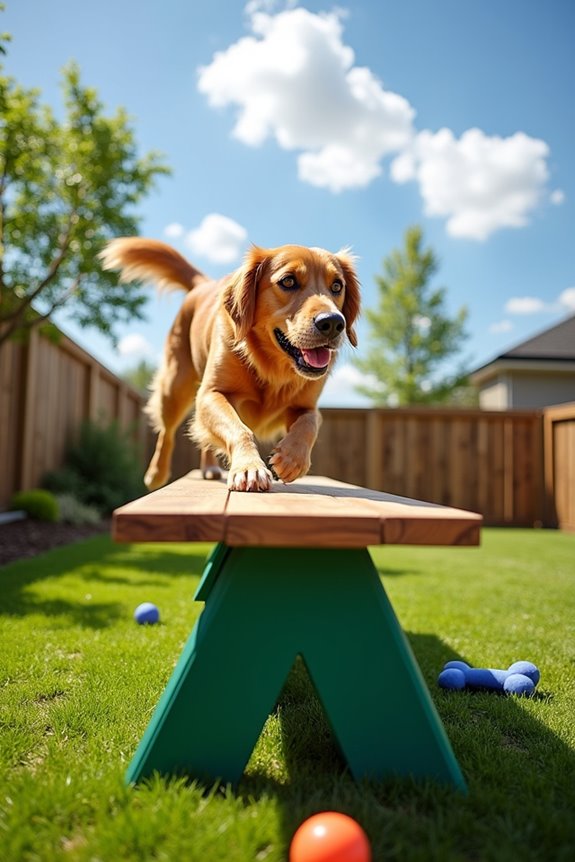
3. Tabletop Obstacles for Balance
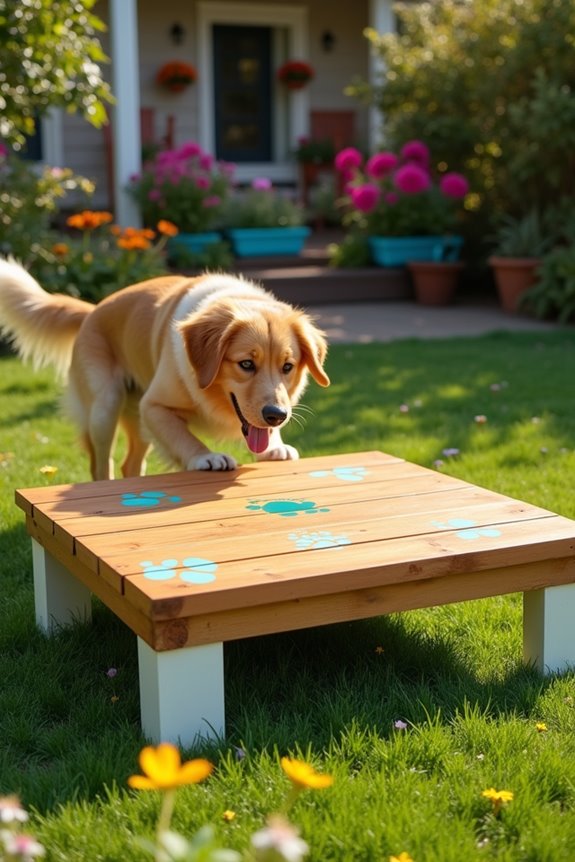
Have you ever watched in awe as doggy athletes master the art of balance on narrow beams? Building a tabletop obstacle for your furry friend can boost their coordination while providing hours of fun. Plus, it’s an economical way to craft an engaging workout that fits right into your backyard, making playtime both enriching and exciting.
Materials Needed:
- A large piece of plywood or a sturdy wood plank (size depending on your dog)
- Four sturdy legs (these could be wooden posts or heavy blocks)
- Screws (suitable for securing the legs)
- Sandpaper (medium and fine grit)
- Non-slip coating or paint
- Measuring tape
- Saw (if needed for adjustments)
- Drill (for securing the legs)
- Optional: Paint or fun stickers for decoration
Step-by-Step Instructions:
- Pick Your Dimensions: Choose how long and wide you want your tabletop to be. A good starting point for small to medium-sized dogs is about 3 feet long and 2 feet wide. Make it a cozy space, just right for their little paws and big dreams.
- Cut Your Wood: If the plywood is larger than you want, grab that saw and trim it down to your ideal dimensions. Remember, all great masterpieces started with a solid foundation; this is yours.
- Smooth It Out: Use medium grit sandpaper to smooth over the edges and surface. Then, finish it off with fine grit sandpaper to guarantee your pup won’t leave the session with any unwanted splinters.
- Add the Legs: Securely attach the legs to each corner of your tabletop using screws. Make sure they’re evenly spaced and sturdy; you want it to stand like a proud pillar of balance right in your backyard.
- Non-Slip Coating: Coat the surface with non-slip paint to guarantee your dog maintains grip as they prance across their new perch. A little extra reassurance goes a long way to building their confidence.
- Test It Out: Once it’s all set up, give the tabletop a good shake (not like you’re dancing—you want to see how stable it is). If it wobbles, adjust those legs so your dog feels secure on their new balance beam.
- Introduce the Tabletop: Use treats to guide your pup onto the surface. Show them how to walk across, rewarding every stride with praise. Celebrate their first steps as if they just landed a triple backflip at the Olympics.
Optional Add-ons/Variations:
Want to jazz it up? Paint your tabletop in your dog’s favorite color or add some clever decals—imagine a little paw print pattern! You can even try using different types of wood for a rustic look or painting it with bright, non-toxic colors.
Pro Tip:
Before starting your project, verify your wood is outdoor-safe; pressure-treated wood holds up well against the elements. It’s a small extra investment that keeps your obstacle strong and secure for many backyard adventures to come. Happy building!
4. A-Frame Climbing Structure
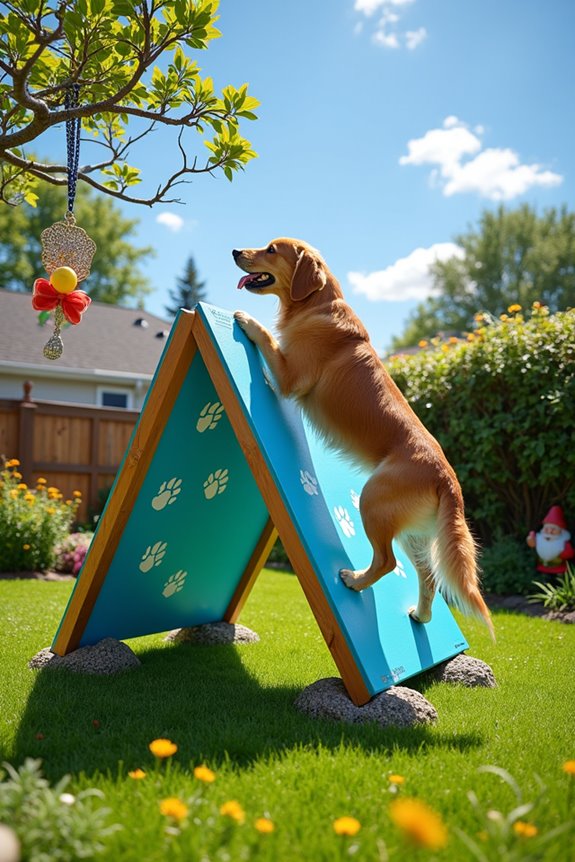
Get ready to elevate your dog’s agility game with a fun and functional A-frame climbing structure! This DIY project is perfect for dog owners looking to create an engaging workout that combines mental challenges with physical activity. Not only is it a fantastic way to boost your pup’s confidence and coordination, it also saves you money compared to store-bought options, all while giving your backyard a little bit of flair. Plus, you can elevate your dog’s style with a designer luxury collar to complete the look.
Materials Needed:
- Two large sheets of plywood (3 feet x 4 feet each)
- Four sturdy wooden beams (2x4s are great for this)
- Screws (make certain they’re weather-resistant)
- Hinges to connect each plywood sheet
- Non-slip paint or rubber matting
- Sandpaper (medium and fine grit)
- Measuring tape
- Saw (if adjustments are needed)
- Drill
- Optional: Colorful paint for customization
Step-by-Step Instructions:
- Measure Twice, Cut Once: Start by laying out your plywood sheets. If you want to adjust the size for your dog, now’s your time. Aim for a height of about 3 feet, so your pup can climb safely without feeling intimidated.
- Cut the Plywood: If your plywood is larger than needed, grab that saw and adjust it to your desired dimensions. Remember, the goal is a triangle, so you’ll have two 3 feet wide planks that will form the A-frame when stood upright.
- Smooth Out Those Edges: Sand down all edges and surfaces using medium grit sandpaper, followed by fine grit sandpaper for a polished finish. You don’t want your dog to get splinters, after all. Imagine the doggy drama that would cause.
- Build the Frame: Use the wooden beams to create a sturdy A-frame structure. Secure each end of the plywood to the beams using screws, confirming everything is well attached and stable. We want it strong enough for those enthusiastic climbs, right?
- Add the Hinges: Attach the two plywood pieces at the top with hinges. This allows the structure to fold for easier storage but keeps it upright during use. It’s like the doggy version of a foldable picnic table!
- Non-Slip Treatment: Coat the climbing surface with non-slip paint or attach rubber matting. This will help your pup grip while climbing and prevent any slippery shenanigans.
- Test and Introduce: Before letting your pup play, give the A-frame a good shake (not in an earthquake sort of way) to verify stability. Now, entice your furry friend to climb using treats—after all, who can resist those yummy rewards? Celebrate each little step as if it’s a huge milestone.
Optional Add-ons/Variations:
Want to add a personal touch? Consider painting your A-frame in your pup’s favorite color, or use fun stencils for paw prints and bones.
Maybe go all out and add some adorable stickers. Why not make it a piece of art they can climb on?
Pro Tip:
Always keep an eye on your dog during their climbing sessions, especially when they’re just starting out. You’ll want to make sure they’re using the structure safely and comfortably.
And here’s a money-saving tip—check out your local hardware store for discounted wood or leftover materials; you might be surprised by what you find!
5. Teeter-totter for Balance Training
Is your dog ready to master the art of balance? A DIY teeter-totter isn’t only a blast for your pup but also an excellent way to sharpen their coordination skills. By adding this simple piece of equipment to your backyard, you’ll create a playground that improves your dog’s agility while strengthening the bond between you two. Plus, having a proper emotional support dog accessory can enhance your pet’s training and comfort experience.
Plus, you’ll save money while making your outdoor space more engaging—who doesn’t want that?
Materials Needed:
- One solid board (at least 10 feet long and 2 feet wide)
- A sturdy base (two long beams for stability, about 8 feet each)
- Screws (make sure they’re weather-resistant)
- A metal pipe or a durable PVC tube (to pivot the board)
- Sandpaper (medium and fine grit)
- Measuring tape
- Drill
- Optional: Paint or wood stain for a personalized touch
Step-by-Step Instructions:
- Choose Your Location: Find a flat area in your yard where the teeter-totter can live. Avoid spots that will flood or collect water—wet dogs plus wooden equipment equals a splintery mess.
- Prep the Board: Sand down the board using medium grit sandpaper, followed by fine grit. You want it smooth, so your pup’s paws don’t get any surprises.
- Create the Base: Measure and cut the two long beams to make an A-shaped base that will keep the teeter-totter stable. Securely attach each beam to the ends of the board—think of this as the teeter-totter’s legs.
- Add the Pivot: Drill a hole slightly larger than the pipe or PVC tube through the center of your wooden board. Insert this pipe to act as a pivot. Make sure it gives a smooth motion; we’re aiming for grace, not clunkiness here.
- Get It Stable: Securely attach both ends of the board on the base beams with screws. Check for stability by giving it a little shake—if it wobbles like a dog on a trampoline, you may need to make adjustments.
- Final Touches: Once everything is in place, consider painting or staining the board to match your backyard style. Perhaps add your dog’s name—fancy, right? Let’s hope they like it more than the dog next door.
- Introduce Your Pup: Allow your furry friend to explore the teeter-totter gently. Reward them with treats when they balance across, and watch their confidence grow—because who doesn’t love a well-done dog trick?
Optional Add-ons/Variations:
Feeling fancy? Paint the board in vibrant colors or even add fun patterns to make it pop. You could also consider wrapping the pivot with brightly colored tape for a touch of flair—it’ll look as good as it functions.
Pro Tip:
Safety first! Always supervise your dog, especially during the initial training sessions. We want them to have fun, not to become a contortionist in search of treats.
Also, remember to check for wear and tear regularly—after all, adventures can sometimes leave the equipment a little worse for wear.
And there you have it, a DIY teeter-totter that’s easy to make, a joy for your dog, and sure to impress anyone who visits your backyard. Happy building!
6. Tire Jump for Versatility

Looking to amp up your dog’s agility game? A DIY tire jump is a fantastic project that not only provides your pup with a thrilling challenge but also elevates your backyard’s play area. It’s a money-saving venture that packs a punch in versatility, encouraging your canine companion to leap, bound, and show off their impressive skills. Let’s get those wheels rolling! Plus, integrating outdoor dog playground equipment in your yard can enhance your pup’s overall play experience!
Materials Needed:
- One old tire (the wider, the better)
- Strong rope or bungee cord (to secure the tire)
- Two sturdy wooden posts or metal poles (for support)
- Drill
- Measuring tape
- Paint (optional, for a personalized touch)
- Sandpaper (for smoothing any rough edges)
Step-by-Step Instructions:
- Select Your Tire: Choose a tire in good condition without any cracks or big holes. A larger tire can be more exciting for your pup. If you’re lucky, maybe it’s lying around in your garage just waiting for a second chance at being awesome.
- Prep the Support: Measure and cut your wooden posts or metal poles to about waist height. You want them sturdy enough to withstand your dog’s leaps but not so tall that they give your furry friend a heart attack.
- Drill Holes: Drill holes into the upper side of each post, making sure they line up. The holes should be slightly wider than your securing ropes or bungee cords. This is where your tire will hang.
- Attach the Tire: Use the strong rope or bungee cord to suspend the tire between the two posts. Make certain it’s anchored securely; if your tire starts swinging like a rogue pendulum, that’s a recipe for a puppy catastrophe.
- Check Your Work: Make certain the tire is at a height that’s challenging but safe for your dog. Give it a little shake (not like a Polaroid picture, though) to verify it’s stable.
- Final Touches: If you want to jazz things up a bit, consider painting the tire in fun colors or patterns. Whether your dog prefers a pop of neon or a classy ombre, a little creativity goes a long way.
- Introduce Your Pup: Allow your dog to approach the tire at their own pace. Use plenty of treats and encouragement. If they leap through it like a superstar they are, celebrate with pats and praise—after all, you’re working towards a world-class agility champion here.
Optional Add-ons/Variations:
Why not take it a step further? You could mix in a second tire for a dual jump or paint a fun design on it that reflects your pup’s personality, like paw prints or polka dots. Not only will it look great, but it also adds a unique element to your outdoor space.
Pro Tip:
Always supervise your dog during practice sessions to guarantee safety. Plus, if the tire ever gets worn or damaged, consider replacing it rather than patching it up. An unhappy tire can lead to a less-than-happy pup, and we all know that’s a no-go.
With this tire jump in your backyard, you’ll not only contribute to your dog’s exercise routine but also spark joy and excitement! So let’s start building, because an agile pup is a happy pup. Happy crafting!
7. Jumping Through Hoops
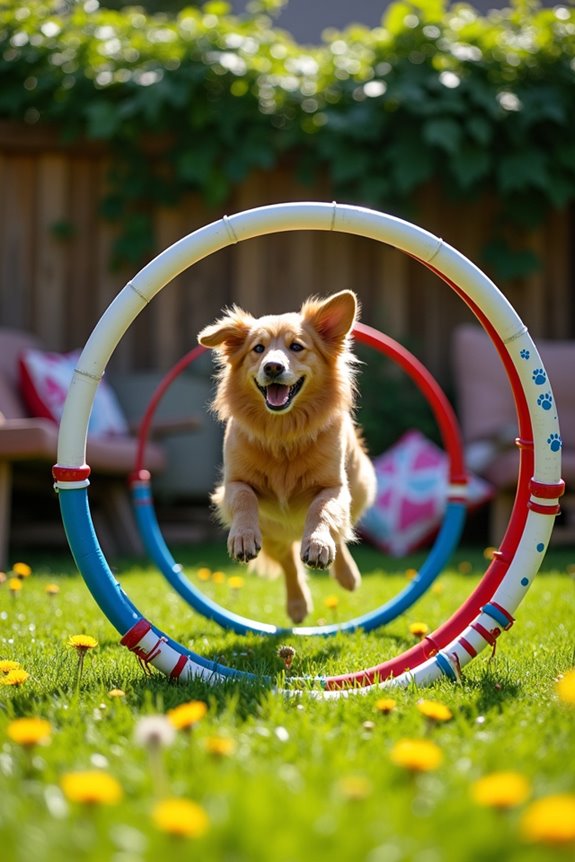
Want to see your dog soar through the air like a seasoned athlete? Creating a DIY jumping hoop is a fantastic way to challenge your pup and boost their agility. Plus, it’s super simple, budget-friendly, and adds a pop of joy to your backyard. Get ready to watch your furry friend become a jumping sensation!
Materials Needed:
- PVC pipes (2-inch diameter)
- PVC elbow joints (2-inch)
- PVC T-joints (2-inch)
- Measuring tape
- Saw (hacksaw works great!)
- Strong adhesive or PVC cement
- Paint (optional for personalization)
- Sandpaper (to smooth edges)
Step-by-Step Instructions:
- Measure and Cut the Pipes: Start by cutting your PVC pipes into lengths. For the hoop itself, you’ll want two long pieces (about 4 feet each) for the top, and two pieces (about 3 feet each) for the sides. Don’t panic if your cuts aren’t perfect; your pup won’t mind.
- Assemble the Base: Take the T-joints and attach them to the bottom of your side pipes. This will create a sturdy base for your hoop. Think of it like building a doggy playground kingdom, one piece at a time.
- Add the Vertical Supports: Connect the other end of the side pipes to the elbow joints. Then, connect the elbow joints to the straight pipe pieces (around 2 feet long) to create the vertical supports. These will help you achieve the height for your hoop. Adjust the height according to your dog’s ability—nobody wants a teeter-totter fiasco!
- Create the Hoop: Bend the remaining long PVC pieces into a circular shape and insert them into the elbow joints at the top. Secure them tight while wishing you’d a fancy way to do it but knowing you’ll handle this like a pro.
- Fasten Everything: Use strong adhesive or PVC cement to reinforce the joints. Wait for it to dry as per the instructions—don’t let excitement lead you to skip this essential step. Safety first, agility second.
- Smooth it Out: Once everything is set, give your edges a quick sand to remove any sharp bits. You wouldn’t want your pup to get a nasty surprise while showing off their moves.
- Paint and Personalize: Feel free to jazz up your hoop with some bright colors or a fun design that reflects your dog’s personality. Maybe give it a name, like “The Launch Pad.”
- Introduce the Hoop: Gently show your dog the hoop and encourage them to jump through using treats and lots of happy chatter. Don’t be surprised if they think it’s a new tunnel to explore instead. Just roll with it.
Optional Add-ons/Variations:
Looking to take it to the next level? Consider using different colors for the hoops or painting fun designs, like paw prints or bones. Or, you could make adjustable heights—so you can challenge your pooch as they get better and better.
Pro Tip:
For a safety precaution, make sure the hoop is stationary and not wobbling while your dog jumps through. If they go flying into it like they’re in the Olympics, a solid base will avoid any embarrassing moments or potential injuries.
Plus, using lighter PVC pipes ensures your pup can navigate without fear! Luxury dog collars are also a great way to elevate your dog’s overall style as they perform their agility tricks!
Extra Tips & Ideas
While you’re setting up your DIY dog agility course, don’t forget that a little creativity can go a long way in keeping your pup engaged and excited.
Try using household items, like chairs for weave poles or a blanket over some boxes for a tunnel. Who knew hacking the furniture could be so fun?
Just remember the safety considerations—make sure everything’s stable and secure, so your dog doesn’t trip.
When it comes to training techniques, use treats and positive reinforcement to encourage your furry friend.
You might end up doing a goofy dance in excitement when they master a jump.
And trust me, there’s nothing quite like showing off your makeshift agility course to friends and neighbors—just don’t be surprised if they ask for tips.
Frequently Asked Questions
What Materials Are Best for Building a DIY Agility Course?
You’ll want lightweight materials like PVC for jumps and wood for tunnels. Strengthen safety considerations by using non-slip surfaces and rounded edges. Equipment recommendations also include cones and weave poles for variety and challenge.
How Much Space Do I Need for a DIY Agility Course?
You need about 30 by 50 feet for a basic agility course, but if you’ve got more space, you can expand your course layout and enhance the agility dimensions, giving your dog room to play!
Can Beginners Train Dogs for Agility Courses?
Yes, beginners can train dogs for agility courses! Start with positive reinforcement training methods, use beginner tips like short sessions, and focus on fun. Consistency and patience will help your dog learn and enjoy the process.
How Do I Measure My Dog’s Performance?
To gauge your dog’s performance, think of a painter evaluating their masterpiece. Track performance metrics like speed, accuracy, and confidence during agility trials. Each run is a canvas, revealing strengths and areas needing more color.
Are There Age Restrictions for Dogs in Agility Training?
There aren’t strict age restrictions for agility training. Puppies can start socialization, while older dogs may need careful assessment. Always consider your dog’s physical ability and health, keeping puppy suitability and senior considerations in mind.
Conclusion
So, you’ve built a fun dog agility course that’s practically calling your pup’s name. Watching them zoom over hurdles and through tunnels is pure joy. Plus, you’ve turned your backyard into a mini playground. It’s like the Olympics for dogs, isn’t it? Remember, every wag and leap is a step toward a stronger bond. So, grab those treats, cheer them on, and don’t forget to enjoy the chaos. After all, who knew training could be this much fun—and a little messy too?