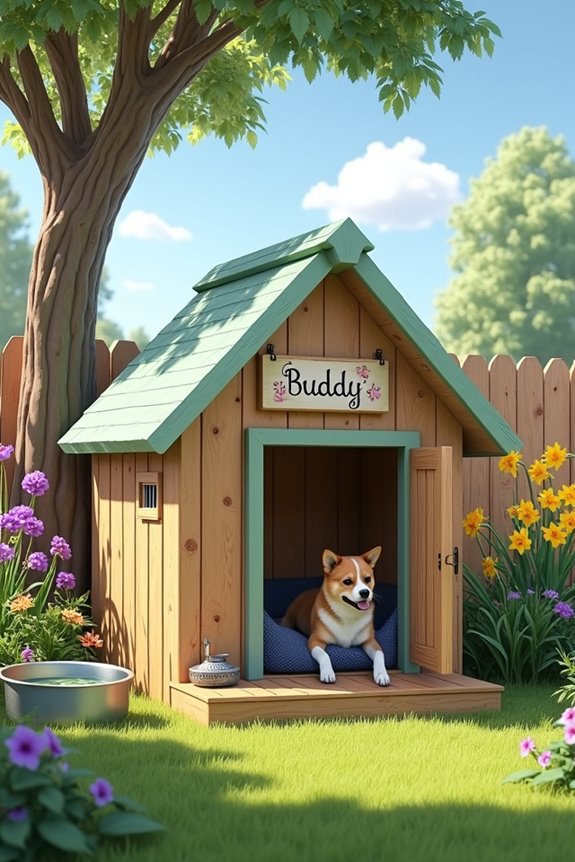
Thinking about giving your pup a stylish new hangout? You’ve hit the jackpot with these DIY dog house ideas. Whether you want a cozy winter retreat or a chic modern design, there’s plenty of options to get your creative juices flowing. And let’s be honest, isn’t it time your dog had a home that matches their personality? So, grab your toolbox, and let’s plunge into some fun ideas that will make your furry friend the envy of the neighborhood.
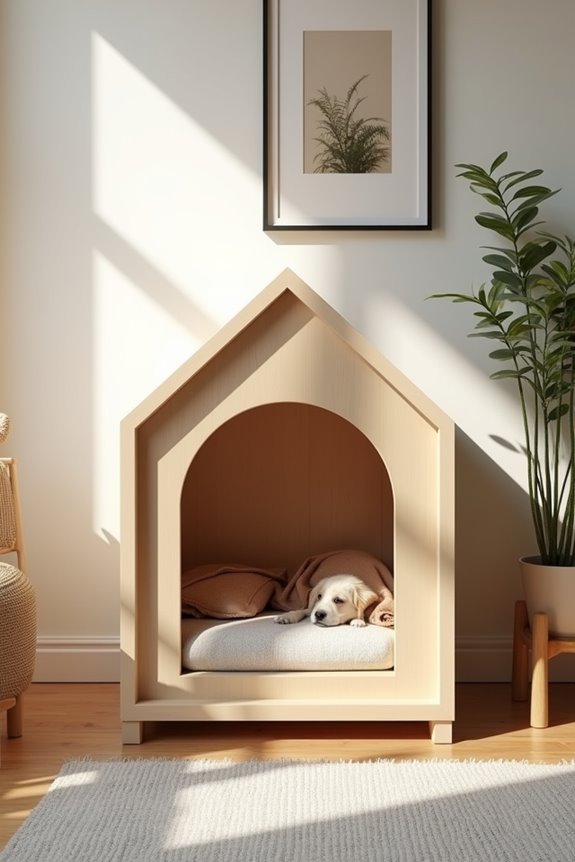
Stylish Modern Dog House
When you’re ready to give your furry friend a chic new pad, thinking about a stylish modern dog house can be a game-changer.
Imagine your pup lounging in a sleek, contemporary space that suits your home. With a little dog house DIY creativity, you can craft something that’s both functional and fabulous.
Start by choosing high-quality materials like wood or even recycled pallets. Don’t forget ventilation—you want your pet comfy, not cooking.
Paint it in trendy colors to match your decor, or get wild with patterns. Add personal touches, like a cozy bed or a snazzy nameplate.
Trust me, every time you look out to see your pup chillin’ in their stylish abode, you’ll feel like a dog house design pro.
Our Collection
We’ve put together a fantastic collection of dog houses that cater to any pup’s needs and your style.
From the Insulated Winter Dog Shelter to the Adventure Treehouse Dog House, there’s something for every furry friend.
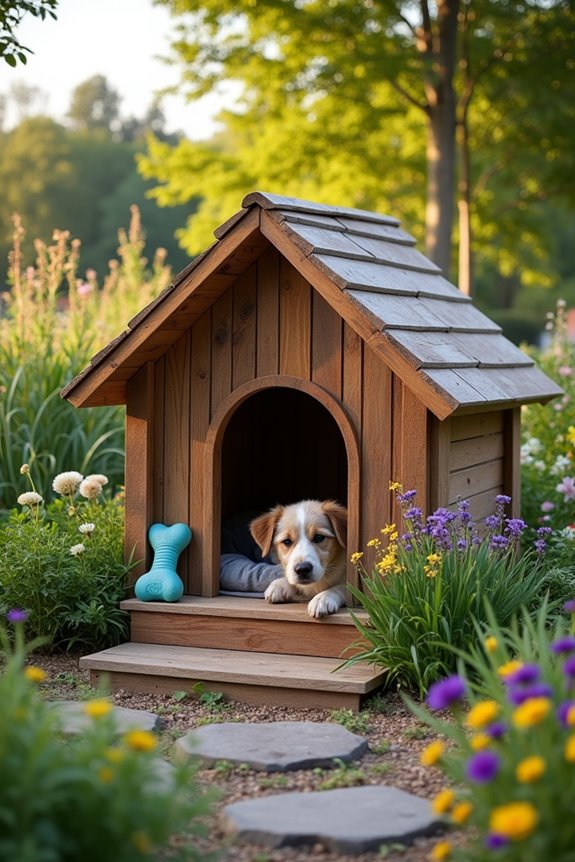
1. Insulated Winter Dog Shelter

When winter rolls in and the temperatures drop, ensuring your furry friend has a warm, snug place to curl up is essential. This insulated winter dog shelter DIY project not only provides your pup with a cozy hideaway but also saves you bucks compared to buying a pre-made dog house. Plus, it can be a fun weekend project that adds a personal touch to your backyard! Additionally, consider the ultimate premium outdoor dog house as an alternative if you’re looking for something expertly crafted and ready-made.
Materials Needed:
- Plywood sheets (for the frame and floor)
- Insulation foam board
- Waterproof paint or wood sealant
- Nails or screws
- A saw (hand saw or power saw)
- Hammer or drill
- Measuring tape
- Ruler
- Sandpaper
- Dog bed or blankets (for added comfort)
Step-by-Step Instructions:
- Measure and Cut the Base: Using your measuring tape and ruler, determine how large you want the shelter to be. A good size for small to medium dogs is about 2 feet wide, 3 feet long, and 2.5 feet high. Cut the plywood to size for the base and sides.
- Create the Frame: Attach the walls to the base using nails or screws. Make sure everything is squared up so it stands sturdy. Don’t worry if it’s not perfect; we’re not building a spaceship here. Just a cozy home for your pup!
- Add Insulation: Cut the insulation foam board to fit between the walls of your shelter. This stuff works wonders at keeping the heat in and the cold out. If it doesn’t fit like a glove, it’s okay—just trim it until it does.
- Attach the Roof: Use two pieces of plywood to create a slanted roof, allowing rain and snow to slide off. Secure it in place with nails or screws. At this stage, you might want to step back and admire your ‘masterpiece’—or laugh a bit because it looks like a blockhouse.
- Waterproof It: Paint or seal the exterior with waterproof paint or wood sealant. This will help protect your shelter from the elements, prolonging its life. Plus, you can choose a fun color that makes your backyard pop, like bright orange or a calming teal.
- Add Comfort: Toss in a soft dog bed or some blankets to make it homier. Watch as your dog gives you a confused look—like “Is this my new palace?” Yes, yes it is.
- Place It Right: Set the shelter in a spot that’s sheltered from wind but still gets some sunlight. Your pup will appreciate the thoughtful placement and might give you a little tail wag in gratitude.
Optional Add-ons
2. Cozy Canine Cottage Retreat
Creating a cozy canine cottage retreat for your beloved dog isn’t only a thoughtful gesture but also a practical DIY project that enhances your outdoor space. Not only does it provide your pup with a charming place to relax, but it can also save you money compared to spending on pre-made dog houses. Plus, it’s a rewarding way to spend your weekend, making something special just for them. Treat your dog to extra comfort with luxurious dog products that complement your DIY efforts.
Materials Needed:
- Plywood sheets (for the structure)
- Wood screws or nails
- Drill or hammer
- Measuring tape
- Saw (hand saw or power saw)
- Sander (or sandpaper)
- Waterproof exterior paint or wood sealant
- Dog bedding (like a plush dog bed or old blankets)
- Optional: Decorative paint, stencils, or outdoor fabric for added flair
Step-by-Step Instructions:
- Plan Your Design: Before diving in, sketch out your cozy cottage’s design. A good size for small to medium dogs is around 2 feet wide and 3 feet long. Keep it simple, like your favorite childhood drawing, and no need for architectural finesse here.
- Cut the Wood: Measure and cut the plywood for the base and walls according to your design. A circular saw works best, but remember, safety first—keep fingers away from the cutting line.
- Assemble the Frame: Using screws or nails, attach the walls to the base firmly. Don’t worry if it wobbles a bit; it’s a cottage, not a skyscraper. Just verify it’s not going to topple over like your last failed attempt at baking banana bread.
- Add a Roof: Cut two pieces of plywood to form a slanted roof—this helps water runoff. Duck beneath it and secure it down tight. Everyone wants a well-roofed retreat, right?
- Seal and Beautify: Once assembled, give your cottage a good coat of waterproof paint or sealant—pick a color that matches your yard or your dog’s personality. Just picture it: a fiery red cottage tucked under the shade of a tree.
- Make It Comfy: Layer in some soft bedding or a comfy dog blanket. Your dog might start looking at you like you’re a pet architect, and why not? You’ve turned a pile of wood into a palace.
- Position It Well: Choose a nice spot for your retreat, ideally somewhere sheltered from wind, yet with enough sunlight for snoozing and dreaming. Your pup will thank you by curling up in their new favorite spot.
Optional Add-ons/Variations:
- Customize the exterior by painting fun designs or adding a sign with your dog’s name. Go with colors that pop, or choose calm earth tones. Just imagine their name in a whimsical font; they’ll feel like royalty.
- Add a little porch area using extra wood scraps for a charming touch. Dogs love keeping an eye on the yard, and a porch might just make them feel like they own the place.
Pro Tip:
Add a layer of thick insulation between the walls for those chilly nights. Your pooch may snuggle deeper than you might expect, but this little tip guarantees they stay toasty warm while dreaming of chasing squirrels.
With this cozy canine cottage retreat, you’ll not only be giving your dog a place to chill, but you’ll also add a fantastic feature to your outdoor space.
3. Deluxe Raised Dog Bed
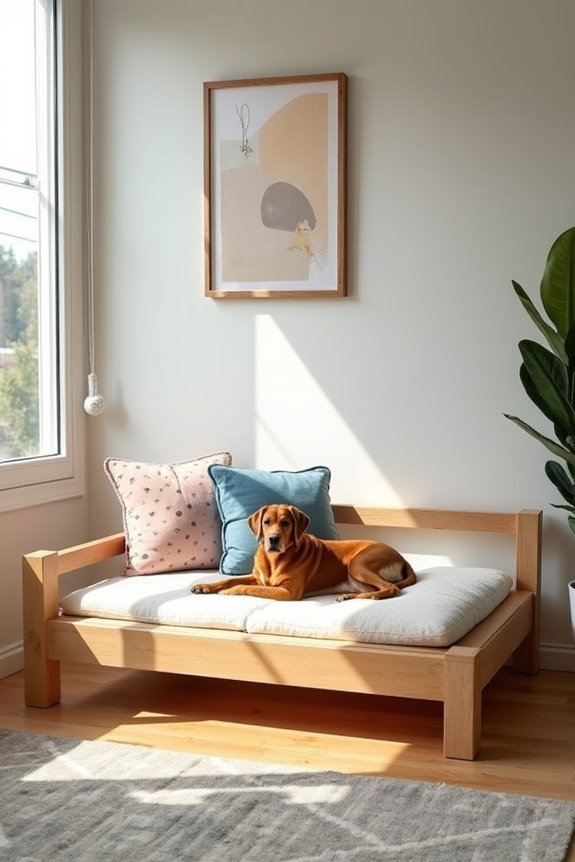
Is your furry friend tired of sleeping on the hard floor? Or maybe you’re just on the hunt for a stylish, cozy spot that elevates their nap game? A deluxe raised dog bed is the perfect DIY project for dog owners looking to provide their pups with unmatched comfort while adding a chic touch to their home décor. A raised dog bed also promotes airflow for comfort, ensuring your pup stays cool and cozy.
Not only does this raised bed help with airflow and keep them off the ground, but it can also save you some bucks compared to those pricey pet store options. Let’s get started!
Materials Needed:
- 2×4 lumber boards (for the frame)
- Plywood sheet (for the sleeping surface)
- Wood screws
- Drill or power screwdriver
- Saw (hand saw or power saw)
- Measuring tape
- Sandpaper or sander
- Non-toxic wood stain or paint (to match your home)
- Dog bed or cushion (for added comfort)
- Optional: Decorative fabric or pillows for customization
Step-by-Step Instructions:
- Design Your Fun Bed: Start with measuring your dog to determine how big the bed should be. A great standard size is about 30 inches long and 24 inches wide for medium dogs. Sketch a simple plan on paper; don’t worry if it looks like it was drawn by a toddler—it’s the thought that counts.
- Cut the Wood: Grab your saw and the lumber. Cut four boards to your desired length for the sides, and another set of boards (two will be for the length, and two for the width) to create a sturdy frame. Think of it as a doggie platform—except not as thrilling as a reality TV show.
- Build the Frame: Using your drill, connect the cut boards into a rectangular frame. Securely screw the corners together, ensuring it’s sturdy enough to hold your pup’s playful weight. If it feels like it could withstand a mini earthquake, you’re doing it right.
- Add the Base: Measure and cut the plywood to fit inside this frame. Secure it down with screws, so it doesn’t surprise your dog with any unexpected “fails” when they jump in.
- Sand and Seal: Now, it’s time to make the edges smooth because we want to avoid any splinters, right? Sand down all edges, then apply a layer of non-toxic wood stain or paint to give it a polished look that matches your style. Just imagine how great it’ll look in your living room.
- Top It Off with Comfort: Add a plush dog bed or a cushion on top for those naps. Your pooch will leap for joy upon seeing their new throne, or at least roll over in anticipation.
- Find the Perfect Spot: Position this elevated wonder in a cozy corner, maybe next to the window where sunlight streams in. Your pup will appreciate the view and the comfort—essentially a two-for-one deal in happiness.
Optional Add-ons/Variations:
- Get creative with the fabric! You can cover the bed with colorful fabric or add cushy decorative pillows to make it fit your home’s vibe. You could even embroider your dog’s name for that personal touch.
- Experiment with paint patterns or stencils. Polka dots, stripes, or even paw prints could bring a fun twist. Just remember, no need for perfection—it’s all about your pup’s comfort.
Pro Tip:
If you’re feeling extra generous (and a little crafty), consider elevating the bed even more by adding adjustable legs. This way, you can change the height based on where you place it. And if you’re concerned about stability, adding rubber feet can help keep it steady and protect your floors. Plus, it keeps your pup from having to leap too high—giving those aging joints some love.
Now, isn’t it heartwarming to think of how much your dog will appreciate this cozy haven? With a little effort and creativity, you’ll have a masterpiece that feels good and looks great in your space. Happy building, and may your dog sleep like the royalty they truly are!
4. Adventure Treehouse Dog House
Are you ready to take your dog’s hangout to new heights? The Adventure Treehouse Dog House isn’t only a fascinating retreat for your furry friend, but it also adds a remarkable point of interest to your backyard. Perfect for the adventurous pup who loves to perch and observe their kingdom, this DIY project saves money while offering a cozy oasis for your dog to relax and play. Furthermore, incorporating essential outdoor dog area equipment can enhance your pup’s enjoyment and safety in their new retreat.
Let’s get those paws moving and build your dog their very own treehouse.
Materials Needed:
- 2×6 lumber boards (for the framing)
- Plywood sheets (for the roof and flooring)
- Wood screws
- Dog-safe wood glue
- Drill or power screwdriver
- Circular saw or hand saw
- Measuring tape
- Sandpaper or a sander
- Non-toxic wood sealant or paint (optional for the exterior)
- Hinges (for a fun door)
- Optional: Small plants or decorative elements for personalization
Step-by-Step Instructions:
- Plan Your Treehouse: Start by measuring your dog’s size and the area where you want to place the treehouse. A good size might be around 4 feet tall and 3 feet wide. Sketch it out because we all know that drawing on napkins is as good as paper.
- Cut the Lumber: Use your saw to cut the 2×6 boards into four vertical posts for the corners and additional boards for the roof frame. Remember, measure twice, cut once. It’s both a proverb and solid advice.
- Build the Base: Assemble a sturdy rectangular base using your cut boards. Make sure the corners are squared off for stability—it’s all about that solid foundation, right? Secure it with wood screws until it feels rock-solid, like a fortress for your pup.
- Add the Walls: Attach the plywood sheets to your frame to create walls. Be sure to leave an opening for your dog to enter and exit. Don’t worry if it doesn’t look perfect—it’s like abstract art, but for dogs.
- Construct the Roof: Cut and secure two roof panels from plywood, connecting them with a hinge on one side—this makes it easy to open up for cleaning or doggo inspections. Your pup can now have a deluxe lookout tower!
- Sand and Seal: Use sandpaper on all edges and surfaces to keep things comfy and snag-free. Then, if you want to, apply non-toxic wood sealant or paint so your treehouse looks stylish and can withstand the elements.
- Add Outdoor Flair: Finish it up with some cozy bedding on the inside and perhaps a few decorative touches outside. If you’re feeling fancy, small potted plants or even dog-themed decorations can add charm.
Optional Add-ons/Variations:
- Consider painting the treehouse in bright colors or using fun stencils to create a playful aesthetic. Maybe your dog would appreciate a “paw print” sign.
- For an extra cozy vibe, you could add a soft outdoor rug inside or lay down some artificial grass for a touch of nature without the maintenance.
Pro Tip:
Always make sure the treehouse is in a shaded area during warmer months and check it regularly for wear and tear. Dogs can be rough on their furnishings, so regular inspections can help keep their adventure home safe and comfortable.
Besides, who doesn’t want to check out the architectural masterpiece they’ve built?
With a little creativity and elbow grease, your doggo will have the ultimate adventure hub. Happy building!
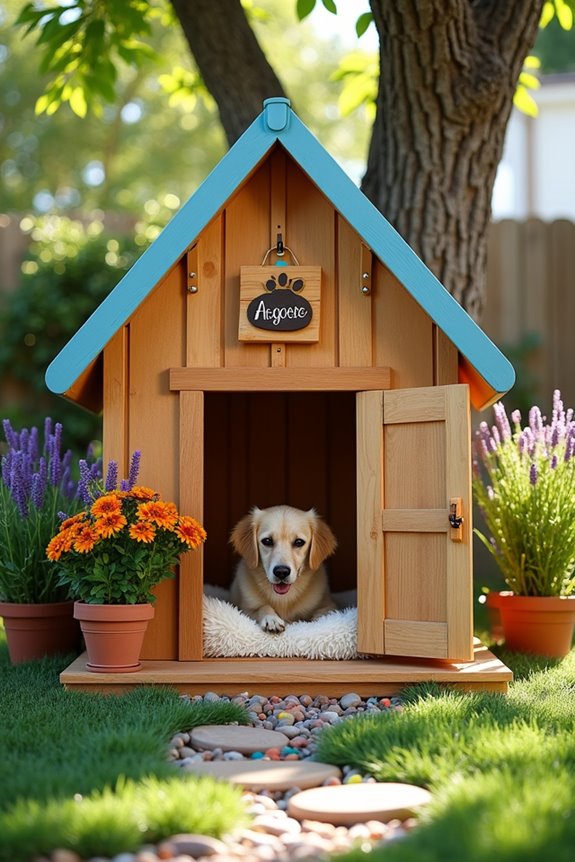
5. Minimalist Chic Dog House
Are you a fan of clean lines and sleek designs? The Minimalist Chic Dog House is the perfect blend of style and functionality, offering a cozy nook for your pet while seamlessly fitting into your modern home aesthetic. This DIY project not only saves you money compared to store-bought alternatives but also enhances your home’s decor and keeps your furry friend comfortable and happy. Additionally, you can complete your dog’s luxurious experience with luxury dog beds large dogs that will complement their chic new home.
Materials Needed:
- 1×2 lumber boards (for framing)
- Plywood sheets (for the base and roof)
- Wood screws
- Dog-safe wood glue
- Drill or power screwdriver
- Circular saw or hand saw
- Measuring tape
- Sandpaper or a sander
- Non-toxic wood finish (stain or paint)
- Optional: Soft bedding or cushions for the interior
Step-by-Step Instructions:
- Measure and Plan: Start by measuring your dog’s size and picking a location for their new home. A base size of about 2 feet by 3 feet is often perfect for small to medium dogs. Jot down a quick sketch to visualize your chic creation.
- Cut the Lumber: Using your saw, cut the 1×2 boards for the frame and the plywood for the bottom and roof. Don’t forget, measure twice! Keep that saw as sharp as a dog’s sense of smell.
- Build the Base: Assemble a rectangular base with the plywood. Secure the corners with wood screws for stability. Reinforce it to guarantee your home lasts longer than that last zoomie session on a rainy day.
- Construct the Frame: Build the walls by attaching the 1×2 lumber to the base. Frame each wall and then attach the plywood to create a sleek finish. Don’t fret over minor imperfections. They’ll add character, just like your dog’s goofy personality.
- Add the Roof: Cut the roof panels from plywood, making sure they sit snug on top of the walls for that minimalist look. Attach them securely and consider adding a hinge for easy access—cleaning up those stray fur bits is life, and we all know it.
- Sand and Finish: Smooth out any rough edges with sandpaper. Apply a non-toxic wood finish to give your dog house that chic, polished look. Choose a neutral color to blend with your home decor.
- Personal Touch: Finally, pop in some soft bedding or a cozy cushion to turn this minimalist house into a warm retreat. Your pup will thank you with all those tail wags.
Optional Add-ons/Variations:
- For a pop of personality, consider painting the house in a color that complements your home—maybe a soft blush or ocean blue.
- You could also use reclaimed wood for an eco-friendly twist that adds a rustic charm while keeping it chic.
Pro Tip:
Always make certain your dog house is elevated slightly off the ground to provide ventilation and keep it dry during wet weather. A couple of extra wood blocks under the base will do the trick. Your pup will be grateful, and you’ll feel smart for thinking ahead.
6. Eco-Friendly Dog House
Looking to pamper your pup while being kind to Mother Earth? The Eco-Friendly Dog House is the perfect DIY project for dog lovers who care about sustainability! Not only do you save money on store-bought options, but you also create a cozy haven for your four-legged friend using eco-friendly materials. It’s a win-win: you support the environment while giving your pup a stylish and comfortable retreat.
Materials Needed:
- Reclaimed wood or pallets (for the structure)
- Non-toxic wood screws
- Eco-friendly wood glue
- Measuring tape
- Saw (hand saw or power saw)
- Drill or screwdriver
- Sandpaper or sander
- Natural wood finish (like beeswax or plant-based stain)
- Optional: Eco-friendly dog bed or cushion
Step-by-Step Instructions:
- Choose Your Wood: Find some reclaimed wood or pallets. It’s not only affordable, but it also gives your dog house a rustic look. Plus, you’re helping the planet—go you!
- Measure and Sketch: Measure your pup to determine the right size. A house that’s around 2 feet by 3 feet works great for small to medium dogs. Create a simple sketch to guide your build. Trust me, it’ll make things smoother.
- Cut the Wood: Use your saw to cut the reclaimed wood or pallets into pieces for the base, walls, and roof. Remember, safety first: wear goggles and keep fingers away from the blade.
- Build the Base: Assemble your floor using the largest pieces of wood. Secure it with eco-friendly screws—because we care about both sturdiness and the planet here.
- Construct the Walls: Attach the wood pieces vertically to create walls around the base. Feel free to mix and match planks for an eclectic look. That squeaky toy of yours has seen some tough battles, but this sturdy house will be your pup’s fortress.
- Add the Roof: Cut the roof panels and secure them on top of the walls. For a fascinating twist, you can create a slanted roof. It adds character and helps with rain runoff—just sayin’.
- Sand and Finish: Smooth out any rough spots with sandpaper; we want it comfy for tiny paws. Apply a natural wood finish to seal it. It’ll retain that beautiful reclaimed vibe while protecting the wood.
Optional Add-ons/Variations:
- Consider adding plants (like catnip—just don’t let the cat find out) on the roof for a green touch. It looks cute and helps with air quality. Who knows, your dog might feel like royalty!
- You can also paint or stain the dog house using non-toxic, eco-friendly colors that match your garden or home décor. A splash of color can really make it pop.
Pro Tip:
Choose woods that are naturally resistant to the elements, like cedar or redwood, so you don’t have to worry about termites munching on your hard work.
Plus, always check for rough edges—nobody wants their doggie getting a splinter during their nap time.
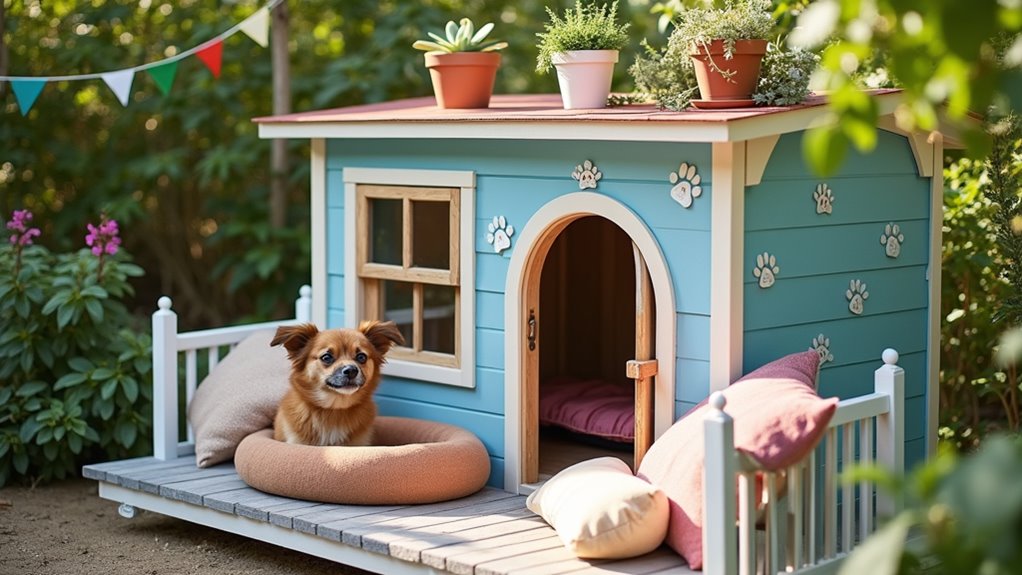
7. Stylish Dog House With Balcony
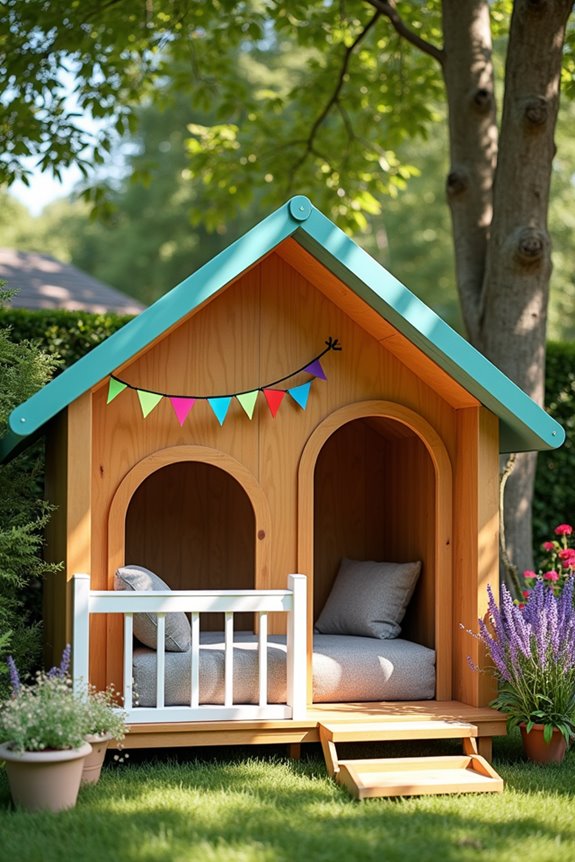
Is your pooch ready for a vacation at home? With this Stylish Dog House featuring a cozy balcony, your furry friend will enjoy lounging in style. This DIY project not only serves as a delightful retreat for your dog but also enhances your backyard’s charm, saving you money while offering comfort that no store-bought option can match.
Plus, let’s be real: who wouldn’t want a dog house that looks like an adorable mini abode?
Materials Needed:
- Plywood (for the base, walls, and balcony)
- 2×4 lumber (for the frame and support structure)
- Non-toxic wood screws
- Eco-friendly wood glue
- Measuring tape
- Saw (hand saw or power saw)
- Drill or screwdriver
- Sandpaper or sander
- Clamps (helpful for assembly)
- Paint or wood stain (your choice of color)
- Optional: Hinges for removable balcony, indoor dog bed or cushion
Step-by-Step Instructions:
- Sketch and Measure: First, grab a pencil and some paper, and sketch out your dog house design—don’t worry about being Picasso; just keep it simple. Measure your pup’s height and length to verify the house is spacious enough to stand and turn around comfortably. A space of around 3 feet high and 2 feet wide would be great for a small to medium dog.
- Cut the Plywood and Lumber: Use your saw to cut out the plywood for the base, walls, and balcony. You want two side walls, a front, a back, and a base—don’t forget the floor piece for the balcony! This is where you can let out that inner craftsman.
- Build the Frame: Using the 2×4 lumber, create a sturdy frame by connecting the pieces. Attach vertical supports for the walls and make sure everything is square—no one wants a crooked house. Assemble it by screwing the pieces together, and use wood glue for added strength.
- Attach the Walls: Secure the plywood wall pieces to the frame. This is where it starts taking shape. The balcony will require cutouts on the front wall to allow easy access for climbing up. You can add a slanted roof to give it character and help with rainwater drainage.
- Create the Balcony: Cut another piece of plywood that will be the balcony. Attach this to your house at the desired height, using additional supports as needed. If you want to make it removable for cleaning, add hinges—you’re building a multi-functional castle for your pup.
- Sand and Finish: Nobody wants splinters, right? Sand down the edges and surface until it’s nice and smooth. Feel free to add paint or wood stain—this is where you can make it pop. Choose bright colors or even fun patterns that complement your home!
- Final Touches: Once everything is assembled and dried, set up a cozy dog bed or cushion inside. Make sure your design is pet-friendly—check for any sharp edges or toxic finishes.
Optional Add-ons/Variations:
- For added flair, you can hang colorful flags or string lights around the balcony. Your dog mightn’t appreciate the decor, but your Instagram feed will surely thank you.
- Consider adding a roof garden, which could be a fun way to use succulents or dog-safe plants. It creates shade and adds pizzazz while making your dog feel like royalty.
Pro Tip:
Before you start hammering away, confirm you position the house in a shaded area of your yard. Dogs need a cool spot to lounge, especially on those scorching summer days.
Also, consider using a weather-resistant sealant to protect your masterpiece from the elements—it’ll keep your dog house looking great for years.
Your best friend deserves a space that mirrors their vibrant personality, so engage in this project and enjoy the rewards of both cuddles and compliments from friends and family alike. Happy building!
Extra Tips & Ideas
When you plunge into building your dog’s dream house, keeping a few extra tips and ideas in mind can really elevate the experience—trust me, it’s worth it.
Consider adding a cozy blanket or cushion inside; your pup will adore curling up. Use outdoor paint for weather resistance, and don’t forget to personalize it with your dog’s name—a little bling never hurt anyone.
You could even throw in some whimsical decorations like a little flowerpot outside. Ever thought about installing a doggy door? It’s a game changer.
And hey, if you’re feeling brave, why not tackle a themed house, like a mini castle or beach hut?
Just remember—it’s for them, but you get to have all the fun.
Frequently Asked Questions
What Materials Are Best for a Durable Dog House?
For a durable dog house, use treated plywood, weather-resistant shingles, and insulated materials like foam board. Metal hardware guarantees stability, while non-toxic wood stains protect against moisture. Your pup deserves a sturdy, long-lasting home!
How Can I Weatherproof My DIY Dog House?
To weatherproof your DIY dog house, you’ll want to use treated wood, seal gaps with caulk, and apply a waterproof paint or stain. Adding insulation and slanted roofs also helps keep moisture out effectively.
What Size Dog House Is Suitable for My Breed?
To determine the right size dog house for your breed, measure your dog’s height and length, then add a few inches. A large dog needs about 30 inches long, while small breeds require about 24 inches.
Are There Any Eco-Friendly Dog House Options Available?
Yes, there are eco-friendly dog house options available! You can choose reclaimed wood, recycled plastic, or even natural materials like bamboo. These choices not only benefit your pup but also help the environment.
How Can I Decorate My Dog House Creatively?
You can creatively decorate your dog house by painting bright colors, adding fun patterns, or using playful decals. Incorporate personal touches like your dog’s name or themed decorations to make it feel uniquely theirs.
Conclusion
By crafting one of these seven dog houses, you’re not just building a shelter; you’re creating a home where your pup can thrive. Picture them lounging on a cozy raised bed, tail wagging, as they soak up the sunshine or greet you with that goofy grin after a romp outside. It’s a space that reflects their personality and your love for them. So grab those tools, let loose your creativity, and give your furry friend a sanctuary they’ll adore.